I’ve decided to write my next post about my time at the Mobile World Congress in Barcelona. Google invited us, Any.DO, to present our product at the Android booth. We gladly accepted the invitation, getting 3 of us on the plane there, including yours truly.
Any.DO had great success lately. We crossed the 1 Million users bar and got selected as one of the 10 best apps for Android by PC Magazine, TechCrunch and The New York Times. Pretty impressive for an app exists for only 4 months. Any.DO also got featured (for the third time!) on the Android Market a day before the MWC began, which gave us lots of traffic and a simpler way to tell people how to download the app – just open the Android Market and it’s on the front page!
The time on the Android booth was amazing! Google really put an effort getting this booth to be the coolest in the entire MWC, and it’s one big ass convention! They had a big slide, Android shaped ice cream sandwiches, 3 different flavors of shakes, Android collectable dolls and other fun stuff like the pins-mania – over 80 different Android shaped pins, scattered along the booth and Android’s partners booths.
Collecting all of the Android shaped pins quickly became a game and created a free-market for pins trading. The craziest trade I was witness to was about 20 pins for only 1, the last pin that guy had needed to complete the whole collection. Now he’s probably logging in to eBay…
Our time at the stand was fun, we met lots of Any.DO users who came to compliment us about the app, which is always fun to hear, aside to people who never heard about us and were amazed by its capabilities and interface. My demonstration got recorded for Laptop Magazine for a piece they wrote about us, you’re welcome to check it out. It was quite exhausting to explain the app for each one (By my calculations, I’ve done it for about 100 times!), but it was rewarding to see all those people get excited about Any.DO as we are.
Android hosted a party for the exhibitors on the booth and Android’s partners booths. It was on a big club, with open bar and food (yep, even ice cream sandwiches were given out there). I had a great time, maybe it was the Jack Daniels I drank like water, and we also got some kind of Android shaped radio/speakers and a special pin that became the rarest pin on the convention 2 days later (the one that got traded for 20 pins – was from that type). Functioning on the next morning was a real challenge for us .
We finished the convention with a toast with the Google team and all the other exhibitors on the booth, drank some beer and got some more freebies to take home.
Well, that’s about it. Now we’re back home, trying to divide the loot we collected. I know I didn’t write about tech issues for a long time, It’s due to the convention’s preparations and some big features coming to Any.DO, but the next one is coming, see you there!
On one of my latest posts, I’ve showed how to download the Android source code, even if you work on Windows (The official instructions are for Linux to Mac). You can check that post here. Having the Android source code can be useful not just to find bugs in the operation system, which I bet you do on your spare time, but can also help understand problems in your own code. To demonstrate, here’s a nice story about a problem I had while developing some layout, and found the problem using the Android source code:
I didn’t intend to make any complex layout, just a simple LinearLayout with 3 buttons. I wanted the buttons to be even by size, take all the space they can have and center the text inside of them. Sounds simple, right? I wrote the following layout:
<LinearLayoutandroid:layout_height="70dip"android:layout_width="fill_parent"android:background="#ffffff"><Buttonandroid:layout_width="0dip"android:layout_height="70dip"android:gravity="center"android:layout_weight="1"android:textSize="15sp"android:text="Udinic"/><Buttonandroid:layout_width="0dip"android:layout_height="70dip"android:gravity="center"android:layout_weight="1"android:textSize="15sp"android:text="Udinic with a long text"/><Buttonandroid:layout_width="0dip"android:layout_height="70dip"android:gravity="center"android:layout_weight="1"android:textSize="15sp"android:text="Chopi"/></LinearLayout>
When I ran the code, that’s what I got:
That’s odd…I gave the buttons the same height as the layout, why the hell the middle one got this gap above it?? Changing the layout_height to “fill_parent” to each of them will solve the problem on this example, but in my case it didn’t (I had a little more complex layout :)). Since it seems like it should be as it is in my head, I’ve decided to get to the bottom of this.
My first step was to check what arguments the onLayout() gets. This method is basically in charge of assigning the views’ positions on the layout. Since we have a position problem, it’ll be square one for us. I’ve created a subclass to Button and override the onLayout() method.
I started debugging, not before adding a breakpoint on that method. A peek on the arguments showed me that the “top” argument is the bad boy here. It’s got a 9 instead of a plain 0, which causing this gap on top of the button. Using IntelliJ and the Android source code, I could get up the Call Stack for this method, and found the following code in the LinearLayout’s source:
The “childTop”, later to be know as just “top”, is getting its value from the childBaseline, which is calculated on the TextView class, and “Button” is extending it:
Only the mLayout.getLineBaseline(0) was held responsible for the evil gap, and after exploring it a bit got me to realize that this is the baseline for the layout, in charge of making all the text in all the TextView/Buttons under it to be aligned to the same horizontal line! After looking closely at my phone, I could see that the text is really aligned to the same baseline (and in the real case, it wasn’t as obvious as on this example). This might be great for other applications of buttons inside a layout, but not for my case. Apparently the layout’s “baselineAligned” flag is always “true” unless told otherwise, which is kind of confusing if you’ll ask me. Adding the android:baselineAligned=”false” to the layout got rid of the problem:
This experience can show you how you can, pretty easily, find problems in your code just by having the operation system’s code. Maybe a clearer behavior of the LinearLayout could be better, but sadly every framework, no matter how great it is, got its dark side.
Download the source code, attach it to your IDE, it’ll probably come in handy in the future.
We’re getting LOTS of feedback about Any.DO. The users write us some kind words about the app, maybe report about a problem they were having and mostly suggesting very useful features we could add for future versions. Of course, some feature requests aren’t that reasonable (Klingon translation? Really??). The most requested features were widgets related: black theme, more sizes, option to scroll over the tasks’ list etc. I gathered all those requests and got me a 3 day trip to Wigeteria-Lane.
One of the widgets is having a ticker to present today’s tasks. The ticker uses a recurring alert to update the current showing task. The reason I’m using alert and not the onUpdate() method. is that the onUpdate can be called in intervals of minimum 30 mins. which is way too long to wait between tasks! I start the alert on the onEnabled() and cancel it on the onDisabled(). They are called when the first instance of that widget was added to the screen, and when the** last instance** was removed from the screen, respectively. But one day I’ve noticed the log messages from the widget are running, even though it’s not currently placed on my home screen!
I couldn’t find the cause for the problem and I didn’t see anything in my code that could lead to such behavior. Luckily, I always work with my Logcat window open (you’ll never know when a hidden exception will pop up), and then it happened again!
I’m using CyanogenMod on my device, which has the ADW Launcher built in. When I was about to add the widget to my home screen, I got the “Widget span config” dialog, allowing me to choose myself the size I want to grant the widget (it’s a feature belongs to the launcher itself) and then I’ve clicked the back button. On my log I could see the onEnabled() do gets called, and when I clicked on the back button I saw that the onDisabled() was not called at all! The alert was running and gave log messages for each cycle, though the widget was not added to the home screen. Trying to add an instance of the widget and removing it didn’t cause the onDisabled() to be called, and even restarting the device didn’t make the widget disappear from the background. I’ve decided to take a side-trip to see what’s wrong with the ADW Launcher.
Have I mentioned I love open-source projects? Well, I do. The ADW Launcher is open-sourced - few minutes later I found myself looking at its code on my IntelliJ. The shortest way to find the code for that problematic dialog, is to search its title. That’s the code for this dialog’s OK button:
The realAddWidget() is in charge of the actual inflation of the widget, but if there’s not enough room at the home screen, the onDisabled() do gets called. We can see it on the code:
The deleteAppWidgetId() is calling the onDisabled() method eventually. Using the mAppWidgetHost.deleteAppWidgetId() I was able to track down the function in charge of adding the widget - mAppWidgetHost.allocateAppWidgetId() and after some looking around, I found out that it gets called right after selecting the widget from the list, before the span config dialog shows. Which means, if anything goes wrong after that - we need to call the mAppWidgetHost.deleteAppWidgetId() to remove the added widget. The case where there’s no space left on the screen is already handled, but what about canceling the “Widget span config” dialog? It’s called after the allocation of the widget. I got back to the code creating that dialog, and saw there’s no handling for the case where the dialog is canceled. That’s the cause of the problem! Mission accomplished.
In order to fix that, all needed to be done is to add an OnCancelListener to the dialog, with a call to the mAppWidgetHost.deleteAppWidgetId() and that’s it! I’ve submitted an Issue on the project’s page, hopefully this will be fixed for future versions.
After that enlightening adventure, I got back to work on the widgets. The results can be seen on the version we published yesterday on the Android Market, go and get it! And don’t forget to send us feedback, we’re open-minded (even about the Klingon thing).
On my last post I was talking about the integration of ACRA, error reporting library, which sends us crash reports from the users of Any.DO. We’ve got some very interesting errors from the users, some exceptions were a matter of minutes to resolve, and others took more time, as the one I’m about to share here.
One of the most repeatable exceptions was an IllegalArgumentException. The stack trace was something like this:
It’s easy to see that the cause of it is a dismissed dialog, which its window doesn’t belong to the current Window Manager. In a nutshell, the Window Manager is a service, designated to create all the drawing surfaces on which your application (and all other applications) draw their components. I won’t elaborate on this subject on this post, maybe on a future one; in the mean time, you can Google it for more information. But why is that happening? The common reason for that is the notorious orientation problem. We couldn’t come across that issue, because we simply applied the magic attribute of __android:configChanges=”keyboardHidden
orientation”__ to almost all of our Activities. Without this configuration, the default behavior for all the activities is to be destroyed and recreated whenever the user bend his arm by 90 degrees. This configuration is doing what I believe should be the default behavior - leaving the activity be. Actually it means that you, the developer, takes responsibility to handle those orientation changes, so it’s actually suppose to generate more work by declaring that. In fact, for inexperienced developers it can cause more harm than good, as on that demonic orientation problem. But, again, this is not the issue here.
After lots of playing around, I’ve managed to reproduce the problem on my device. That’s how I did it:
Go to some activity other than the main
Created AsyncTask that starts and dismisses a progress dialog, and sleeps for 5 seconds in between
While the AsyncTask was taking a nap, I’ve pressed on the** HOME** button
When the home screen appeared, I quickly pressed on the** app’s shortcut**
BOOM!
Why is that? Well, The AsyncTask was created on one of the sub-activities of the app, let’s call it Activity B, and the main activity will be A. When it was time to dismiss the dialog, I’ve already pressed the HOME key and Activity B was no longer visible (HOME key -> Home screen). This is not suppose to be an issue, because the activity remains on the memory until killed by an over-excited Task Killer app or by the operation system, if it needs to clear some memory. The problem is that I’ve also pressed on the app’s home screen shortcut, and it has the flag “Intent.FLAG_ACTIVITY_CLEAR_TOP”, which practically saying that it’ll kill all the other activities on the task’s activities stack. You can read more about that stack, and how it operates, here: http://developer.android.com/guide/topics/fundamentals/tasks-and-back-stack.html. Since I’ve killed Activity B (with all its dialog), and the app’s shortcut is starting activity A, the AsyncTask was trying to dismiss a a dialog that’s no longer exists! We get an IllegalArgumentException. Hooray! Now what?
On a this very comprehensive post about the orientation problem, there’s a nice solution for that issue, but not entirely for my problem. That solution transfers the AsyncTask between the destroyed activity and the created one when screen orientation changes. Since I’m just killing the activity, I want the activity to ignore any dismissing command for dead dialogs! I’ve decided to build a solution on top of my progress dialog and activities, allowing me to start a progress dialog on any activity, and let this whole thing be managed.
When started, I’ve tried using the AsyncTask solution, presented on that blog, and just extend it to write my own doInBackground() logic. Unfortunately, there was some AsyncTask internal problem with that approach; It’s too long to start explaining here, so I’ll pass. My solution includes this interface:
Every activity that runs a progress bar should implement it, and it’s fairly easy:
/**
* Starts the progress dialog
* @param title
*/@OverridepublicvoidstartProgressDialog(){showDialog(AnydoProgressDialog.DIALOG_ID,args);}/**
* Stopping a currently active progress dialog
*/@OverridepublicvoidstopProgressDialog(){// Detaching the currently showing dialog from the activity.if(mCurrProgressDlg!=null)mCurrProgressDlg.detachFromActivity();}/**
* Dismissing the progress dialog. In use by the dialog itself!
* In order to dismiss a progress dialog - use the #stopProgressDialog
*/@OverridepublicvoiddismissProgressDialog(){if(isDialogShown){dismissDialog(AnydoProgressDialog.DIALOG_ID);}}
As you can see, I keep the current displayed dialog (mCurrProgressDlg), and dismiss it only if it’s shown. On the activity, all I need to know about is the startProgressDialog() and the stopProgressDialog() functions. How do I know that the dialog is shown? And what is that “detach” thing? On the progress dialog itself I save the calling activity as a field from type ProgressDlgHandlingActivity (as our interface), and accessing it with those 2 methods:
/**
* Attaches the dialog to the argumented activity.
* @param activity
*/publicvoidattachToActivity(ProgressDlgHandlingActivityactivity){mActivity=activity;}/**
* Removing the dialog from the activity
*/publicvoiddetachFromActivity(){if(mActivity!=null){mActivity.dismissProgressDialog();}mActivity=null;}
Notice that the detach function also dismisses the dialog if there’s an activity currently attached to. Back to our activity, we need to add the code to create the dialog when calling the showDialog() function, I’ve implemented it like this:
The create function is pretty straightforward and just create the dialog if not exist. On the prepare dialog, we attach the current activity to the dialog and set the isDialogShown flag, which we saw earlier. The most important part, is to close the dialog when the activity closes (or killed); For that, I’ve added the stopProgressDialog() to the onDestroy() function of the activity.
That’s it! When I want to performs a long operation with a progress dialog running during it, I can do it like this:
When the activity will finish, the dialog will do so too. Now I know what you’re probably thinking - why did I go all this trouble just to dismiss a dialog in the end of the activity? Well, this solution also combines a solution to the orientation problem. In order to support that as well, you need to override this method on the activity:
// In case we created after a rotation has occurred, we'll reload any running progress dialogObjectretained=getLastNonConfigurationInstance();if(retainedinstanceofAnydoProgressDialog)mCurrProgressDlg=(AnydoProgressDialog)retained;
Congrats! Now you have safe to use Progress dialog, with no need to extend AsyncTask with particular results types. Hope this will help someone, I know It did the job for me. If I’ll get any requests for it - I’ll also upload an example project to my GitHub account.
I’m working a lot with open source libraries, some of them just give you a source, short explanation, and…good luck! The others are well documented and their developers are active. On this post I’m bringing a nice story about integrating an Error reporting mechanism to Any.DO . After doing some investigation, ACRA was found as the best solution. And yes…it’s open sourced, and from the second kind I’ve presented here.
ACRA integrates as the default exception handler in the program, and reports to a Google spreadsheet (on Google Docs), Email or to any place you’d like. It also presents the user with a friendlier dialog when a crash occurs. In each report you can define the data to send from a wide variety of information, starting with the stack trace and the LogCat of the last 2 minutes prior to the crash and up to the system’s dumpsys and the saved shared preferences. If the user doesn’t have internet connection at the time of the crash, or the reporting process failed from some reason, the report is saved on the device and is sent later. And it’s really easy to use!
Anyway, we decided to send the crash reports to a Google spreadsheet along to our DB, making it easy to query for statistical information about the users’ crashes. In the spreadsheet we kept almost all the information we can get, and on the DB we kept only the most important info, like the stack trace and the version information. We also saved the AcraReportId on our DB, which helped us track down the extended information in the spreadsheet (if needed..). THE PROBLEM WAS that we got over 20,000 users on the first 48 hours to our launch (Hooray!), and some of our debug reports (reports intentionally sent to check issues raised on our beta stage) made our spreadsheet fatter than Apple’s bank account. At some point all the reports sent to the spreadsheet got IOException-ed (very few requests were successful), and we couldn’t even open the spreadsheet nor download it! “At least we have that information on our DB..” I thought, but what I didn’t know was that ACRA didn’t send the reports to our DB as well!! Hmmmm….now it began interesting…
We were blind. The users count is getting bigger and bigger, and we didn’t know why our DB gets only 3-5 new reports a day (I know our app is perfect, but not that perfect!). Since ACRA is open sourced, finding the cause for the problem was pretty easy. I’ve looked at the code responsible to send the reports:
privatestaticvoidsendCrashReport(Contextcontext,CrashReportDataerrorContent)throwsReportSenderException{booleansentAtLeastOnce=false;for(ReportSendersender:mReportSenders){try{sender.send(errorContent);// If at least one sender worked, don't re-send the report// later.sentAtLeastOnce=true;}catch(ReportSenderExceptione){if(!sentAtLeastOnce){throwe;// Don't log here because we aren't dealing with the Exception here.}else{Log.w(LOG_TAG,"ReportSender of class "+sender.getClass().getName()+" failed but other senders completed their task. ACRA will not send this report again.");}}}}
The problem was obvious, if the first sender throws an exception - the next ones on the array will be ignored! Since the Google spreadsheet sender is one of the internal report senders, it precedes any custom sender made (like our beloved DB report sender). The report will be sent again later, but as long as there’s a problem with the spreadsheet - it’s doomed to fail. According to the code here, if the order of the array was different, our report would’ve been sent, and ACRA will not send the report again to the spreadsheet, since it was successfully sent already through other report sender. I filed an Issue about that behavior on the ACRA’s project site, suggesting to try and send the report through ALL the report senders, before giving up. Hope it’ll be fixed in future versions.
In order to overcome such issue until it’ll be fixed, I found a little trick to make my custom report sender be the first on the array. Since the array is maintained on the ErrorReporter class, and it’s a singleton, I just called the ErrorReporter.getInstance().addReportSender() BEFORE calling the ACRA.init(), which also calls the addReportSender() with the default report senders, as the Google spreadsheet for example.
Problem solved! And now…we wait for all the users to update to the new version. My DB and I will be waiting for all those pending error reports, failed to be sent on the previous version, to flood our DB with might-be-irrelevant error reports. I’ll go make some coffee…
The first one - Any.DO, my baby, the Android app I’ve been working on for the past 9 months, has launched with great success! Over 50K users in a week, rating of 4.5, numerous articles on famous websites and awesome feedback! If you have an Android device - come and join the party! Market Link or Any.DO website. Give us a feedback!
The second reason - The source code for Android 4.0, IceCreamSandwich (or ICS), was released! After a long wait for the new Android versions’ source code, we finally get it. As you might recall, Google refused to release the Honeycomb’s source code, due to that fact it’s designed for large screen devices. As far as I know, they didn’t want people to take the code and build a modified version for small screen devices, as mobile phones, hurting their brand.
The source code is very useful for debugging purposes. You can access the lower parts of the Stack-Trace, and get a better understanding of the situation. However, downloading the source-code under Windows is not trivial, as all the scripts to do that are designed to work under Linux or Mac OS. I’ve tried modifying the scripts to work under windows using Cygwin. I’ve managed to get pass a few obstacles on the way, but after that I just couldn’t make it work. I decided to try a different approach.
Since I don’t have Linux installed on my computer, I’ve downloaded Ubuntu 11 and used it as a live CD. That way, I don’t need to install new operation system solely for the purpose of downloading source files. Since the amount of space needed is a few GBs, I decided to mount my NTFS drive, and download everything there. In order to do that, I’ve opened the Terminal, and unleashed some bash commands. First, we’ll get the device name for the partition we want to mount. Its name should be “sdaX”, where X is some number. In order to retrieve the correct name, you need to run:
sudo fdisk -l
and you’ll get a list like that:
Device Boot      Start         End      Blocks   Id  System
/dev/sda1              63       80324       40131   de  Dell Utility
/dev/sda2   *       81920    23670783    11794432    7  HPFS/NTFS/exFAT
/dev/sda3        23670784   238710783   107520000    7  HPFS/NTFS/exFAT
/dev/sda4       238710784   625139711   193214464    7  HPFS/NTFS/exFAT
These are all the partitions on the system. Don’t know which one is drive D on your Windows? Look at the number of blocks and a little trial and error to get the right one.
Now, armed with the device name, we’ll start the magic:
# Entering god-modesudo su
mkdir /media/udinic
# Mounting the partition to be accessed from /media/udinic
mount /dev/sdaX /media/udinic -oexec
Note that I’ve used the “exec” option for the mount command. This is because one of the downloaded scripts will be executed as part of the process, and Ubuntu by default doesn’t mount devices with the option to execute files (That is due to lots of complaints by new Linux users, started with Ubuntu, who got into a mess by that).
Now, go to /media/udinic, which directs you to your windows partition, and create your own folder for this process. From here you can just follow the instructions on the Android site. You’ll need to use the “apt-get” command to install a few missing components, but you’ll be given the exact command for that when needed. You can download a specific branch, as the Gingerbread branch instead of the ICS branch. After some downloading time (6 GB of download), you’ll have a nice folder with all the source code for that Android version. You’ll also get all the tools for building your own Android version.
Most devices run a custom ROM, which is a modified version of Android. Popular ROMs as CyanogenMod, publish their source code, and gives you the ability to download it. If the device you’re working on is running CM, you’ll probably want that more than the
original Android source code. The instructions for downloading the CM source code are here, and they are similar to the Google’s instructions.
After the download is complete, you can restart your computer back into Windows, and attach to source (positioned in the partition you’ve selected, in the folder you’ve created, using Ubuntu) to your favorite IDE. Happy debugging for us all!
Last week I gave a talk about Android performance optimization in a Google’s GTUG convention. The subject was “Android: Speed up your app”, which is about optimizing your app’s performance. I decided to focus on explaining the tools that’ll help you find performance problems, instead of just throwing some random tips found on the Internet.
The lecture was videotaped, but of course my bad luck had to intervene. The battery was dead halfway to the lecture, so no recording of that (but I have witnesses!). I decided to write a post, to treasure all that vital/interesting/lost information I gave that day. I wrote that post on my company’s blog for a change, so you’re all welcome to go there and check it out yourself. The link is: http://tech.any.do/android-performance-optimization/
This post will actually be a reference to an article I wrote about a year ago. Android is not the subject on this case, but it’s a very interesting C++ solution for a more interesting (and common) problem. Back then, I bought a new car stereo which was capable of playing music from USB flash drives. CD burning age was over for me! I dragged LOTS of songs to one of my available USB sticks, played a few songs, and when I tried to randomize the songs’ order - I’ve noticed that didn’t work as I expected!
Don’t you worry! As a dedicated software developer, I found a good solution to make everything work as I wanted it to be. To read more about the problem and the solution I designed for it, you are welcome to read my article in The CodeProject: http://www.codeproject.com/KB/files/FAT-32-Sorter.aspx.
Sorry for the long wait, I was on a small vacation lately with with my love. But don’t you worry! All those nice views got me thinking about some other great posts I can write here. And yes, “my love” = “Girlfriend”, and not “Galaxy S”.
The post today will be about something not directly related to Android code, but to a very useful utility I wrote recently. Whether you develop at home, or for some people in suits, you don’t always have enough phones to test your apps. I think that the best way to find bugs - is to actually USE IT. If you’re using the same phone to develop and as your primary phone, you’ll need to install and uninstall the app lots of times, making it hard to use it for personal purposes (with all the data in it been trashed or deleted). You can try and use that awful emulator that comes with the SDK, or the cool Android x86 VM, but working on the real thing is always the best way to see performance/convenience issues. Unfortunately, The Android system won’t allow 2 apps with the same package name. I tried to find some automated way to change the package name for a whole project - but got nothing. So as a good engineer - I just wrote one!
Changing the package name is not as simple as it may seem. It’s not just ordinary find&replace. There’re lots of places where the package name is written in a different way than we used to (e.g. “com.blabla” can be found as “com_blabla”). After some trial and error, I got all the places where the package name needed be to changed (at least for my project, which is pretty big).
The script I wrote is in Python, and the only stuff you need to change is the package names you want to switch between, the base folder for your project and the app name that you’ll probably want to change as well (how else will you know how to distinguish between those versions?). If you have a big project, with sub modules, no problem! Just call the handleModule for each one.
defhandleModule(moduleBaseFolder,codeFolder)
This will rename the appropriate code folders with the new package name. For example:
After that, just run the script with the desired package name as an argument, refresh your project on the IDE to recognize the changed files’ tree, and rebuild the app, that’s it! To revert back, just pass the other package name as an argument to the script. This can be also used for ordinary java project, though I haven’t tested it for that purpose.
The script can be improved to take any package name as an argument, or to identify all the sub modules on its own. Feel free to fork my git project and add more functionality. Also, corrections will be welcomed as well.
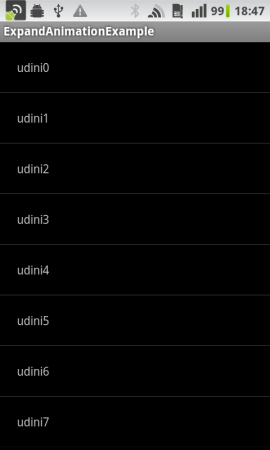
If you ever wrote an Android app, there’s a 90% chance that you used the ListView component at least once.
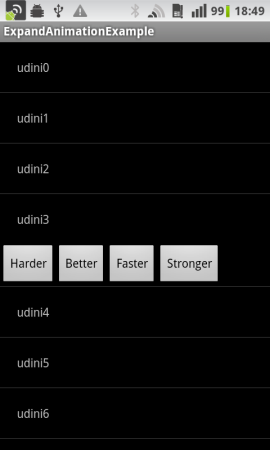
In the app that I wrote, I needed to give the user some options he can perform on each one of the list items. I thought about sliding a toolbar from the side, which will replace the list item, like they do on twitter, but it’s less convenient due to the fact that you hide the data that list item presents. A better approach, for me at least, was to slide out a toolbar. In that way - you can see the list item and get the option to perform some commands on it. And basically getting from this:


 .
.