This short post will be about creating a back-door to your app, giving you the option to provide more information or actions than you want end users to have. This will be using the Secret Code feature.
I came across some articles with list of codes in order to access some phone’s data (i.e. Camera’s firmware spec.), run some tests (i.e. Vibration test) or even perform actions such as reset to factory settings. Some examples can be found here and here and even as an app that indexes all that information.
Create your own
Creating your own secret doorway for your app can help you get more information from users of your app in a time of need. Getting crash reports from end users can be done by several services such as ACRA or BugSense, but how about errors that are not crashes? How many times did your Mom/Spouse/Friend/Mailman showed you their phone, running your app, and said something like: “Why do I see duplicates on the list here?! Why can’t I sync??”. You probably can’t do anything without debugging the app or at least take a look at the app’s SharedPrefs/SQLiteDB. Using a backdoor can help you get more internal information that will help you find the cause for the problem, no computer is necessary!
Another cool thing is providing more actions to do with your app. You want to keep the app clean for your users, but you might want more power to yourself. You can tweak your internal settings, whether for testing purposes or just to try out new features on your everyday use. Not needing to compile a new version after each change of internal setting, can help a lot in the task of identifying tricky problems.
Examples
Before learning how you can create your own secret code to do some cool stuff, let’s review some use cases that you can use it for:
Diagnose information - Presenting technical details of you app, such as generated UUID that can be used to find relevant server data.
Send internal data outside - You can dump app information, such as the SharedPrefs/DB data, and send it to you via email. Since this code runs on the same process as your app - you have access to everything!
Change settings - You can change the internal settings of your app. Showing more debug logs, communicating with a different server or even change the sorting order of the list you present the user. Anything that can help you understand more about the current situation of the app.
Demo mode - Need to show your app to investors? Showoff to your Friends? You can create shortcuts to some app features that are relatively difficult to simulate. For example: Notification that triggers every morning or when the phone is idle for more than 30mins. Maybe a SMS/phone-call triggered action, QR code scan or a sensor’s incoming data. You can create a demo screen to start everything you want to show on the app, and with sample data to make a neat presentation.
How?
Let’s see how to create one of our own secret code:
That’s what you put on your manifest. Looks simple right? All we do is provide a listener to a secret code, defined in a <data> tag as the “android:host” attribute, and declare a receiver for it. On the receiver, we can just run some code, open an Activity, run a Service etc. Here’s an example of a receiver that starts a new Activity:
We create an intent with the Activity class, Diagnoser, and start it. That activity will run on the same process as our app, allowing us to access all the data that our app has, using all the permissions that our app has been granted with.
Use it
To start our diagnose screen, all you need to do is go to the phone’s stock dialer (third party dialers not always work with secret codes) and dial the secret code you defined in the “android:host” attribute on the manifest, in the following pattern: “###*#*. In our example, you'll need to dial *#*#111222#*#*, the DiagnoserReceiver will receive the intent and start the Diagnoser activity.
That’s it. I hope this post helped you get more from your app. If you have more ideas for use cases for this feature - write them on the comments to help us all exploit this nice feature.
When I wrote Any.DO’s sync system, about 18 months ago, I wanted to use the built in AccountManager API to authenticate and store the users’ credentials. When I used it to access Google accounts it seems a pretty simple experience, so I thought I should do that for Any.DO as well. It also goes very well with a sync mechanism (using a SyncAdapter), making it the perfect solution. The problem - no good documentation was out there. The developers community didn’t have much experience with that back then, and since we didn’t have much time to figure out issues that could arise from this “No man’s land”, a decision was made to use other methods.
But times have changed..
I recently studied that feature again for a project I’m working on, and saw there’s a huge improvement with the knowledge about it. Besides the better documentation on the Android.com site, more and more tutorials went out to the wild, feeding us with knowledge about the mysteries of the notorious Account Manager. Some tales were told about the road to create your own account. I read pretty much all of them.
But..they all still miss something.
I didn’t feel that I actually know everything I wanted to know about the process, and some parts weren’t clear enough. So I did what I usually do when I want to know everything about something - investigate it “Jack Bauer style”! This post is the in-depth conclusion of my journey, with all the quirks and features that this service provides and I thought was important enough to find out. There will be a followup post about Sync Adapters as well, so I recommend RSS/Twitter subscribing to be notified…if you’re into this kind of stuff. I’ve been pretty thorough learning all those features, not just the basic stuff as all other tutorials did, but if I forgot something - please let me know by commenting this post.
Why Account Manager?
Why really?
Why not just write a simple sign-in form, implement a submit button that post the info to the server and return an auth token? The reason for that is the extra features you get and in the small details that you don’t always cover. All those “corners” that developers often miss when they need their users to sign-in, or dismiss by saying “This will happen to 1 out of 100000 users! It’s nothing!”. What happens if the user changes the password on another client? Has an expired auth-token? Runs a background service that doesn’t have a UI the user can interact with? Wants the convenience of logging-in once and get automatically authenticated on all account-related app (like all Google’s apps do)?
Reading this article will probably make you think it’s complicated stuff, but it’s not! Using the Account Manager actually simplifies the authentication process for most cases, and since I’m already giving you a working code sample - why not use it :)
So, to recap the benefits:
Pros: Standard way to authenticate users. Simplifies the process for the developer. Handles access-denied scenarios for you. Can handle multiple token types for a single account (e.g. Read-only vs. Full-access). Easily shares auth-tokens between apps. Great support for background processes such as SyncAdapters. Plus, you get a cool entry for your account type on the phone’s settings:
Look mom, my name is on the settings screen!
Cons: Requires learning it. But hey, that’s what you’re here for, isn’t it?
The steps we’ll performs to get this done:
Creating our Authenticator - the brain behind this operation
Creating the Activities - in those the user will enter his credentials
Creating the Service - through it we can communicate with the authenticator
This week I had the time to write a small and cool transition animation between Activities.
The regular transition animations between activities animate the Activity as a whole. I wanted to create an animation that split Activity A into 2 parts, animate them in the way out and revealing Activity B. Here’s a gif that illustrate this:
The idea is fairly simple:
Save Activity A as a bitmap
Split bitmap into 2 parts
Pass the 2 bitmaps to Activity B
Show the bitmaps on top of Activity B’s layout
Animate the bitmaps outwards
User is now seeing Activity B
The implementation was not as straightforward as I thought. I ran into some difficulties on the way, but I found solutions to all the problems I encountered. Let’s go step by step.
Note: This implementation requires holding a snapshot bitmap of the entire screen. For some devices that might be a very expensive operation due to low memory and/or large screen area. If you choose to use this animation - do it with care and don’t overuse it.
Save as Bitmap
In order to get a bitmap of the Activity, we can use this code:
On the first line, we get the root view for the activity. We find the view with the id of _android.R.id.content, _which is the FrameLayout that exist on every layout and contains the layout you put on setContentView(). Here’s how it looks on HierarchyViewer:
In order to get a bitmap of the root view, or any view for that matter, we call the getDrawingCache() method. This will return the cached bitmap of this view in case we have enabled the caching for it. That’s why we also call the setDrawingCacheEnabled() before that. If there isn’t a cached bitmap for the view – it’s been created on the spot.
_bmp _is the main Bitmap for the entire Activity.
_splitYCoord _is the Y coordinate of the splitting point.
I create 2 smaller bitmaps. mBmp1 is the upper part of the larger bitmap and mBmp2 is the bottom part. Each part’s height is determined by the splitYCoord.
Pass the bitmaps to the next Activity
After I have the 2 bitmaps, I want to start the next Activity and put them on top of its layout. That way the user will see Activity A’s layout where in fact we already moved on to Activity B.
At first, I wanted to pass them as Extras of the Intent, it’s possible since Bitmap is Parcelable . The problem is the bitmaps are too large to transport in an Intent, due to size limitation for IPCs. This is the error I got:
!!!FAILEDBINDERTRANSACTION!!!
There are few workarounds for this, including writing the bitmaps into a file and then read them back on the other end. I found the easiest and fastest way will be to just keep them as data members in a common area. I created a static class to contain the bitmaps and all the logic to create and animate them. More on that later.
Show the bitmaps on Activity B
After I start Activity B, disabling any default activity animation using overridePendingTransition(), I create 2 ImageViews to contain the previously created bitmaps, and presenting them on screen. I do that before calling _setContentView() _to avoid seeing Activity B’s layout ahead of time.
The ImageViews are added directly to the Window of the activity. This allows the ImageViews be on top of the soon-to-be inflated layout and gives more flexibility when deciding the location of each one of them on the screen.
The gravity states where we’ll put our layout in the window. Since we calculated the X,Y position of the bitmaps relative to the top of the screen – we’ll set the gravity to TOP.
Animate the bitmaps
After we created and positioned the bitmaps on Activity B, we can call setContentView() to inflate the Activity’s layout. After the layout is inflated we can start the animation that pushes the 2 bitmaps outwards, thus revealing the Activity’s layout.
mSetAnim=newAnimatorSet();mTopImage.setLayerType(View.LAYER_TYPE_HARDWARE,null);mBottomImage.setLayerType(View.LAYER_TYPE_HARDWARE,null);mSetAnim.addListener(newAnimator.AnimatorListener(){@OverridepublicvoidonAnimationEnd(Animatoranimation){clean(destActivity);}@OverridepublicvoidonAnimationCancel(Animatoranimation){clean(destActivity);}...});// Animating the 2 parts away from each otherAnimatoranim1=ObjectAnimator.ofFloat(mTopImage,translationY,mTopImage.getHeight()*-1);Animatoranim2=ObjectAnimator.ofFloat(mBottomImage,translationY,mBottomImage.getHeight());mSetAnim.setDuration(duration);mSetAnim.playTogether(anim1,anim2);mSetAnim.start();
The animation is a simple TranslationY animation that moves every ImageView outside the screen, each one to a different directions. I use hardware acceleration (read my last blog post to learn more about HW accelerated animations) and I do some cleaning after the animation is finished or canceled (removing hardware layer, removing the ImageViews from the window etc.).
How to use my Animation
So I was debating with myself what’s the best way to make it easier to use, without limiting the developer too much. The easiest way was to create a base Activity that the developer can extend and the actions will be taken care of without too much effort. The reason I didn’t do that is because I **HATE **extending from other base activities just to get some more features. If your application has it’s own base activity it can be very frustrating if every library will demand you to extend from their own branded Activity.
That’s the reason I created a simple class with static methods that do all the work. here’s the API:
/**
* Utility class to create a split activity animation
*
* @author Udi Cohen (@udinic)
*/publicclassActivitySplitAnimationUtil{/**
* Start a new Activity with a Split animation
*
* @param currActivity The current Activity
* @param intent The Intent needed tot start the new Activity
* @param splitYCoord The Y coordinate where we want to split the Activity on the animation. -1 will split the Activity equally
*/publicstaticvoidstartActivity(ActivitycurrActivity,Intentintent,intsplitYCoord);/**
* Start a new Activity with a Split animation right in the middle of the Activity
*
* @param currActivity The current Activity
* @param intent The Intent needed tot start the new Activity
*/publicstaticvoidstartActivity(ActivitycurrActivity,Intentintent);/**
* Preparing the graphics on the destination Activity.
* Should be called on the destination activity on Activity#onCreate() BEFORE setContentView()
*
* @param destActivity the destination Activity
*/publicstaticvoidprepareAnimation(finalActivitydestActivity);/**
* Start the animation the reveals the destination Activity
* Should be called on the destination activity on Activity#onCreate() AFTER setContentView()
*
* @param destActivity the destination Activity
* @param duration The duration of the animation
* @param interpolator The interpulator to use for the animation. null for no interpulation.
*/publicstaticvoidanimate(finalActivitydestActivity,finalintduration,finalTimeInterpolatorinterpolator);/**
* Start the animation that reveals the destination Activity
* Should be called on the destination activity on Activity#onCreate() AFTER setContentView()
*
* @param destActivity the destination Activity
* @param duration The duration of the animation
*/publicstaticvoidanimate(finalActivitydestActivity,finalintduration);/**
* Cancel an in progress animation
*/publicstaticvoidcancel();}
In order to use it, just call this from Activity A when you want to animate to Activity B:
// Preparing the 2 images to be splitActivitySplitAnimationUtil.prepareAnimation(this);// Setting the Activity's layoutsetContentView(R.layout.act_two);// Animating the items to be open, revealing the new activity.// Animation duration of 1 secondActivitySplitAnimationUtil.animate(this,1000);
That’s it!
No need to extend anything, just 3 simple calls to static methods.
The code supports API14+ but it can easily be converted to work on older devices using NineOldAndroid.
A week ago I gave a talk about Android performance, presenting some old and should-be-known-to-all-developers methods, aside to new tools introduced in Jellybean. The talk was recorded and here’s the video:
I know that performance optimization tends to be pushed aside when developing a project, especially if you’re in a start-up company and all you do is pretty much “run” with the product.
On this post I’ll give you the tools **and knowledge **to easily do a performance review and solve common issues in your app, rising it up to the challenge of smooth running.
As a busy/lazy developer, I always try to automate repeating routines. Those sequence of actions are getting annoying after a few times and always make me gasp. That’s why some of my time is dedicated to writing small scripts to make my life easier, and the development process faster and anger-free. Most of them are very specific to the apps I’m working on, and some are more generic. I’ve pushed them to a new repository on GitHub, and it will updated with more scripts when I’ll make some more, or generalize other existing scripts that I use.
ADB Batch Scripts
ADB – Android Debug Bridge, is a very powerful tool. You can control a lot of features on the phone. Furthermore, granting yourself with a ROOT access will bring many rewards, as getting files in and out the file-system, manipulating system files and more. I highly recommend rooting your development phone; it’ll prove itself worthy towards the trouble that it might cause in some devices. I’ll also note that the root access from ADB is limited on production builds (stock ROMs) vs. custom ROMs (e.g. Cyanogenmod), so I prefer to just flash a custom ROM on my development phone, making me the master of its domain!
Most of my repeated ADB commands are for DB access. I need to check the app’s SQLite DB to see that my code did everything right. So I wrote this windows batch script:
First, I request to start ADB with root access, not applicable on stock ROMs (as least not easily), and pulling out the DB file to a temp location. The first time running this will show an error, since the _adb root _command restarts the ADB daemon on you computer, which causes the next ADB command not to find the device momentarily. The second time running this will be the charm. To open the DB I use SQLite Browser, which is very simple and lite. Running SQL on the DB is buggy, but for simple table viewing – it’s good enough.
If we want to modify the DB on the device, I wrote a small script to receive any SQL statement, and run it directly on a DB inside the device:
Very simple. Using the sqlite3 command, we can get a SQLite prompt that’s running on the device itself. If you don’t have the sqlite3 file in your device, which can happen on stock ROMs mostly, you can use this nice article that helped me do it on my Galaxy Nexus, or just search Google.
Another common thing I do, is executing specific services and activities, great help for my debugging life. The syntax is simple, but here’s an example to show how easy that it:
adb shell am startservice -n <package name>/<Service full class name> [<extras>]
adb shell am start -n <package name>/<Activity full class name> -a android.intent.action.MAIN [<extras>]
I can pass extras, action and even activity attributes as clear-top, no-animation and more. I recommend reviewing all the options for those commands, you might get ideas how to automate some of your routines.
Some tests require installing/uninstalling the app to clear the data fast or to test upgrading code. The _adb install _and _adb uninstall _will do the trick here. Very simple to use and fast. I usually install the newest version of Any.DO on my device using an ADB command, rather than from Google Play. It’s just faster!
Python Scripts
Using Python, I could write more complex stuff, like analyzing a system dump, pulling only the important information. If you’re familiar with ADB, you probably heard of “adb shell dumpsys”. This command will print a dump of the system, containing LOTS of data about memory allocations, registered receivers, apps permissions and more. You can call “adb shell dumpsys <service name>” to get a specific service’s information. Some examples:
# All the information about accounts on the device
adb shell dumpsys account

# The battery state
adb shell dumpsys battery

# All the registered alarms on the device
adb shell dumpsys alarm
The problem with the last command – it prints out too much garbage. There are lots of alarms registered on your device at any given moment, and the dump’s printing format is not exactly an eye candy. Since there’s a lot of alarm handling on Any.DO, I needed a clear and easy way to look only at the relevant information. That’s why I wrote this script:
p=subprocess.Popen([r'adb','shell','dumpsys alarm'],stdout=PIPE,stderr=PIPE,shell=True,cwd='C:\\')out,err=p.communicate()p.wait()pp=pprint.PrettyPrinter(indent=4)lines=out.split('\n')alerts=[["RTC TYPE","When","Repeat","pkg","Type"]]foriinxrange(len(lines)):iflines[i].replace(" ","")[:3]=="RTC":# Extract the information we
rtc_type=lines[i].strip().split()[0]when=re.findall('when=([0-9a-z+]*)',lines[i+1])[0]repeat=re.findall('repeatInterval=([0-9a-z+])*',lines[i+1])[0]intentType=list(re.findall("PendingIntentRecord{(\w+) ([\w\.]+) (\w+)",lines[i+2])[0])# If the user has passed a package name as an argument
# we'll filter all other packages' alarms
iflen(sys.argv)>1:ifintentType[1]==sys.argv[1]:alerts.append([rtc_type,when,repeat,intentType[1],intentType[2]])else:alerts.append([rtc_type,when,repeat,intentType[1],intentType[2]])out_lines=[""]*len(alerts)# Format the data nicely to columns
forcolumninxrange(len(alerts[0])):foralert_indexinxrange(len(alerts)):out_lines[alert_index]+=str(alerts[alert_index][column])line_size=max(map(len,out_lines))+5foralert_indexinxrange(len(alerts)):out_lines[alert_index]+=" "*(line_size-len(out_lines[alert_index]))forlinout_lines:printl
All I do here, is getting the output from the command “adb dumpsys alarms”, and extract the information I need the most:
The repeat interval of the alarm, if there is one.
The intent type that the alarm will invoke. Could be a Service, Activity or a Broadcast.
Here’s an example output:
Passing the package name as an argument will print only its relevant alarms.
Another issue I encountered was activities’ stack handling. All those activities’ attributes, “singleTop”, “singleInstance” and more, can get you utterly confused about what would happen when you press the back button. Will you be navigated to the previous activity? will you be thrown to your main activity? or is it to the launcher screen? Reading the documentation will help you understand what **should **be, and using my “Activity stack viewer” will help you see what **is **happening back there. This script is parsing the dumpsys, as the previous script did, and prints the activities’ stack grouped by their package name:
Here I can see that on the Twitter app, I opened the post activity from the home activity. I see all the other paused activities that haven’t been destroyed yet by the operation system. Passing a package name as an argument will print a filtered list;
That’s all for now. I hope I helped at least some of you to do things a little bit more efficient. I’ll keep that GitHub repository updated with new scripts I’ll write in the future. If you have a script to contribute – go ahead and submit a PR!
This week I decided to publish the code from an old project I did couple of years ago, the FAT32 Sorter. I wrote a little about it in here, and a lot about it in there. As I went through the code, make final adjustments before releasing it to the wild, I saw other old projects of mine. Just by reading those folder names, my mind has started reciting the story behind each and one of them.
Ah… memories…
When I started coding, around the age of 14, I wasn’t attracted to write small games, as my classmates were doing from time to time. I wanted to solve problems that I find myself get annoyed by, or to make stuff easier for me. So whenever I got frustrated by something, I immediately started thinking – “How can I create a better experience?”.
And I did.
I decided to release another project to the open source community. Before I’ll introduce it –I’ll explain the story behind it: As a heavy Windows user, I tried to tweak it as much as I can, making the glove better fit my hand. I wanted to enable the “Hide extension for knows file types” property. This helps me rename the file name without messing with its extension. But, I also wanted to be able to rename the file’s extension easily (Yes! I did rename extensions quite often. How did you write .BAT files if not from a .TXT file?!). Since Windows’ file properties didn’t give an option to edit the extension, I created RenameExt, which adds a context menu option for that:
The new option raises a minimal dialog to do the operation I needed
Of course I handled all the cases where you select multiple files, and not necessarily with the same extension. Since Windows Vista, when you rename a file, the file’s extension is excluded from the selection, so it’s easier to rename just the file name. I don’t use RenameExt anymore, but if you want to check out the code – here it is.
Another utility that I wrote, came due to a computer failure, where the only option was to format the hard-drive and start fresh. The problem – I had a big and organized Favorites folder, with all the websites I kept close. Back than, we didn’t have auto-sync to all the favorites, like those spoiled kids have now, so I had to back them up myself. Since I couldn’t get Windows to load, I did that using DOS. The problem: DOS does not support long file names, at least not the DOS I had at that time. This means all the favorites’ titles just got truncated to shit like “HOWSTU~1.url”, which ruins any chance to understand what it links to. The solution: FavoriteOrganizer.
This small utility scans all the .url files, go to the website they refer to, get the title from the HTML file and rename the .url file to that title. It identifies dead links and webhosting service pages, which probably means that this site is no longer exist (Well, excluding some ACTUAL webhosting sites I kept there..). My favorites were saved, only to be completely deleted a few years after that.
There’s also a VB project that I wrote to solve a very specific problem I had with my brother – music. My brother and I have different taste in music, but some genres are common to both of us. To save space, we had one music folder with all the music, but each have his own Winamp playlist with all the songs he listens to. It’s not like today, where I have over 10,000 songs, we had maybe a 100, each and one of them were handpicked. You can’t afford downloading full discographies when you download in a rate of 7 KB/s at best. Downloading new songs and moving them to the common music directory caused a lot of problems, since we forgot to let each other know about new stuff that the other party might find interesting in, causing duplicates and stupid arguments. That’s why I wrote the SongsOrganizer:
It’s in Hebrew, but I’ll explain: The screen on the left side presents all the newly downloaded songs that are still in the download folder, waiting to join their friends in the music folder. Currently – there are no songs to transfer. Each user can see the song’s details and even play it. If the current user wants it, he presses the button that says “Transfer song” which causes this chain of events: Moving the song to the music folder, add the song to the current user’s playlist and save this song’s information in the internal DB. When the other user logs in, He can see all the songs the other user has moved, and click on the “I want too” button, which add this songs to his playlist too.
Neat huh? This really made our lives much easier, at least until we each got a computer of his own :).
After a while, I got attracted to mobile development. J2ME was the first platform I learned, followed by Symbian and of course – Android. Using the mobile phone, I could solve a different kind of problems I encountered. The first JAVA supporting device I had was the Nokia 3510i
It was really cool, it even had colored screen! The first problem I solved with it, was reading the menu at dark bars. We all used the light from our mobile devices, but it kept turning off, and was not bright enough. So I thought – why not create an app to light the screen all the time with white color? And that’s how FlashLight was born. Couple of months after I released it to the internet, I saw other apps do the same, and now we have dozens of those, but back then – I was the first one. No app stores were exist, so I can’t really know that for sure, but I did my research before that.
I also researched for an idea to create an app to keep all my passwords on my mobile device, and be able to sync them with my computer. I wrote the stuff I need to investigate on this To-Do list I created:
Even back then I was into To-Do lists :) Eventually I didn’t complete this project due to technological difficulties. Today I’m a happy user of KeePass on my PC and Android, and I sync the data using Dropbox. Much easier!
Last but not least, is my University project I did with a close friend of mine. We wrote a chat app called ChatWithME, allowing PC and mobile clients to chat together. We wanted to make something cooler than just a regular server-client chat, so besides writing a beautiful J2ME chat client a person can write in a week, we give the mobile users the option to chat using a server connection or Bluetooth, which saves precious KBs if we want to speak with our classmates during a lecture.
We got an A+ for that project.
I also found a few small Symbian apps that I wrote, C# projects and more, but they are less interesting than those are.
Hope you had fun like I did, taking this trip down memory lane. My only takeaway here - make the time to work on the things you love.
Quite recently, we added a sync feature to Any.DO. The users can sync all their tasks to Any.DO’s server, allowing them to access their tasks from our Android, iOS and Chrome clients.
Our data structure is a classic fit to REST API architecture. After getting our server ready, it was now the time to teach the Android client how to “talk the talk”. I didn’t want to use simple HTTP requests, constructed to use our REST API. I wanted to use some library to make my life easy, and my code readable. I also didn’t want to reinvent the wheel, so I did my research. I found some good and simple libraries for Android, as Resty, but then I found a more elegant solution for that – RestAdapter in Retrofit by Square.
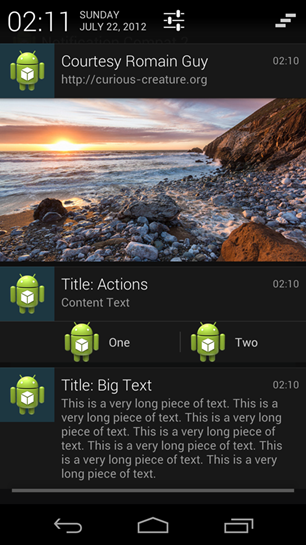
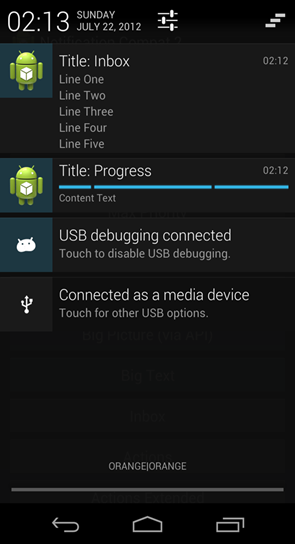
One of most useful features on Android are the Notifications. While iOS just got them – Android keeps improving them. JellyBean has presented some sweet notifications’ features. Larger area, multiline text entry, list of different items and pictures. There’s also an option to create your own custom layout to present there (though I think it potentially can ruin the uniformity of the notifications design). All those “tall” notifications can be also collapsed/expended to save some space. One more thing, and this could be the coolest of all, is the option to add **actions **to the notifications.
(Sample notifications on JellyBean. Taken using NotificationCompat2 sample app, by Jake Wharton)
Three actions don’t (always) make it right.
Each notification can suggest up to 3 actions, but what if I want more? Maybe I want that a click on one action will give some other actions to pick from? I know it’s not a common case, but I can think of several cases where it can be useful. Since all the notifications are built on the same way AppWidgets are built, using RemoteViews, there are not much place for run-time manipulation.
Seems like the old switch-a-roo will do the trick here.
Changing the actions is possible by replacing the whole notification with a new one. The replacing notification can have a different title and different actions from the previous one, but it must have the same notification id. This is how it’ll look like:
How to do that?
First, let’s clarify something – notification’s actions don’t just have an OnClickListener like regular buttons, they fire an Intent using a PendingIntent. A receiver needs to receive that Intent and “notify” the replacing notification to the Android’s Notification Service. The receiver can be a BroadcastReceiver, Service or even an Activity, but we want something that doesn’t take much resources/loading-time (as an Activity) or doesn’t have the potential to be called from other applications (as a BroadcastReveiver). A Service, or even simpler – IntentService, will fit perfectly here.
publicclassNotificationReplaceServiceextendsIntentService{publicstaticStringACTION_SWITCH_NOTIFICATIONS="com.jakewharton.notificationcompat2.SWITCH_NOTIFICATIONS";publicstaticStringSWITCH_NOTIFICATION_ARG_ID="NOTIF_ID";publicstaticStringSWITCH_NOTIFICATION_ARG_NOTIFICATION="NOTIF_NOTIFICATION";publicNotificationReplaceService(){super("NotificationReplaceService");}@OverrideprotectedvoidonHandleIntent(Intentintent){if(ACTION_SWITCH_NOTIFICATIONS.equals(intent.getAction())){intnotifiId=intent.getIntExtra(SWITCH_NOTIFICATION_ARG_ID,-1);Notificationnotification=intent.getParcelableExtra(SWITCH_NOTIFICATION_ARG_NOTIFICATION);// Creating the new notification based on the data came from the intentNotificationManagermgr=(NotificationManager)getSystemService(NOTIFICATION_SERVICE);mgr.notify(notifiId,notification);}}}
This service supports the “SWITCH_NOTIFICATION” action, which has 2 extras:
Notification Id: Must be the same as the notification we’re replacing
Notification object: The second notification we replace the current notification with
Luckily for us – the Notification class is Parcelable, meaning I can pass it as one of the Intent’s extras with no problem.
To illustrate this idea, I used Jake Wharton’s NotificationCompat2 project, which gives a simple API to build notifications for all Android versions from 1.6 to 4.1. My service was added to the manifest
<!-- Declaring the service --><serviceandroid:name="com.jakewharton.notificationcompat2.NotificationReplaceService"/>
I created the first notification, the one to be replaced:
NotificationnotiMain=getSimple("Action with extension").addAction(android.R.drawable.sym_def_app_icon,"Action",getPendingIntent()).addAction(android.R.drawable.sym_def_app_icon,"More..",intentReplaceNotification).build();
The intentReplaceNotification _is the PendingIntent fired when pressing the “More..” action on the notification. This pending intent is the one in charge of calling the _NotificationReplaceService with the replacing notification.
// First - Building the extended notification.// This will replace the first one when the "More.." button will be pressedNotificationnotiReplacement=getSimple("Actions extended").addAction(R.drawable.no_icon,"udinic1",getPendingIntent()).addAction(R.drawable.no_icon,"udinic2",getPendingIntent()).addAction(R.drawable.no_icon,"udinic3",getPendingIntent()).build();// Creating the switch notification intent.// The receiver will get this and send notiExtended to the NotificationManager, replacing the current one with the same IdIntentswitchNotificationIntent=newIntent();switchNotificationIntent.setClass(SampleActivity.this,NotificationReplaceService.class);switchNotificationIntent.setAction(ACTION_SWITCH_NOTIFICATIONS);switchNotificationIntent.putExtra(SWITCH_NOTIFICATION_ARG_ID,notifiId);switchNotificationIntent.putExtra(SWITCH_NOTIFICATION_ARG_NOTIFICATION,notiReplacement);PendingIntentintentReplaceNotification=PendingIntent.getService(SampleActivity.this,0,switchNotificationIntent,0);
Here we created the replacing notification, and passing it to the replacing action intent. This intent will start my _NotificationReplaceService, _which will use the intent’s extras to replace the main notification.
All that is left now to do is to notify the main notification to the Android’s Notification Service
You can check the full code on my GitHub account. Just please do me one favor – don’t abuse this method to create a complex menu in the users’ notification bar, think about your users!
After seen the new features added to Android 4.1 (A.K.A. Jelly-bean), I immediately started seeking a way to get it into my phone. Waiting for the OTA (Over the Air) update is not acceptable!
I didn’t participate the Google I/O convention, which means I didn’t get the new Nexus 7 nor a Galaxy Nexus Device with the JellyBean already preloaded. But, I do have my own Galaxy Nexus with Android 4.0.4, and since I have a Nexus device – it should be fairly easy to flash it in.
It wasn’t that far from the truth.
After reading some information about the different firmware the Galaxy Nexus has, I know that there are 2 main variant types: “takju” and “yakju”, where the first one is found on models bought in the USA, and the other is international. The first JellyBean build that I’ve found is JRO03C, but it’s not a full image, but an update to a specific build of Android 4.0.4. That required build was IMM76I and I had IMM76K. Problem.
On a side note: My phone just recently got the Android 4.0.4 OTA, even though this update is out for months now, it appears to be because I have a sub-variant of “yakju”. Since Google manage and support only the “takju” and “yakju” variants, all the sub-variants get updated later. it explains why I just now got my 4.0.4 OTA. Meaning, If you can’t wait for OTAs – get one of those variants on your phone, and you’ll be one of the first to get them! The needed IMM76I build is a “yakju” variant.
So, back to my problem. I needed to have the IMM76I build instead of my IMM76K, in order to apply the JellyBean updated. That image can be found on the Google’s Factory Images for Nexus Devices site, or in goo.im, which also have a massive collection of ROMs for all phones/tablets. After downloading it – I have to flash it to my device. The easiest way I found was to use Galaxy Nexus Toolkit, which made my life much easier, even just for rooting purposes. There’s even an option to download the images straight from there, but I haven’t tried it. Just follow the instructions on the Toolkit and on that XDA post to get it done. WARNING: All your data will be deleted on the process, make sure you back up. Also, make sure you have the appropriate device, my device is a GSM, if you have CDMA/LTE, there are other images needed to be download.
After getting the “right” build for me, I only needed to update it with the new JellyBean OTA. After downloading the OTA (can be found in goo.im or here) I copied it to my phone, and run it from the Phone’s Recovery. If you don’t have a recovery installed – you can use the Galaxy Nexus Toolkit I presented above. I installed the CWM touch recovery, and it’s very convenient in compare to the non-touch recovery that I used in the past.
Mission accomplished!
I did a factory reset at the end of it, to get the full new-user-experience, and I got to say – It’s even better than the one on ICS.
Don’t forget to give some quick pressed on the “Android version” line on this “About phone” screen. This will give you a cute picture related to the current Android version. This is the one from the new JellyBean:
All that left to do now is to explore the new API, and find some cool stuff. My next post will be on one of those…
The new Any.DO version was released to beta testers this week. It’s been a long journey..
On the last couple of months I was working hard on that version. Lots of infrastructure changes, Some of them are Database changes, which I hate because then I have to support upgrading from older DB version. It’s irritating to write it, and even more irritating to test it afterwards (no matter how many useful scripts I wrote to make it easier).
In Android we use SQLite Database, and even though it supports many SQL commands as the more functional Databases around (MySql, Oracle…) it lacks a few useful commands. The ALTER TABLE DROP COLUMN is one of the things I miss the most. There were times where I considered leaving a redundant column in the table, just to avoid the whole process of removing it while upgrading :).
The Internet is full with with people asking about alternatives, and some got useful answers in the shape of pseudo code to get the table on its way to salvation. I got myself into a situation where I needed to drop 4 column on 3 different tables. Damn.
That’s it, no more excuses! I’m dealing with this once and for all!
From the SQlite’s FAQ page, one must follow these steps to get this done:
The main problem here – not a generic solution. I need to know the list of column I want to keep, instead of just the columns I want to remove. I solved this problem by using the following SQL command:
PRAGMAtable_info(table_name);
This will query the list of columns this table has, among with their properties (type, default value etc.). Using this, I wrote a function to get all the columns of a certain table:
Now we can proceed to the the dropColumn() implementation:
privatevoiddropColumn(SQLiteDatabasedb,ConnectionSourceconnectionSource,StringcreateTableCmd,StringtableName,String[]colsToRemove)throwsjava.sql.SQLException{List<String>updatedTableColumns=getTableColumns(tableName);// Remove the columns we don't want anymore from the table's list of columnsupdatedTableColumns.removeAll(Arrays.asList(colsToRemove));StringcolumnsSeperated=TextUtils.join(",",updatedTableColumns);db.execSQL("ALTER TABLE "+tableName+" RENAME TO "+tableName+"_old;");// Creating the table on its new format (no redundant columns)db.execSQL(createTableCmd);// Populating the table with the datadb.execSQL("INSERT INTO "+tableName+"("+columnsSeperated+") SELECT "+columnsSeperated+" FROM "+tableName+"_old;");db.execSQL("DROP TABLE "+tableName+"_old;");}
So what do we have here?
This function is receiving the db and the connectionSource as arguments, as for the onUpgrade() method, which is the main entry point for the whole Database upgrading process.
The createTableCmd is the “CREATE TABLE… “ command to create the new table. You must have that command in order to create the table on a new installation of the app.
The tableName is…well…the name of the table.
The colsToRemove is an array of columns we want to remove from the table. We can also easily create a convenient function to receive only a String of one column name.
That’s it! Let the columns’ dropping frenzy begin! You can also use this method to support the missing RENAME COLUMN command. The badly-named columns days are over, no more columns like “task_title_which_is_shared_via_email”. Just rename them!
On my next posts I’ll publish some of my useful scripts to help me develop and test more efficiently.