When I wrote Any.DO’s sync system, about 18 months ago, I wanted to use the built in AccountManager API to authenticate and store the users’ credentials. When I used it to access Google accounts it seems a pretty simple experience, so I thought I should do that for Any.DO as well. It also goes very well with a sync mechanism (using a SyncAdapter), making it the perfect solution. The problem - no good documentation was out there. The developers community didn’t have much experience with that back then, and since we didn’t have much time to figure out issues that could arise from this “No man’s land”, a decision was made to use other methods.
But times have changed..
I recently studied that feature again for a project I’m working on, and saw there’s a huge improvement with the knowledge about it. Besides the better documentation on the Android.com site, more and more tutorials went out to the wild, feeding us with knowledge about the mysteries of the notorious Account Manager. Some tales were told about the road to create your own account. I read pretty much all of them.
But..they all still miss something.
I didn’t feel that I actually know everything I wanted to know about the process, and some parts weren’t clear enough. So I did what I usually do when I want to know everything about something - investigate it “Jack Bauer style”! This post is the in-depth conclusion of my journey, with all the quirks and features that this service provides and I thought was important enough to find out. There will be a followup post about Sync Adapters as well, so I recommend RSS/Twitter subscribing to be notified…if you’re into this kind of stuff. I’ve been pretty thorough learning all those features, not just the basic stuff as all other tutorials did, but if I forgot something - please let me know by commenting this post.
Why Account Manager?
Why really?
Why not just write a simple sign-in form, implement a submit button that post the info to the server and return an auth token? The reason for that is the extra features you get and in the small details that you don’t always cover. All those “corners” that developers often miss when they need their users to sign-in, or dismiss by saying “This will happen to 1 out of 100000 users! It’s nothing!”. What happens if the user changes the password on another client? Has an expired auth-token? Runs a background service that doesn’t have a UI the user can interact with? Wants the convenience of logging-in once and get automatically authenticated on all account-related app (like all Google’s apps do)?
Reading this article will probably make you think it’s complicated stuff, but it’s not! Using the Account Manager actually simplifies the authentication process for most cases, and since I’m already giving you a working code sample - why not use it :)
So, to recap the benefits:
Pros: Standard way to authenticate users. Simplifies the process for the developer. Handles access-denied scenarios for you. Can handle multiple token types for a single account (e.g. Read-only vs. Full-access). Easily shares auth-tokens between apps. Great support for background processes such as SyncAdapters. Plus, you get a cool entry for your account type on the phone’s settings:

Look mom, my name is on the settings screen!
Cons: Requires learning it. But hey, that’s what you’re here for, isn’t it?
The steps we’ll performs to get this done:
-
Creating our Authenticator - the brain behind this operation
-
Creating the Activities - in those the user will enter his credentials
-
Creating the Service - through it we can communicate with the authenticator
But first, some definitions.
Authenti..what?
Lets start with the basics - these are the main parts here:
Authentication Token (auth-token) - A temporary access token (or security-token) given by the server. The user needs to identify to get such token and attach it to every request he sends to the server. On this post I’ll use OAuth2 as the authentication standard, since it’s the most popular method there is.
Your authenticating server - The server that will manage all the users that use your product. It will generate an auth-token for any user that logs in and verify it for every request the user makes on your server. The auth-token can be time limited and expire after a period of time.
AccountManager - Managing all the accounts on the device and pretty much running the show. Apps can request auth-tokens from it and that’s its job to get it done. Whether it means it needs to open a new “Sign-in”/”Create account” activity, or retrieving a stored auth-token that was previously requested, the AccountManager knows who to call and what to do on each scenario to get the job done.
AccountAuthenticator - A module to handle a specific account type. The AccountManager find the appropriate AccountAuthenticator talks with it to perform all the actions on the account type. The AccountAuthenticator knows which activity to show the user for entering his credentials and where to find any stored auth-token that the server has returned previously. This can be common to many different services under a single account type. For instance, Google’s authenticator on Android is authenticating Google Mail service (Gmail) along with other Google services such as Google Calendar and Google Drive.
AccountAuthenticatorActivity - Base class for the “sign-in/create account” activity to be called by the authenticator when the user needs to identify himself. The activity is in charge of the sign-in or account creation process against the server and return an auth-token back to the calling authenticator.
Whenever your app needs an auth-token, it only talks with one method, the AccountManager#getAuthToken(). The AccountManager will take it from there and jump through hoops to get you that token. Here’s a nice diagram of the process from Google’s documentation:
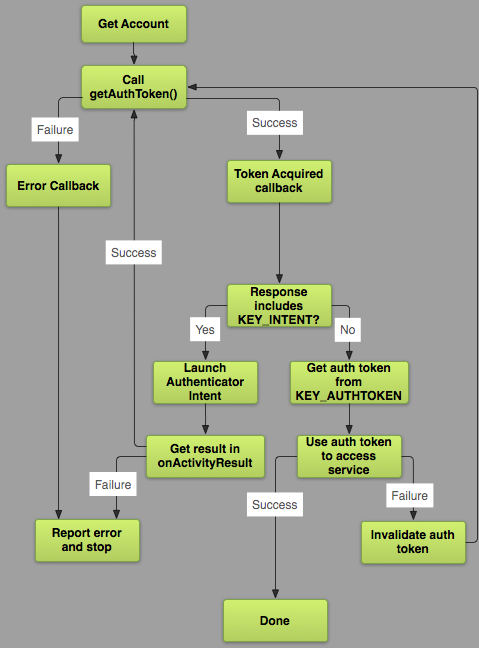
It may look a little cumbersome, but it’s fairly simple. I’ll explain the common case where we log-in to an account for the first time on the device.
First time logging-in
-
The app asks the AccountManager for an auth-token.
-
The AccountManager asks the relevant AccountAuthenticator if it has a token for us.
-
Since it has none (there’s no logged-in user), it show us a AccountAuthenticatorActivity that will allow the user to log-in.
-
The user logs-in and auth-token is returned from the server.
-
The auth-token is stored for future use in the AccountManager.
-
The app gets the auth-token it requested
-
Everyone’s happy!
In case the user has already logged-in, we would get the auth-token back already on the second step. You can read more about authenticating using OAuth2 here.
Now that we know the basics, let’s see how to create our own account type authenticator.
Creating our Authenticator
As written earlier, the Account Authenticator is the one that gets addressed by the AccountManager to fulfill all account relevant tasks: Getting stored auth-token, presenting the account log-in screen and handling the user authentication against the server.
Creating our own Authenticator requires extending AbstractAccountAuthenticator and implementing some methods. Let’s focus for now on the 2 main methods:
addAccount
Called when the user wants to log-in and add a new account to the device.
We need to return a Bundle with the Intent to start our _AccountAuthenticatorActivity _(explained later). This method can be called by the app itself by calling AccountManager#addAccount() (requires a special permission for that) or from the phone’s settings screen, as seen here:
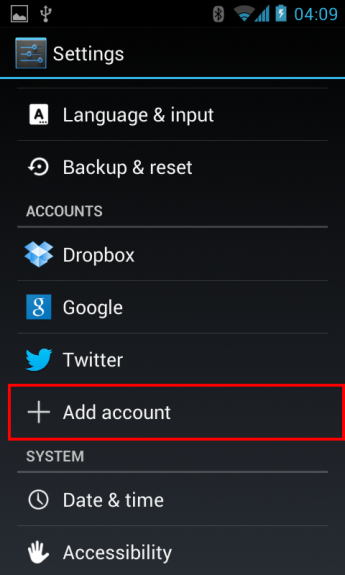
Add an account from the device’s Settings
Example:
@Override
public Bundle addAccount(AccountAuthenticatorResponse response, String accountType, String authTokenType, String[] requiredFeatures, Bundle options) throws NetworkErrorException {
    final Intent intent = new Intent(mContext, AuthenticatorActivity.class);
    intent.putExtra(AuthenticatorActivity.ARG_ACCOUNT_TYPE, accountType);
    intent.putExtra(AuthenticatorActivity.ARG_AUTH_TYPE, authTokenType);
    intent.putExtra(AuthenticatorActivity.ARG_IS_ADDING_NEW_ACCOUNT, true);
    intent.putExtra(AccountManager.KEY_ACCOUNT_AUTHENTICATOR_RESPONSE, response);
    final Bundle bundle = new Bundle();
    bundle.putParcelable(AccountManager.KEY_INTENT, intent);
    return bundle;
}
getAuthToken
Explained by the diagram above. Gets a stored auth-token for the account type from a previous successful log-in on this device. If there’s no such thing - the user will be prompted to log-in. After a successful sign-in, the requesting app will get the long-awaited auth-token. To do all that, we need to check the AccountManager if there’s an available auth-token by using AccountManager#peekAuthToken(). If there isn’t we return the same result as for addAccount().
@Override
public Bundle getAuthToken(AccountAuthenticatorResponse response, Account account, String authTokenType, Bundle options) throws NetworkErrorException {

    // Extract the username and password from the Account Manager, and ask
    // the server for an appropriate AuthToken.
    final AccountManager am = AccountManager.get(mContext);

    String authToken = am.peekAuthToken(account, authTokenType);

    // Lets give another try to authenticate the user
    if (TextUtils.isEmpty(authToken)) {
        final String password = am.getPassword(account);
        if (password != null) {
            authToken = sServerAuthenticate.userSignIn(account.name, password, authTokenType);
        }
    }

    // If we get an authToken - we return it
    if (!TextUtils.isEmpty(authToken)) {
        final Bundle result = new Bundle();
        result.putString(AccountManager.KEY_ACCOUNT_NAME, account.name);
        result.putString(AccountManager.KEY_ACCOUNT_TYPE, account.type);
        result.putString(AccountManager.KEY_AUTHTOKEN, authToken);
        return result;
    }

    // If we get here, then we couldn't access the user's password - so we
    // need to re-prompt them for their credentials. We do that by creating
    // an intent to display our AuthenticatorActivity.
    final Intent intent = new Intent(mContext, AuthenticatorActivity.class);
    intent.putExtra(AccountManager.KEY_ACCOUNT_AUTHENTICATOR_RESPONSE, response);
    intent.putExtra(AuthenticatorActivity.ARG_ACCOUNT_TYPE, account.type);
    intent.putExtra(AuthenticatorActivity.ARG_AUTH_TYPE, authTokenType);
    final Bundle bundle = new Bundle();
    bundle.putParcelable(AccountManager.KEY_INTENT, intent);
    return bundle;
}
If the auth-token we got from this method is not valid anymore, because of time expiration or changed password from a different client, you need to invalidate the current auth-token on the AccountManager and ask for a token once again. Invalidating the current token is done by calling AccountManager#invalidateAuthToken(). The next call to getAuthToken() will try to log-in with the stored password and if it fails - the user will have to enter his credentials again.
So..where will the user enter his credentials? That’ll be in our derivation for AccountAuthenticatorActivity
Creating the Activity
Our AccountAuthenticatorActivity is the only direct interaction that we have with the user.
This activity will show the user a log-in form, authenticate him with our server, and return the result to the calling authenticator. The reason we extend from AccountAuthenticatorActivity, and not just from the regular Activity, is the setAccountAuthenticatorResult() method. This method is in charge of taking back the result from the authentication process on the activity and return it to the Authenticator, who called this activity in the first place. It saves us the need to keep a response interface to communicate with the Authenticator ourselves.
I built a simple username/password form on my Activity. You can use the Login Activity Template suggested on the Android site. When submitting I call this method:
public void submit() {
    final String userName = ((TextView) findViewById(R.id.accountName)).getText().toString();
    final String userPass = ((TextView) findViewById(R.id.accountPassword)).getText().toString();
    new AsyncTask<Void, Void, Intent>() {
        @Override
        protected Intent doInBackground(Void... params) {
            String authtoken = sServerAuthenticate.userSignIn(userName, userPass, mAuthTokenType);
            final Intent res = new Intent();
            res.putExtra(AccountManager.KEY_ACCOUNT_NAME, userName);
            res.putExtra(AccountManager.KEY_ACCOUNT_TYPE, ACCOUNT_TYPE);
            res.putExtra(AccountManager.KEY_AUTHTOKEN, authtoken);
            res.putExtra(PARAM_USER_PASS, userPass);
            return res;
        }
        @Override
        protected void onPostExecute(Intent intent) {
            finishLogin(intent);
        }
    }.execute();
}
sServerAuthenticate is the interface to our authenticating server. I implemented methods such as userSignIn and userSignUp that return the auth-token from the server, upon a successful log-in.
mAuthTokenType is the type of token that I request from the server. I can have the server give me different tokens for read-only or full access to an account, or even for different services within the same account. A good example is the Google account, which provides several auth-token types: “_Manage your calendars”, “Manage your _tasks”, “View your calendars” and more.. On this particular example I don’t do anything different for the various auth-token types.
When I finish, I call finishLogin():
private void finishLogin(Intent intent) {
    String accountName = intent.getStringExtra(AccountManager.KEY_ACCOUNT_NAME);
    String accountPassword = intent.getStringExtra(PARAM_USER_PASS);
    final Account account = new Account(accountName, intent.getStringExtra(AccountManager.KEY_ACCOUNT_TYPE));
    if (getIntent().getBooleanExtra(ARG_IS_ADDING_NEW_ACCOUNT, false)) {
        String authtoken = intent.getStringExtra(AccountManager.KEY_AUTHTOKEN);
        String authtokenType = mAuthTokenType;
        // Creating the account on the device and setting the auth token we got
        // (Not setting the auth token will cause another call to the server to authenticate the user)
        mAccountManager.addAccountExplicitly(account, accountPassword, null);
        mAccountManager.setAuthToken(account, authtokenType, authtoken);
    } else {
        mAccountManager.setPassword(account, accountPassword);
    }
    setAccountAuthenticatorResult(intent.getExtras());
    setResult(RESULT_OK, intent);
    finish();
}
This method gets a fresh auth-token and do the following:
-
Existing account with an invalidated auth-token - in this case, we already have a record on the AccountManager. The new auth-token will replace the old one without any action by you, but if the user had changed his password for that, you need to update the AccountManager with the new password too. This can be seen in the code above.
-
You add a new account to the device - that’s a tricky part. When creating an account, the auth-token is NOT saved immediately to the AccountManager, it needs to be saved explicitly. That’s why I’m setting the auth-token explicitly after adding the new account to the AccountManager. Failing to do so, makes the AccountManager do another trip to the server, when the getAuthToken method is called, and authenticating the user again.
Note: The third argument to addAccountExplicitly() is a “user data” Bundle, which can be used to store custom data, such as API key to your service, right with the other authentication related data on the AccountManager. This can also be set by using setUserData().
After the log-in process done by this Activity, we have the AccountManager all set up with our account. The call to setAccountAuthenticatorResult() returns the information back to the Authenticator.
Now we have the process ready to go, but who will start it? How will it gain access to it? We need to make our Authenticator available for all the apps that want to use it, including the Android settings screen. Since we also want it to run in the background (The log-in screen is optional), using a Service is the obvious choice.
Creating the Service
Our service will be very simple.
All we want to do, is letting other processes bind with our service and communicate with our Authenticator. Luckily for us, the AbstractAccountAuthenticator, which our Authenticator extends, has a getIBinder() method that returns an implementation to IBinder. Our service needs to call it on its onBind() method and that it! The basic implementation takes care of calling the appropriate methods on the Authenticator by the request of an outside process. To see how it’s actually done, you can take a look on Transport, an inner class of AbstractAccountAuthenticator and read about AIDL for inter-process communication.
Here’s how our service will look like:
public class UdinicAuthenticatorService extends Service {
    @Override
    public IBinder onBind(Intent intent) {
        UdinicAuthenticator authenticator = new UdinicAuthenticator(this);
        return authenticator.getIBinder();
    }
}
..and on the manifest we need to add our service with the
<service android:name=".authentication.UdinicAuthenticatorService">
    <intent-filter>
        <action android:name="android.accounts.AccountAuthenticator" />
    </intent-filter>
    <meta-data android:name="android.accounts.AccountAuthenticator"
               android:resource="@xml/authenticator" />
</service>
Simple, huh?
The authenticator.xml, that we link as a resource, is used to define some attributes for our Authenticator. That’s how it looks:
<account-authenticator xmlns:android="http://schemas.android.com/apk/res/android"
                       android:accountType="com.udinic.auth_example"
                       android:icon="@drawable/ic_udinic"
                       android:smallIcon="@drawable/ic_udinic"
                       android:label="@string/label"
                       android:accountPreferences="@xml/prefs"/>
Let’s explain some of them:
accountType is a unique name to identify our account type. Whenever some app wants to authenticate with us, it needs to use this name when approaching the AccountManager.
icon and smallIcon are icons for the account to be seen on the device’s Settings page and on the account approve page (more on that later).
label is the string that represent our account when listed on the device’s Setting’s page.
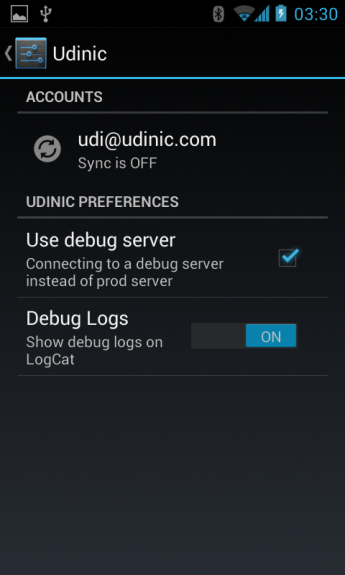
accountPreferences is a reference to a Preferences XML. This will be shown when accessing the account’s preferences from the device Settings screen, allowing the user more control over the account. You can check the stuff Google and Dropbox are letting you change about their account for some examples. Here’s an example of my own:
Random stuff you may want to know
During my investigation I ran into some interesting scenarios that I thought I’d share, keeping your hair intact while working with this API.
- Check existing account validity - If you want to get an auth-token for an account name that you stored yourself, check that this account still exist first by using the AccountManager#getAccounts*() methods. I’ll quote the AccountManager’s documentation:
“Requesting an auth token for an account no longer on the device results in an undefined failure.”
For me, the “undefined failure” was to bring the sign-in page and then do nothing after I submitted my credentials, so there you have it.
-
First in, first served - Let’s say you copied your authenticator’s code to 2 of your apps, thus sharing its logic, and altering the sign-in pages design on each app to fit the app it belongs to. In that case, the first installed app’s authenticator will be called for both apps when an auth-token will be requested. If you uninstall the first app, the second app’s authenticator will be called from now on (since it’s the only one now). A trick to overcome this will be to put both sign-in pages on the same authenticator, then use the addAccountOptions argument on the addAccount() method to pass your design requirment.
-
Sharing is caring..for security - If you try to get an auth-token from an authenticator that was created by a different app, which was signed using a different signing key, the user will have to explicitly approve this action. This is what the user will see:
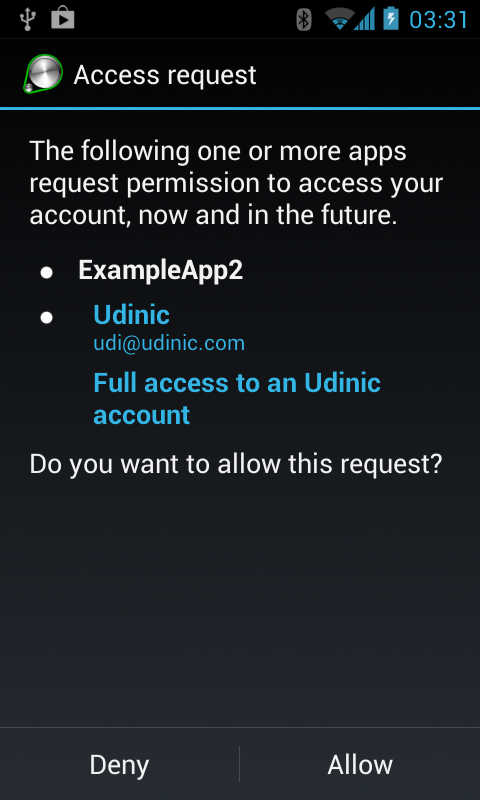
The “Full access to..” string is retrieved from the our Authenticator’s _getAuthTokenLabel(). _You can specify different labels for each auth-token type, being more user friendly on cases like this.
- Storing the password - The AccountManager is not secured by any encryption method. The passwords there are stored in plain text. You can’t peekAuthToken() to other Authenticators (You’ll get a “caller uid X is different than the authenticator’s uid”), but a root access and some adb commands will do the trick. In the sample code I’m storing the password for the convenience of auto-login the user in case of token expiration. It’s the ultimate trade-off between security and convenience. In most cases I would take the secure road, but for some it’s not worth the inconvenience caused to the user. If someone has a root access and can run adb commands on your device - he can do much more damage than accessing your user’s “high scores” table..
Now what?
Now that you got familiar with this great service, you can download from Google Play the sample authenticator that I wrote. It will allow you to create an “Udinic account” on your device. The authentication will be against a Parse.com account that I created for this cause. These are the options you get on the sample app:
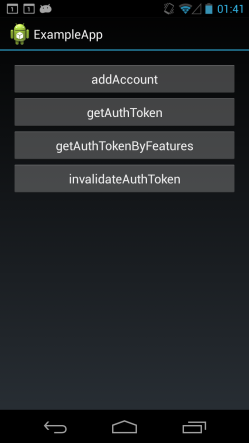
The getAuthToken button will query first all the Accounts from the type “Udinic” on the device. If there’s one, it’ll return its token by calling AccountManager#getAuthToken(). If there’s more than one, it’ll populate them on a dialog and let you choose which one you want.
The getAuthTokenByFeatures calls a cool convenient method on the AccountManager by the same name, that do all the work for you. It’ll query the AccountManager for accounts with the requested type, “Udinic”, and its behavior is as follows:
-
There are no accounts: Starts_ addAccount()_ to allow the user to add a new account. After that, it will automatically call getAuthToken() on the created account to get the token for it.
-
There’s one account: Get its auth token.
-
There are 2 accounts or more: Create an account picker dialog and return the token of the account the user picked.
If you want to invalidate the token, you can use the invalidateAuthToken button. Note: The Udinic authenticator knows how to recover from invalidated tokens, as seen previously on the sample code for getAuthToken(). Meaning, after invalidating the token the getAuthToken button will still return a token, but it’ll be only after he asks for it again from the server. You can confirm that by looking at the LogCat and see network communication to the server in that case. Removing the account is possible only through the device’s settings screen.
You can download the source code from GitHub: https://github.com/Udinic/AccountAuthenticator. There are 2 sample apps in there, allowing to play around with them since they both share the same Authenticator. For example: Use different signing keys for them and see the different flow for the user when one is asking for auth-token created by the other sample app. You can also try to create an apklib for the authenticator and reuse it across different apps. If you have a fix or a suggestion - don’t hesitate posting it here or as a Pull Request on GitHub.
- AbstractAccountAuthenticator ,
- Account ,
- Account Manager ,
- AccountAuthenticator ,
- AccountAuthenticatorActivity ,
- AccountManager ,
- addAccountExplicitly ,
- Android ,
- auth-token ,
- authentication ,
- authenticator ,
- authenticator.xml ,
- getAuthToken ,
- getAuthTokenByFeatures ,
- invalidateAuthToken ,
- OAuth2 ,
- peekAuthToken ,
- security ,
- setAccountAuthenticatorResult
