
The AOSP codebase in big.
Developing on the AOSP is not as simple as writing an app, where you execute a nice gradle target and poof! you see it on the device. So far in this series, we discussed how to get the AOSP code into our environment, and how to build this code into a sweet flashable Android image files. We can now fill in the missing piece – how to efficiently develop for such an enormous system.
In this post, I will cover:
-
Properly importing an AOSP repository into your source control
-
Use better ways to build modules and deploy to the device
-
Writing scripts for faster development process
I’ll use Git and Bash commands that you may not know, but can definitely search and learn as we go. You can also use this simple Bash scripting tutorial to get started.
Versioning our manifest
Before changing any repository on the manifest, I’ll make a small change on the manifest I worked with on my previous posts. The manifest was based on the master branch on Google’s git server. I want my manifest, and my entire AOSP system, to be based on a specific Android version, not the master branch. This will give me more control when new features are coming out to Google’s repository, and I’ll need to choose to migrate those changes into my system. It’s a best practice to avoid syncing new changes before they’ve been tested properly.
To do that, I’ll create a new folder and initialize the repo for the android version tag that I want, in this case - Android 4.4.3_r1.
$ cd tmp_folder
$ repo init -u https://android.googlesource.com/platform/manifest -b android-4.4.3_r1
Inside this folder, the .repo/manifest.xml file is the manifest file relevant for this version. We’ll merge that manifest with the one I currently have. You can take a look at the commit that I made to see the changes, which are basically just taking all the projects definition from the android-4.4.3_r1 tagged manifest, and adding my “udinic” remote.
The merged manifest is the one we’ll start using from now on. I created a separate branch for the updated manifest (not to interfere with the examples on my last posts), called “dev_branch”. Now I’ll re-initialize my working dir with the new branch and sync it, to get the latest changes from the android 4.4.3 version.
$ cd <working dir>
$ repo init -u git@github.com:Udinic/ucmod_manifest.git -b dev_branch
$ repo sync
Note: This is the exact procedure you’ll need to do to your manifest, when updating your AOSP system with a new version from Google’s servers. Meaning - if your ROM is based on Android 4.4.2, and now Android 4.4.4 came out, that’s the first step you need to do in order to apply those updates on your codebase. If there’ll be enough requests - I’ll post a complete guide for this process.
Now that we got that out of the way, let’s move on to do some real changes:
Bringin’ it home
Our first step – being able to “edit” an AOSP repository. We need to push an existing AOSP repository to our own source control, so we can push new changes. Basically - making it “our own”.
Copy a repository to my Github account
The first repository we want to make changes to, is the frameworks/base project. This project contains the entire Android framework code, with all the UI elements you see on your screen (Notification bar, Navigation Bar etc.).
We first need to create a new repository on the Github account that hosts our repositories; we’ll call it “ucmod_frameworks_base”. I used my account on Github, but you can use BitBucket or any other source control that you’d like, as long as you’re using Git.
After doing that - Let’s get some code inside.
$ cd <working dir>/frameworks/base
$ git status
HEAD detached at 36e356c nothing to commit, working directory clean
Running git status inside that folder is showing that we’re currently on “detached HEAD mode”. This means that we’re aren’t standing on any branch for this repository, and need to checkout a branch before being able to commit anything. This is a safe state, helping to avoid committing changes that we may not want to commit. The current checked-out revision for the repository, is the one stated on the manifest file for this specific project. In our case - the one that’s tagged with the android-4.4.3_r1 tag. Before we can push the frameworks/base code, we need to create a branch. This will be our “development branch”, from which we’ll branch out and merge back in when developing.
A few words on “development branches” in general - some developers/companies prefer to use the “master” branch as a development branch, and some prefer using a separate branch, from which all feature branches will be created and merged back into after the work on them was done. In that case, the master branch can be used to hold the most stable version or even not be used at all. There are other options of course, each with its own pros/cons, and your decision should depend on the project’s size, architecture, team size and more.
My development branch will be called udi-dev. That’s how I’m creating and pushing it:
$ git checkout -b udi-dev
$ git remote add udinic git@github.com:Udinic/ucmod_frameworks_base.git
$ git push udinic udi-dev
These commands will:
-
Create a new branch called udi-dev, from the existing revision.
-
Add a new remote called “udinic” to point the repository I just created under my Github account.
-
Push my development branch into the new remote.
This process will take a while, since this is a big repository. In the meantime, we can update our manifest to point the frameworks/base project to the new repository.
Updating the manifest
We’ll go to the dev_branch branch on the manifest project, and edit the frameworks/base project from:
<project path="frameworks/base" name="platform/frameworks/base"/>to be
<project path="frameworks/base" name="ucmod_frameworks_base" remote="udinic" revision="udi-dev"/>The new project definition will take the ucmod_frameworks_base repository from the udinic remote, in the “udi-dev” revision - the development branch we created earlier for this project.
Making some changes
To start coding, I’ll open the entire AOSP codebase on my Android Studio. Yes, it’s possible and there are even scripts in the AOSP system to help us do that.
Opening the codebase in the IDE
I use Android Studio and I’m sure many of you do too.
I’ve found these great instructions very helpful for opening the AOSP codebase in Android Studio. They are meant for opening the CyanogenMod codebase, but it’s using scripts that are available as part of the AOSP. As I mentioned in one of my Google+ posts, I did do something different than the original instructions, so you’re welcome to use my advice when using these instructions.
The codebase is big and might take a couple of mins. to index when first opening it. Usually it works pretty smoothly after that. If you feel it’s really slow to operate - turn on the “Power save mode” from the “File” menu. This will turn off features like auto-compilation, auto-import and other stuff that could hang when working on large codebases.
Workin’ Workin’
As the first change to our new ROM, I wanted to pick something simple, yet visual.
There’s a small text item on the status bar that appears whenever there’s no service at the moment, letting us know we can only make emergency calls. This text item is not shown at all in all other cases. Here’s how it looks like when it does:
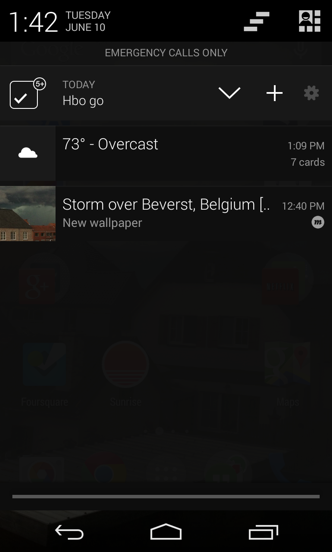
We can use that text item to put something of our own, when not used for this purpose. For example, I thought it could be a nice place to put a small branding text, such as my website. But in order to do that - I need to figure out where is it being created. I used Hierarchy Viewer to locate the TextView and after a short investigation - found it in the PhoneStatusBar.java file, in the makeStatusBarView() method. Here’s a snippet of how it’s initialized:
final boolean isAPhone = mNetworkController.hasVoiceCallingFeature();
if (isAPhone) {
 mEmergencyCallLabel =
 (TextView) mStatusBarWindow.findViewById(R.id.emergency_calls_only);

 if (mEmergencyCallLabel != null) {
   mNetworkController.addEmergencyLabelView(mEmergencyCallLabel);
   ...
 }
}
The first thing we notice - it’s shown only if the current device has a voice calling feature. A Wifi only tablet will never show this text item. We’ll modify the code to show the text view, with the text I want, and do that for every device.
1
2
3
4
5
6
7
8
9
10
11
12
13
14
15
16
17
 if (isAPhone) {
   mEmergencyCallLabel =
     (TextView) mStatusBarWindow.findViewById(R.id.emergency_calls_only);

   if (mEmergencyCallLabel != null) {
     mEmergencyCallLabel.setVisibility(View.VISIBLE);
     mEmergencyCallLabel.setText("http://www.udinic.com");
      ...
   }
 } else {
   mEmergencyCallLabel =
     (TextView) mStatusBarWindow.findViewById(R.id.emergency_calls_only);
   if (mEmergencyCallLabel != null) {
     mEmergencyCallLabel.setVisibility(View.VISIBLE);
     mEmergencyCallLabel.setText("http://www.udinic.com");
   }
 }
Whether we’re running on a phone or a wifi only tablet, we will always show the URL to my website in the status bar. This is not a robust solution, or even a well-written one, but I’m keeping it that way for simplicity.
Building
Remember how we bring those changes to the device? If you read my last post, you’d know already how to build our codebase into something we can flash on a device. Go refresh your memory if you don’t remember.
I’ll test the code on my Wifi only Nexus 7 2013, so I’ll run
$ source build/envsetup.sh
$ lunch full_flo-eng
$ make -j16
and flash
$ adb reboot bootloader  // Put the device in fastboot mode
$ fastboot flashall -w      // Flashes the images created
The result:

Rapid development on AOSP
That was nice huh?
But you know what? Now that I look at it, I think that I might go with a shorter text, something like “UdinicMod”. But wait a second! I just spent a few minutes to get this working, do we really need to run make and flash it for every simple change we make?!
Well..no.
Luckily, we have options to make the process more efficient and much shorter. To learn how, we first need to understand how things are structured within the build system.
Modules in the AOSP system
Every project in our codebase can introduce one or more modules. These can be apps, libraries, services and more. Every module is declared in the Android.mk file, located inside the project’s folder, along with all its source files. Every Android.mk file can declare one or more modules. The Android.mk file contain all the instructions needed to build its modules. When running make -j16, the build system is basically invoking all the Android.mk files in the system, relevant to the selected build variant and with respect for dependencies of course.
Under the framewoks/base folder we have a few modules declared in separate Android.mk files:
-
In the frameworks/base/Android.mk file, we have the “framework” and “framework2” modules (separated to overcome the Dex’s 64K methods limitation) among other smaller modules.
-
Under the frameworks/base/services/java we’ll find the “services” module, containing system services; Services such as media, location, connectivity, input and more.
-
Under the the frameworks/base/packages/SystemUI we’ll find the “SystemUI” module, which is an apk with the System’s UI, including the status bar, navigation bar and more.
-
Under frameworks/base/core/res lays the frameworks-res module, containing framework resource files such as strings, drawables, dimensions and more.
-
Many more… Just run: find . -name “Android.mk” inside the framework/base folder to see all of them.
The change I made earlier is part of the SystemUI module. Let’s continue and see how can we build just that one.
Building specific modules
Since we usually work on a single module, we basically need to build just that. Running make -j16 will try to build all the projects in the system. Since the vast majority of them haven’t changed - nothing will be built. Since there are so many of them, it’ll take time to finish “building” everything.
When running the source build/envsetup.sh command, we add some useful function for our day-to-day development. Here is a list of functions coming with the AOSP (seeing by the command hmm):
- lunch: lunch <product_name>-<build_variant>
- tapas: tapas [
...] [arm|x86|mips|armv5] [eng|userdebug|user] - croot: Changes directory to the top of the tree.
- m: Makes from the top of the tree.
- mm: Builds all of the modules in the current directory, but not their dependencies.
- mmm: Builds all of the modules in the supplied directories, but not their dependencies.
- mma: Builds all of the modules in the current directory, and their dependencies.
- mmma: Builds all of the modules in the supplied directories, and their dependencies.
- cgrep: Greps on all local C/C++ files.
- jgrep: Greps on all local Java files.
- resgrep: Greps on all local res/*.xml files.
- godir: Go to the directory containing a file.
If the description is not enough, you can always see the source code for those functions. The most helpful functions, in my mind, are the croot, lunch and the mm/mmm functions.
The mm function will build the project that we’re currently standing in. The mmm function will take a list of projects folders to build, and build them. Here are some examples:
$ cd <working directory>
$ mmm packages/apps/Email        // Build the Email app
$ cd packages
$ mmm apps/Email apps/Music    // Build the Email and Music apps
$ cd apps/Email
$ mm                                                   // Build the Email app
Note: Sending more than one path to the mmm function is available only when running on Bash. I’m using Zsh (along with the highly recommended Oh-my-Zsh) and it’s not working for me, due to the way the function works internally. As a workaround, you can run “mmm path1 && mmm path2”.
The mma/mmma functions are doing the same, only they are also building the depended modules. Since there’s a need to create some sort of dependency graph for those, in order to see who depends on what, these functions are naturally slower than the mm/mmm functions. In most cases you’ll be working on a single module, therefore there’s no need to search for its depended modules. Even if there are dependencies you need to build, you would probably know about them and can build them by yourself using the mm/mmm functions, instead of wasting everyone’s time building a dependency graph.
As mentioned earlier, if the module hasn’t changed - nothing will be done. But we do have the option to rebuild, using the -B switch. For example:
$ mmm packages/apps/Email -BSince our new feature is part of the SystemUI module, we need to run the following command in order to build it:
$ mmm frameworks/base/packages/SystemUISo now we have the updated module, but we still need to transfer that module into the device somehow. Let’s review our options for that too.
Updating the device
Want to get those freshly built modules into your device? Here are 2 ways for you to do that:
Recreating the system image files
The make -j16 command has given us several image files, which we flashed using the notorious fastboot flashall command. Since we’re building only specific modules, we need another way to generate those image files. For that, we have another make target, called “snod” (= “System no dependencies”). When running:
$ make snodWe’re re-creating the system image file from the modules that are already built. This command won’t build anything, just create the image file. After that, we can flash using the regular fastboot flashall command.
This command is much faster than running the regular make -j16, with less than a minute of runtime (in compare to a few minutes).
Syncing the changes directly
The previous method is faster than running the full make, but we still have the overhead of the image flashing, which also takes time. There’s an even better way than that, by syncing the changes directly to the device. No flashing is required and not even a full restart of the device!
To do that, we’ll simply run
$ adb syncWhat it does, is checking what are the modules that were changed, in compare to what’s already on the device, and copies them.
If you’re not working on any of the framework modules, you don’t need to do anything after running the adb sync command, and the device should run your code without a problem. If you did make some changes to the framework modules, you need to reload them because they are in use. You can restart the device, but you can simply just restart the Shell, which restarts the framework and other operation system components. Restarting the Shell is quicker than restarting the device and in most cases - that’s all you’ll ever need.
Since we’re just copying files and not flashing an entire image, and we also get away from doing a full restart to the device, this process is way shorter.
How short you ask?
The regular make -j16 and flash process takes around 5 minutes to complete on my machine. The make snod and flash process takes around 2 minutes. The adb sync process takes less than 30 seconds!
So to recap that, we can do our change on the PhoneStatusBar.java file and run the following commands to update the device:
$ mmm frameworks/base/packages/SystemUI        // build the SystemUI module
$ adb sync              // Sync the updated module to the device
$ adb shell stop     // Stopping the shell
$ adb shell start    // Starting the shell again
And all that will take less than 30 seconds!
YRMV.
Automate our lives
After we saw there are faster ways to develop on AOSP, we can now create some helper functions to help us do that easier.
I got inspired by some of the functions in the CyanogenMod’s envsetup.sh script, especially the dopush function, which accepts another build function and pushes the changes to the device. For example:
$ dopush mmm packages/apps/MusicI ported it into my Envsetup.sh file, and modified the way it works a little. This is my implementation:
-
Check that a device is connected
-
Run the function that we got as parameter (e.g. “mmm packages/apps/Music”)
-
Run_ adb sync_ to sync all the built modules
-
If one of those modules is a framework one - restart the shell
-
Print a summery with the number of synced files
I also defined aliases for faster workflow:
alias mmp='dopush mm'
alias mmmp='dopush mmm'
Now I can simply run this, to build the module and push to the device:
$ mmmp packages/apps/MusicSince sometimes I change several framework modules at a time, I created an alias to help me build them all, and push the changes to the device.
alias mfwk='mmm frameworks/base/core/res frameworks/base frameworks/base/services/java frameworks/base/packages/SystemUI'alias mfwkp='dopush mmm frameworks/base/core/res frameworks/base frameworks/base/services/java frameworks/base/packages/SystemUI'Here I’m building all the framework modules I introduces earlier, and after that I push them to the device. The dopush script will restart the shell in order for my changes to apply.
The changes were committed to the envsetup.sh in the build project of udinicmod. That project was also added to my github in the same way as I did for the frameworks/base project. If you have other commands that you find yourself writing over and over again, you can add new alias or scripts to your envsetup.sh file too. If you feel other can use them - you’re more than welcome to share :)
Tips
Some random tips you can use:
Creating a feature branch on multiple projects
If your feature requires changes on more than one project, you can use the repo start command to start a feature branch on all of them at once. The syntax is:
repo start feature_branch_name PROJ1_name [,PROJ2_name, PROJ2_name…]
The project name is the same name used in the manifest file. For example:
$ repo start brand_ucmod ucmod_frameworks_baseThe repo start is almost identical to just running git checkout -b branch_name, but it also set some properties needed by the git upload command, which is relevant if you’re using Gerrit for code review. Gerrit is out of the scope of this post.
Playing with the manifest file
If you need to edit your manifest file, whether for adding new repositories or editing existing ones, you have 2 options:
-
Clone your own copy of the manifest project, edit it, commit+push and then repo sync your AOSP workspace.
-
Work on the clone you already have inside your working directory, inside _
/.repo/manifests_
Using the second option will allow you to easily test changes you make, without the need to commit and push every time. As long as you stay on the default branch, which is the initialized branch that the repo init command set. If you change branches, to apply your change to a specific branch, you can reset to the default branch by running the repo init command again.
Conclusion
The purpose of this 3-part series was to show that AOSP development is not hard. It does require learning to use new tools and operate a different build system, but it’s not really complicated.
Getting to know the AOSP allows you to know more about how Android work, and developing on it will give you the freedom to take a adjust Android as you want it, to answer all your needs. The possibilities are endless, just think what you really need and work on that. You can also contribute directly to the AOSP project or to other open source AOSP forks, such as the popular CyanogenMod. You feature could get large exposure and many users could benefit from it.
I hope things were clear enough to understand. Questions and suggestions are always welcome on the comments section.
- .repo/manifests ,
- adb shell start ,
- adb shell stop ,
- adb sync ,
- Android ROM ,
- android studio ,
- android.mk ,
- AOSP ,
- aosp module ,
- build fast ,
- build/envsetup.sh ,
- croot ,
- cyanogenmod ,
- detached head ,
- development branch ,
- dopush ,
- efficient development ,
- emergency calls only ,
- emergency_calls_only ,
- envsetup ,
- fast ,
- framework ,
- framework2 ,
- frameworks/base ,
- frameworks/base/packages/SystemUI ,
- frameworks/base/services/java ,
- git add remote ,
- git checkout HEAD~0 ,
- github ,
- hierarchy viewer ,
- lunch ,
- make -j16 ,
- make snod ,
- makeStatusBarView ,
- manifest ,
- mfwk ,
- mfwkp ,
- mm ,
- mma ,
- mmm ,
- mmma ,
- mmmp ,
- mmp ,
- navigation bar ,
- PhoneStatusBar ,
- platform_frameworks_base ,
- repo ,
- repo init ,
- repo start ,
- repo sync ,
- status bar ,
- system no dependencies ,
- systemui ,
- udinicmod
