On my last post on the subject, Write your own Android Authenticator, we embarked on a journey to the unfamiliar part of authentication on Android. I received many positive responses about it from you all, and it seems I really helped a lot of people to get to know this feature well.
Since then, I had a lot of stuff going on in my life (getting married is one of them) which delayed the release of this obvious sequel. On this post, our journey continues to another not-well-documented area, which goes hand-in-hand with our own authenticator. It’s no other than the notorious SyncAdapter. I’ll show you how to make your app more efficient and robust when it comes to data synchronization, by using sync adapters. The web doesn’t have all the information I’d hope to find about it. I felt like I need to give this feature another one of my in-depth researches, see what this feature is all about, how it works, how to write one, and finally – report back.

In the screenshot: That’s how a sync adapter looks on the account screen, under the device’s Settings screen.
First, I’ll explain the benefits of the sync adapter. Then, how it works and after that how to build and monitor it. Finally, I’ll introduce the sample app I wrote, demonstrating how the sync adapter works, and also allowing you to play with its settings to learn from experience.
Terra Incognita
So what is this SyncAdapter?
A SyncAdapter is a plug-in that handles background syncs. It’s usually needed to sync data from your app to a server. This plug-in is registered on the platform’s Sync Manager, which is in charge of running it. It’s triggered when needed, requested or scheduled.
Some of you may think about writing a simple Service/IntentService to do that task. But, writing a SyncAdapter has many advantages over that and other similar approaches:
-
Battery efficiency – The system schedules the sync to run when other syncs run, or when some other network request was already made on the device. This prevents awaking the device from its sleep for performing a single sync.
-
Interface – All sync adapter on the device can be accessed from the Settings screen, under the account they are tied to. This gives the end user the option to change sync preferences, see if there are any sync problem or even disable the sync.
-
Content awareness – If we use ContentProvider for accessing/manipulating our data, the sync adapter can observe any changes done to it. That way it can run only when the data **actually **changes.
-
Retry mechanism – The sync manager has its implementation to retry failed syncs, using timeouts and exponential back offs. All those to conserve battery and sync your data as soon as possible.
And you get all that for free!
The fine print is that you need to learn how to write one, which was not easy until recently. The documentation got improved since this feature was introduced on Android 2.0 (API level 5), and there’s even a training chapter on the Android developers site. But, even combined with the SampleSyncAdapter by Google (comes with the SDK), it’s still not simple to understand how to create your own adapter to fit your needs. There are many unanswered question about its properties, and how it operates under certain circumstances.
How the sync adapter works
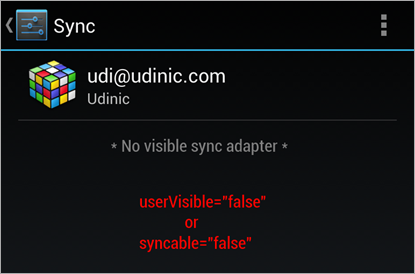
The sync adapter has 2 main properties: syncable and auto-sync. The syncable property is the enabled state for the sync adapter. A syncable=false adapter cannot sync automatically or manually, and won’t be seen in the device’s Settings screen. The _auto-sync _property determine if the sync adapter should sync automatically, which will be discussed next:
Automatic sync
We can set the sync adapter to run automatically, which means it’ll trigger whenever it’s needed. By default, all SyncAdapters with auto-sync=ON will be triggered every 24 hours. But, they can also run when there is a change to our data, notified by the content provider. We’ll get back to how it’s actually done later.
The auto-sync setting cannot be ON by default, but can be set programmatically by calling setSyncAutomatically(), or by the user on the device’s Settings screen. Here’s how it looks when the sync is off and then on:
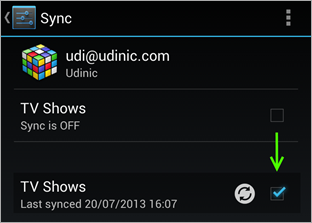 Note: A sync request will be submitted when this setting changes from OFF to ON.
Periodic Sync
If you need to check up on your server once in a while, see if it has new data for us, you can call addPeriodicSync() and get our sync adapter to run periodically. The sync requests won’t **be fulfilled **exactly **when the time period has passed, but on the closes battery efficient moment to that time. Note: A periodic sync can only be run if its auto-sync setting is ON **and it’s syncable=true.
A better approach to this problem will be to use GCM (Google Cloud Messaging). The server can send push notification to the device(s) whenever there’s a change the client needs to know about. On the client, we request a sync manually upon receiving such message. It’s more battery efficient and we get updated as soon as our server is, without waiting for the next sync cycle.
Manual Sync
If we have our own way knowing the data has changes, or we just want to implement a simple “Refresh”/”Sync Now” button on our app, we can request a manual sync. For that, we use requestSync(). Besides the usual account _and _authority, we also pass as an argument extras to specify parameters to describe a more specific request. If we have no special requests, the system will run our sync after it gathers other sync or network tasks to run at the same time, for battery efficiency. The auto-sync setting must also be ON for that to work. To override these constraints, you can use the extras:
SYNC_EXTRAS_MANUAL – will force a sync, even if the auto-sync setting is OFF. SYNC_EXTRAS_EXPEDITED – will start the sync immediately, no waiting for the system to find optimal moment for that.
This function cannot override the syncable= false setting. If the sync adapter is not syncable, there’s no way to run the sync.
Canceling
We have the option to cancel a sync request, by calling cancelSync(). If the sync adapter is in “Pending” state, which means it hasn’t started yet, it’ll be canceled immediately and become “Idle”. If it’s already running, the onSyncCanceled() method on the sync adapter will be called. You can use it, for example, to set a “isSyncStopped” flag that the onPerformSync() will check regularly and respond to.
Building the Sync Adapter
After learning more about the way it works, we can now build our sync adapter. We’ll do that in 4 steps:
-
Creating the account authenticator and content provider - the sync adapter will later authenticate with one and listens to changes of the other.
-
Writing the sync adapter class – where all the syncing algorithm goes.
-
Creating the Sync Service – under its context the sync adapter will run.
-
Connecting all the pieces – introduce the account authenticator and content provider to the sync adapter, and make them all work together.
Creating the account authenticator and content provider
The sync adapter will access the local data, represented by a ContentProvider, and contact the server using an auth token retrieved from the app’s Authenticator. Using these mechanisms will make our lives easier and our code simpler and robust.
But they aren’t mandatory!
The sync adapter requires you to **declare **an account type and a ContentProvider to be tied with it, but it doesn’t mean that you actually need to use them. For each of these, I’ll show you how to easily create a stub, among a list of reasons why you should just get the real deal.
Account Authenticator is the component that handles a specific account type. It will authenticate the users with their credentials against the server, hold the auth-token retrieved from the server and will raise a login screen upon token/password invalidation. I strongly recommend writing an authenticator to your app, making it robust to all those loose ends that nobody take care of when implementing your own simple user log-in/register. This is the reason I wrote my last post about the benefits of the Account Authenticator and a step-by-step guide to create one of your own. If all that didn’t convince you, just go ahead and write a stub authenticator using this great guide.
**ContentProvider **is a component that manages the access to your data. Content providers have the ability to control access from outside or inside the app, allowing you to easily and securely share data. They also has standard API to register for data changes, using ContentObserver. You can learn more about content providers and see how to create one in this official guide or from this blog post. Examples for content providers: Accessing your device’s Contacts and Calendar is done by a content provider. Even for Any.do, we recently published a read only content provider for tasks. If all that also didn’t convince you that you need one, you can create a stub content provider using this guide.
Writing the sync adapter
The sync adapter itself is a subclass of AbstractThreadedSyncAdapter. The most important method there is onPerformSync(), called by the sync manager when it’s sync time. This method operates from a background thread, so no worries while doing network calls.
A sync adapter can be tied to one account type on the device, but there could be multiple users signed in to this account type. For example, you can connect with more than one Google account on your device, and the “Calendar” for both accounts will be synced to your device, using sync adapters. This method receives as an argument the current account the sync manager has requested the sync for.
Let’s see an example for such class:
public class TvShowsSyncAdapter extends AbstractThreadedSyncAdapter {
    private final AccountManager mAccountManager;

    public TvShowsSyncAdapter(Context context, boolean autoInitialize) {
        super(context, autoInitialize);
        mAccountManager = AccountManager.get(context);
    }

    @Override
    public void onPerformSync(Account account, Bundle extras, String authority, ContentProviderClient provider, SyncResult syncResult) {
        Log.d("udinic", "onPerformSync for account[" + account.name + "]");
        try {
            // Get the auth token for the current account
            String authToken = mAccountManager.blockingGetAuthToken(account, AccountGeneral.AUTHTOKEN_TYPE_FULL_ACCESS, true);
            ParseComServerAccessor parseComService = new ParseComServerAccessor();

            // Get shows from the remote server
            List remoteTvShows = parseComService.getShows(authToken);

            // Get shows from the local storage
            ArrayList localTvShows = new ArrayList();
            Cursor curTvShows = provider.query(TvShowsContract.CONTENT_URI, null, null, null, null);
            if (curTvShows != null) {
                while (curTvShows.moveToNext()) {
                    localTvShows.add(TvShow.fromCursor(curTvShows));
                }
                curTvShows.close();
            }
            // TODO See what Local shows are missing on Remote

            // TODO See what Remote shows are missing on Local

            // TODO Updating remote tv shows

            // TODO Updating local tv shows

        } catch (Exception e) {
            e.printStackTrace();
        }
    }
}
The sync adapter I chose to write is syncing TV shows information from the device to a server, and vice versa. I created a ContentProvider to hold the records locally, and a Parse.comaccount to store the records remotely.
The syncing algorithm is completely under your responsibility. The sync adapter is only in charge of running your code, it has no idea how your data should be synced with the server, so it’s your job to get it right. There are sample algorithms for common sync tasks on the web, for you to “get inspired” when designing your algorithm.
To communicate with our server, we need an auth token, so we first call blockingGetAuthToken(), which is doing the same as getAuthToken_() _but done synchronously, since we’re already running on a background thread. The last parameter for this method is notifyAuthFailue and if set to “true” it will raise a notification to the user in case there was an authentication problem, such as an invalidated auth token.
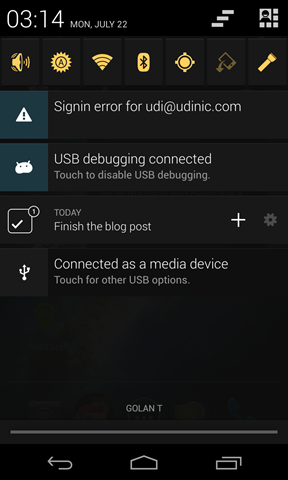
Once the user click on that notification, the authenticator’s default sign in activity will show and ask him for credentials. After the user identify himself, the auth token gets renewed and the sync is working again! To learn more about invalidating tokens and showing a default sign in activity from the authenticator, see my previous post about account authenticators.
Note: On my sample app, I built a smart re-login mechanism for my authenticator, which auto sign-in the user in case of a token invalidation. That means this problem will occur only after the token has been invalidated **and **the password was changes on the server. See the getAuthToken() method on UdinicAuthenticator for more information.
Creating the Sync Service
The sync adapter, as for the Account Authenticator, also needs a Service to operate in. We need to create it ourselves in order for the sync adapter to be run on the same UID (user-id) as our app. This privilege gives the sync adapter access to our app’s resources, such as the account information and ContentProvider.
The Service is pretty simple and only needs to instantiate our sync adapter upon creation.
public class TvShowsSyncService extends Service {

    private static final Object sSyncAdapterLock = new Object();
    private static TvShowsSyncAdapter sSyncAdapter = null;

    @Override
    public void onCreate() {
        synchronized (sSyncAdapterLock) {
            if (sSyncAdapter == null)
                sSyncAdapter = new TvShowsSyncAdapter(getApplicationContext(), true);
        }
    }

    @Override
    public IBinder onBind(Intent intent) {
        return sSyncAdapter.getSyncAdapterBinder();
    }
}
Connecting the pieces
Connecting between the sync adapter, the account authenticator and the content provider, is done using the XML definition of the sync adapter. This XML is a resource, as the strings.xml and the layout files, that’s why it’s going into the “res” folder under a folder called “xml”.
<sync-adapter xmlns:android="http://schemas.android.com/apk/res/android"
              android:contentAuthority="com.udinic.tvshows.provider"
              android:accountType="com.udinic.sync_example"
              android:userVisible="true"
              android:allowParallelSyncs="false"
              android:isAlwaysSyncable="false"
              android:supportsUploading="true"/>
Let’s review the attributes:
contentAuthority is the authority for our content provider. Also defined in the <provider> tag in the Android Manifest.xml, with the rest of the content provider’s attributes.
accountType is the account type that is tied with our sync adapter. It’s also defined in the authenticator’s xml, with the rest of the authenticator’s attributes.
allowParallelSyncs will allow this sync adapter to handle syncs for multiple accounts at the same time. If you use a common resource for those syncs and parallel syncs will cause problems – you can keep this setting to “false”. Furthermore, if you want to disallow adding more than one account, preventing this situations entirely, you can return an error code on the authenticator’s addAccount() in such case.
userVisible will determine if the user can see our sync adapter on the device’s Settings screen.
isAlwaysSyncable sets the adapter to be syncable=true by default for every new account the user adds. This property can be override from code with setIsSyncable()__.
supportUploading will start a sync whenever there was a change to the content provider, with a special argument that hint the sync adapter only to upload the changes. The ContentResolver.SYNC_EXTRAS_UPLOAD will be inside the extras passed to the onPerformSync(), and you can use it to optimize your sync adapter not to perform a full sync, but just to update your server. The content provider notifies there was a change by calling notifyChange(), which its 3rd argument determine if the sync will be requested for this change. That way, you can fine-tune your sync requests to the changes that really needs immediate sync to the server.
A reference to the xml is sent as meta data to the sync adapter service, when declaring the service on the AndroidManifest.xml:
<service
        android:name=".syncadapter.TvShowsSyncService"
        android:exported="true">
    <intent-filter>
        <action android:name="android.content.SyncAdapter" />
    </intent-filter>
    <meta-data
            android:name="android.content.SyncAdapter"
            android:resource="@xml/sync_adapter" />
</service>
Relevant permissions to ask for on the AndroidManifest.xml:
WRITE_SYNC_SETTINGS – Gives us the right to add a sync adapter to the system. Mandatory. READ_SYNC_SETTINGS – Allows us to read the sync adapter’s settings, such as isSyncable _or _syncAutomatically. READ_SYNC_STATS – Helps us get the sync state, if it’s currently syncing, pending or idle.
If you want to add sync settings of your own, the kind your users can change, you can use the accountPreferences property in the authenticator xml. You can also read about it on my last post about authenticators.
Note: The sync adapter’s name, as it shows on the Settings screen, is the content provider’s name as defined in the <provider> tag in the AndroidManifest.xml.
Results and progress
SyncStatusObserver
If you need to know what your sync adapter is up to, you can register a SyncStatusObserver by calling addStatusChangeListener(), and removing it with removeStatusChangeListener(). It will trigger for **any **sync adapter status change, not just yours. Meaning, you need to check every time you get a callback the status of your sync adapter, by using isSyncActive() and isSyncPending(). You cannot catch those events on a background thread, unless you use a Service that runs all the time, which is a bad practice and a bad idea in general. For such a case, you can just send your own broadcast intents when the sync starts or ends (you implement the sync algorithm remember?). You can also do a little more and send progress intents, helping to give the user a more visual way of the sync progress, when he’s interacting with your app. Don’t forget that sending intents has a system overhead. Don’t send a progress update intent for every 1 percent of sync progress.
SyncResult and Errors
While the sync process is running, we can update the SyncResult object, which is received as an argument for the onPerformSync() method, the problems and statistics of the sync process. This data is used by the sync manager to determine if the sync was successful or not, and helps determine when to run the next sync, if at all. The SyncStats _object, inside the _SyncResult object, holds that information as counters for the number of exceptions for each type (e.g. numAuthExceptions, numIoExceptions etc.). Depending on the type of error, soft or hard, it decides what to do. You can see which error is considered to be hard or soft be reviewing the SyncStats class.
For hard errors, such as authentication exceptions, it will show an error mark on the sync adapter’s screen on the device’s Settings:
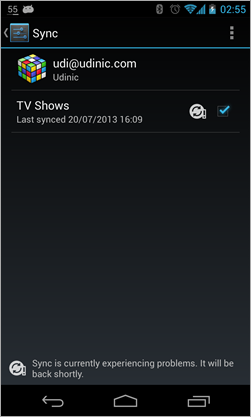
For soft errors, the sync manager will run the sync again later. The time of the next run will be calculated by the sync manager using a backoff algorithm.
The other statistics members, such as numInserts, numUpdates etc., are not saved anywhere, and merely needed to see if there was **some **progress on the sync operation. This information will help the sync manager decide what to do in case of an error (schedule another sync or wait for user action).
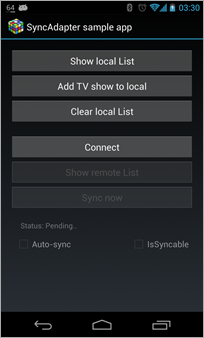
Using the sample app
The sample app is intended to understand the concept of sync adapters. I wrote a simple app that holds a local list of TV shows and syncs them with a Parse.com server, using its REST API. The content provider is a simple provider, managing one table with 2 columns: TV show title and release year.
 ]
] 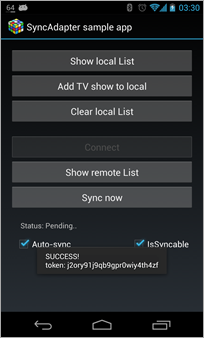
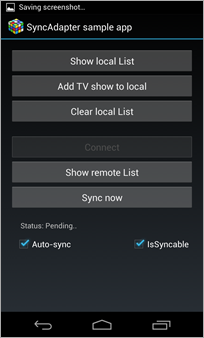
Once connected, you’ll have access to all the sync adapter’s options. You can “Sync now”, change the “syncable” and “auto-sync” settings and also see the current status of the sync adapter (Pending, Syncing, Idle).
If there’s no “Udinic” account logged-in, you will receive a log-in screen when pressing the “Connect” button. Removing accounts can be done from the Settings screen.
The sync algorithm is very simple – it checks which TV shows are on the local list, but not on the remote list, and vice versa, then it sync the missed TV shows between the client and the server. A new TV show can be added to the local list using the “Add TV show to local” button, which randomly picks a TV show from a resource file, created by scraping Wikipedia’s “List of American television series” (if you’re interested, the script I created for this task can be found here).
I encourage you to experiment with the settings, add shows, force syncs, remove and add accounts etc. This is the best way to really know the sync adapter and they way it works.
The full source code can be found on my GitHub.
The sample app can also be downloaded from Google Play.
More information
You can never learn enough. Follow these links to learn more:
Android Protips 3: Making apps work like magic_, by Reto Meier _– Great tips to consider when developing an app, sync adapters are among them (min. ~49). Reto explains how to implement one with stub account authenticator and content provider, and also admits its not a very documented feature :)
Transferring Data Using Sync Adapters, on the Android Developers website – explains the steps to create a sync adapter with stub authenticator and content provider.
Writing your own Content Provider, by Wolfram Rittmeyer – Great tutorial to write your own content provider, which you need for your sync adapter.
Write your own Android Authenticator, by Me – My last post about writing your own authenticator, which you also need for your sync adapter.
I hope you have found this post useful. As always – you can comment here with questions/idea/corrections.
- AbstractThreadedSyncAdapter ,
- account authenticator ,
- accountType ,
- addPeriodicSync ,
- allowParallelSyncs ,
- Android ,
- android authenticator ,
- Any.DO ,
- auth-token ,
- authtoken ,
- blockingGetAuthToken ,
- contentAuthority ,
- ContentProvider ,
- getAuthToken ,
- isAlwaysSyncable ,
- isSyncActive ,
- notifyChange ,
- onPerformSync ,
- onSyncCanceled ,
- performance ,
- python ,
- READ_SYNC_SETTINGS ,
- READ_SYNC_STATS ,
- SampleSyncAdapter ,
- setSyncAutomatically ,
- supportUploading ,
- sync adapter ,
- sync data ,
- sync manager ,
- sync service ,
- syncadapter ,
- SyncResult ,
- SyncStats ,
- SyncStatusObserver ,
- SYNC_EXTRAS_EXPEDITED ,
- SYNC_EXTRAS_MANUAL ,
- SYNC_EXTRAS_UPLOAD ,
- WRITE_SYNC_SETTINGS
