Watching TV is one of my favorite activities, but I noticed it’s become too easy for kids (and adults) to fall into the endless loop of short, addictive YouTube videos instead of enjoying a thoughtful episode of a TV show or diving into an adventure movie. I got tired of seeing my kids glued to the screen watching yet another YouTuber attempt a ridiculous “Fast-Food Challenge.”
So I decided to make good content more accessible - and fun to play. The result: watching content on the TV by scanning physical Movie Cards with NFC. I call it CardFlix.
This project was a great opportunity to involve my kids in electronics, showing them how to make something truly useful by building it together.
The scanner runs on ESPHome - a framework that makes creating custom smart devices surprisingly simple, and connects to my Home Assistant smart home setup. With my kids’ help, we created over 50 cards covering all their favorite shows and movies, and the collection keeps growing. It was such a hit that I built a second scanner for another room in our house. To make the scanner blend in, I designed and 3D-printed a small enclosure that matches the décor of the room while keeping the scanner kid-friendly and accessible.
Creating the initial version of this scanner was a fun weekend project. I was able to show my kids the process of bringing an idea to life, in addition to me gaining more confidence creating ESPHome projects, which became more useful for other projects that I’ll share soon.
Building the electronics
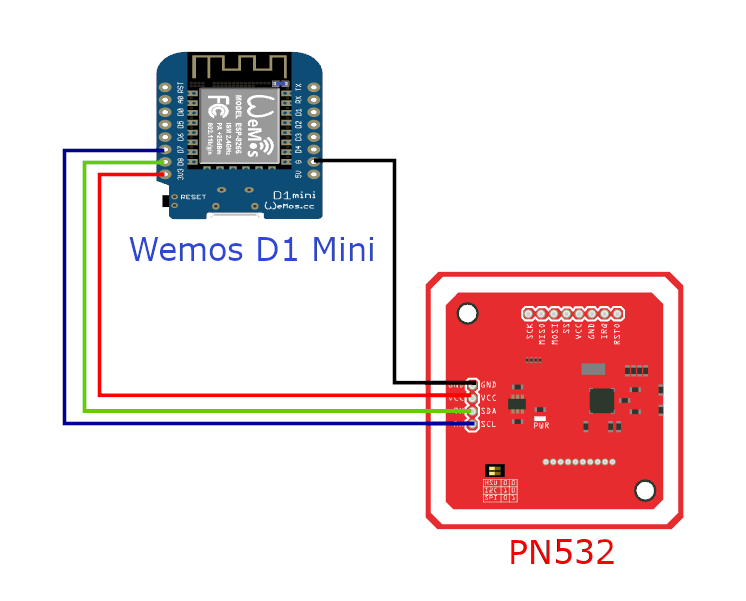
The circuit is straightforward: connecting an NFC reader module (PN532) to a microcontroller (ESP8266 WeMos D1 mini).
To connect a microcontroller, like the Wemos D1 Mini, to an NFC reader (or other peripherals such as sensors, displays etc.) there are 2 common methods: I²C or SPI. SPI can handle higher throughput than I²C and is generally faster, which is good if we connect an LCD display and need to move a lot of pixels quickly for it, but it’s not particularly useful for a simple tag scanner. I chose I²C because it’s simpler to hook up, it needs only 2 wires in compare to 4 wires we need to support SPI connection.
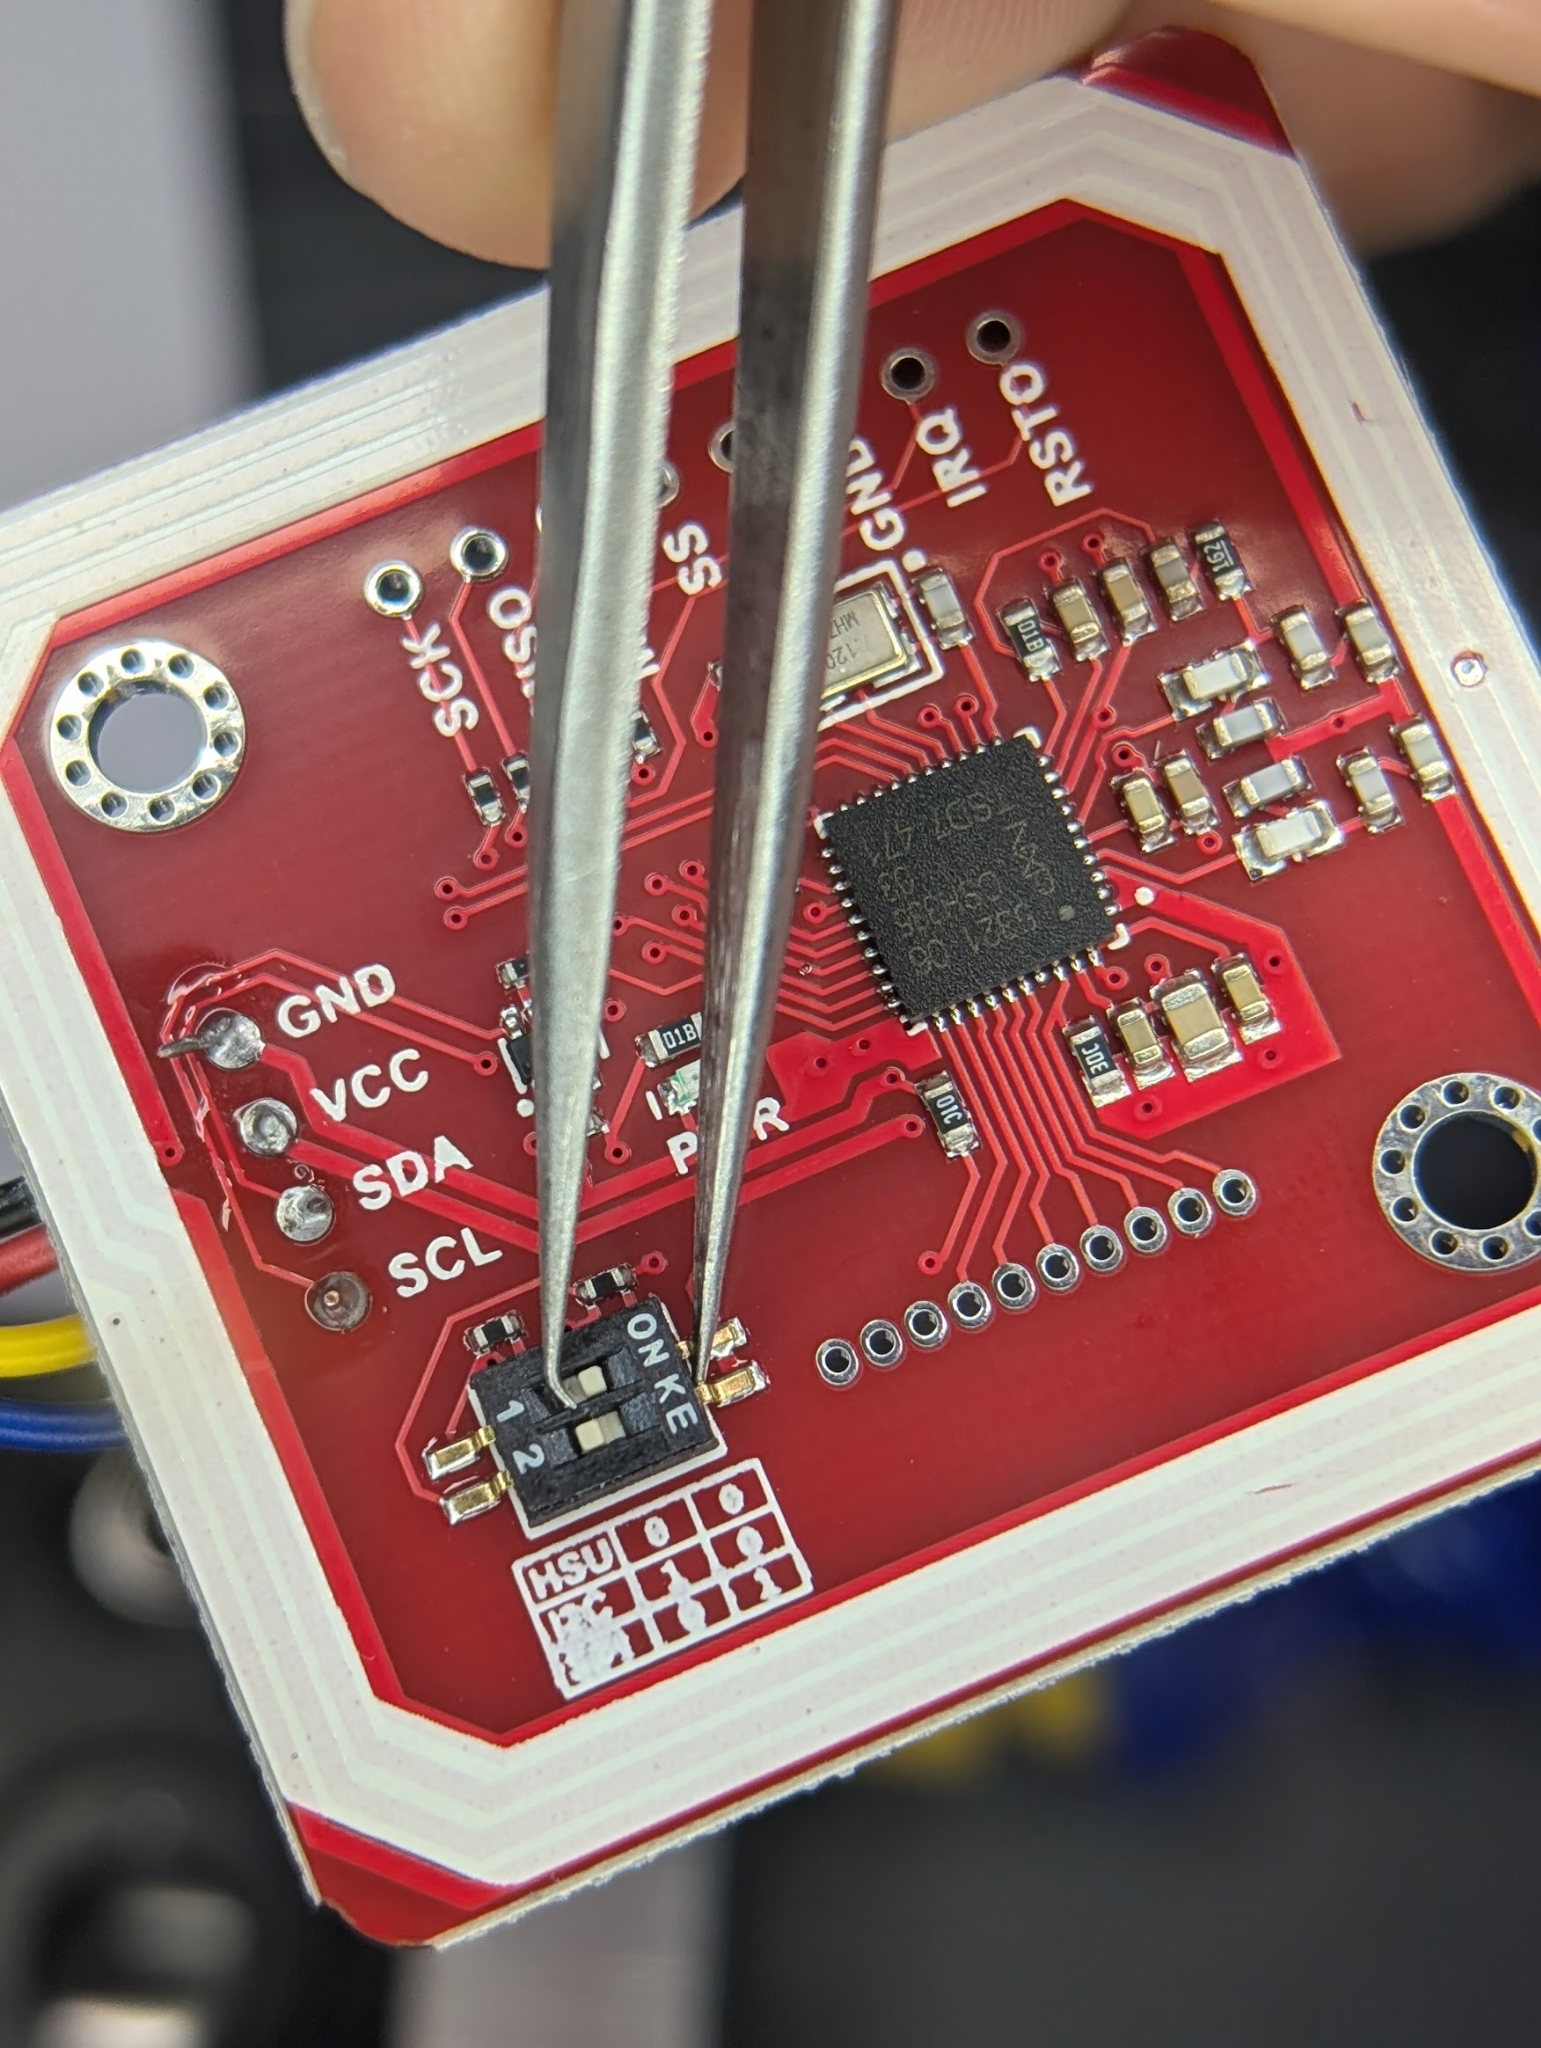
One critical step to note here: set the PN532’s mode correctly. The board has tiny DIP switches to toggle between I²C and SPI. Make sure these match your chosen mode - otherwise you’ll be staring at a non-responsive scanner and wondering why nothing works. Let’s just say I learned that lesson the hard way…
Once the correct mode is set, I wired the SDA and SCL pins from the PN532 to the Wemos D1 mini. You can map I²C lines to almost any pins on the microcontroller; I chose D8 (for SDA) and D7 (for SCL). These need to match what we’ll later declare in the ESPHome config:
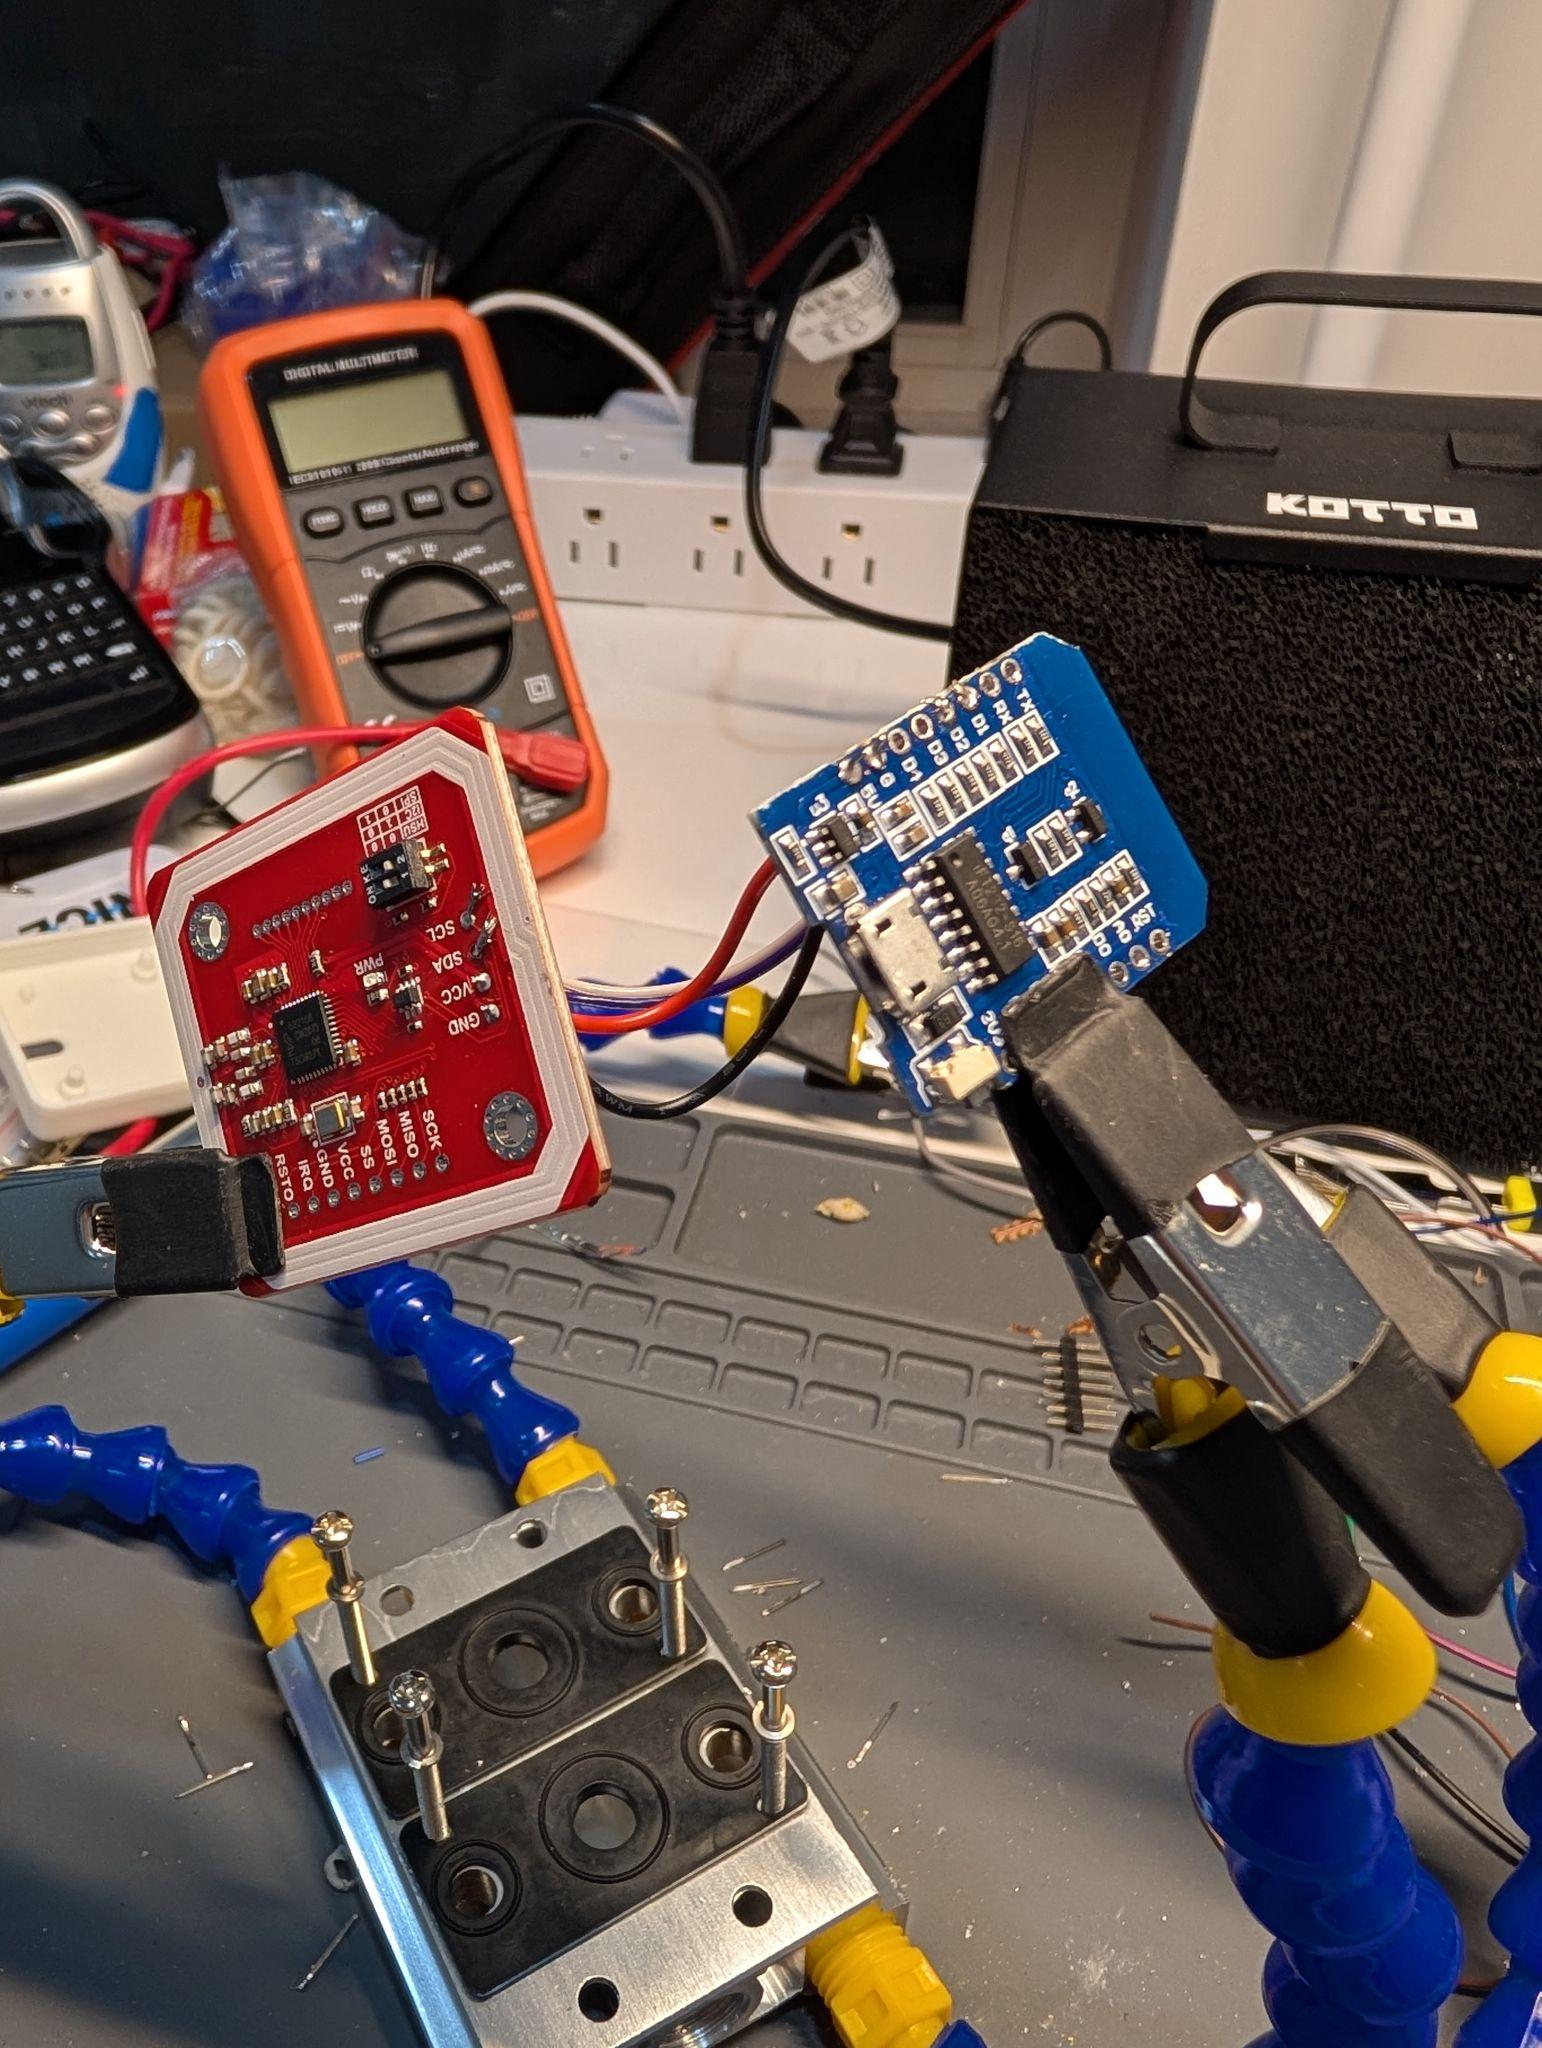
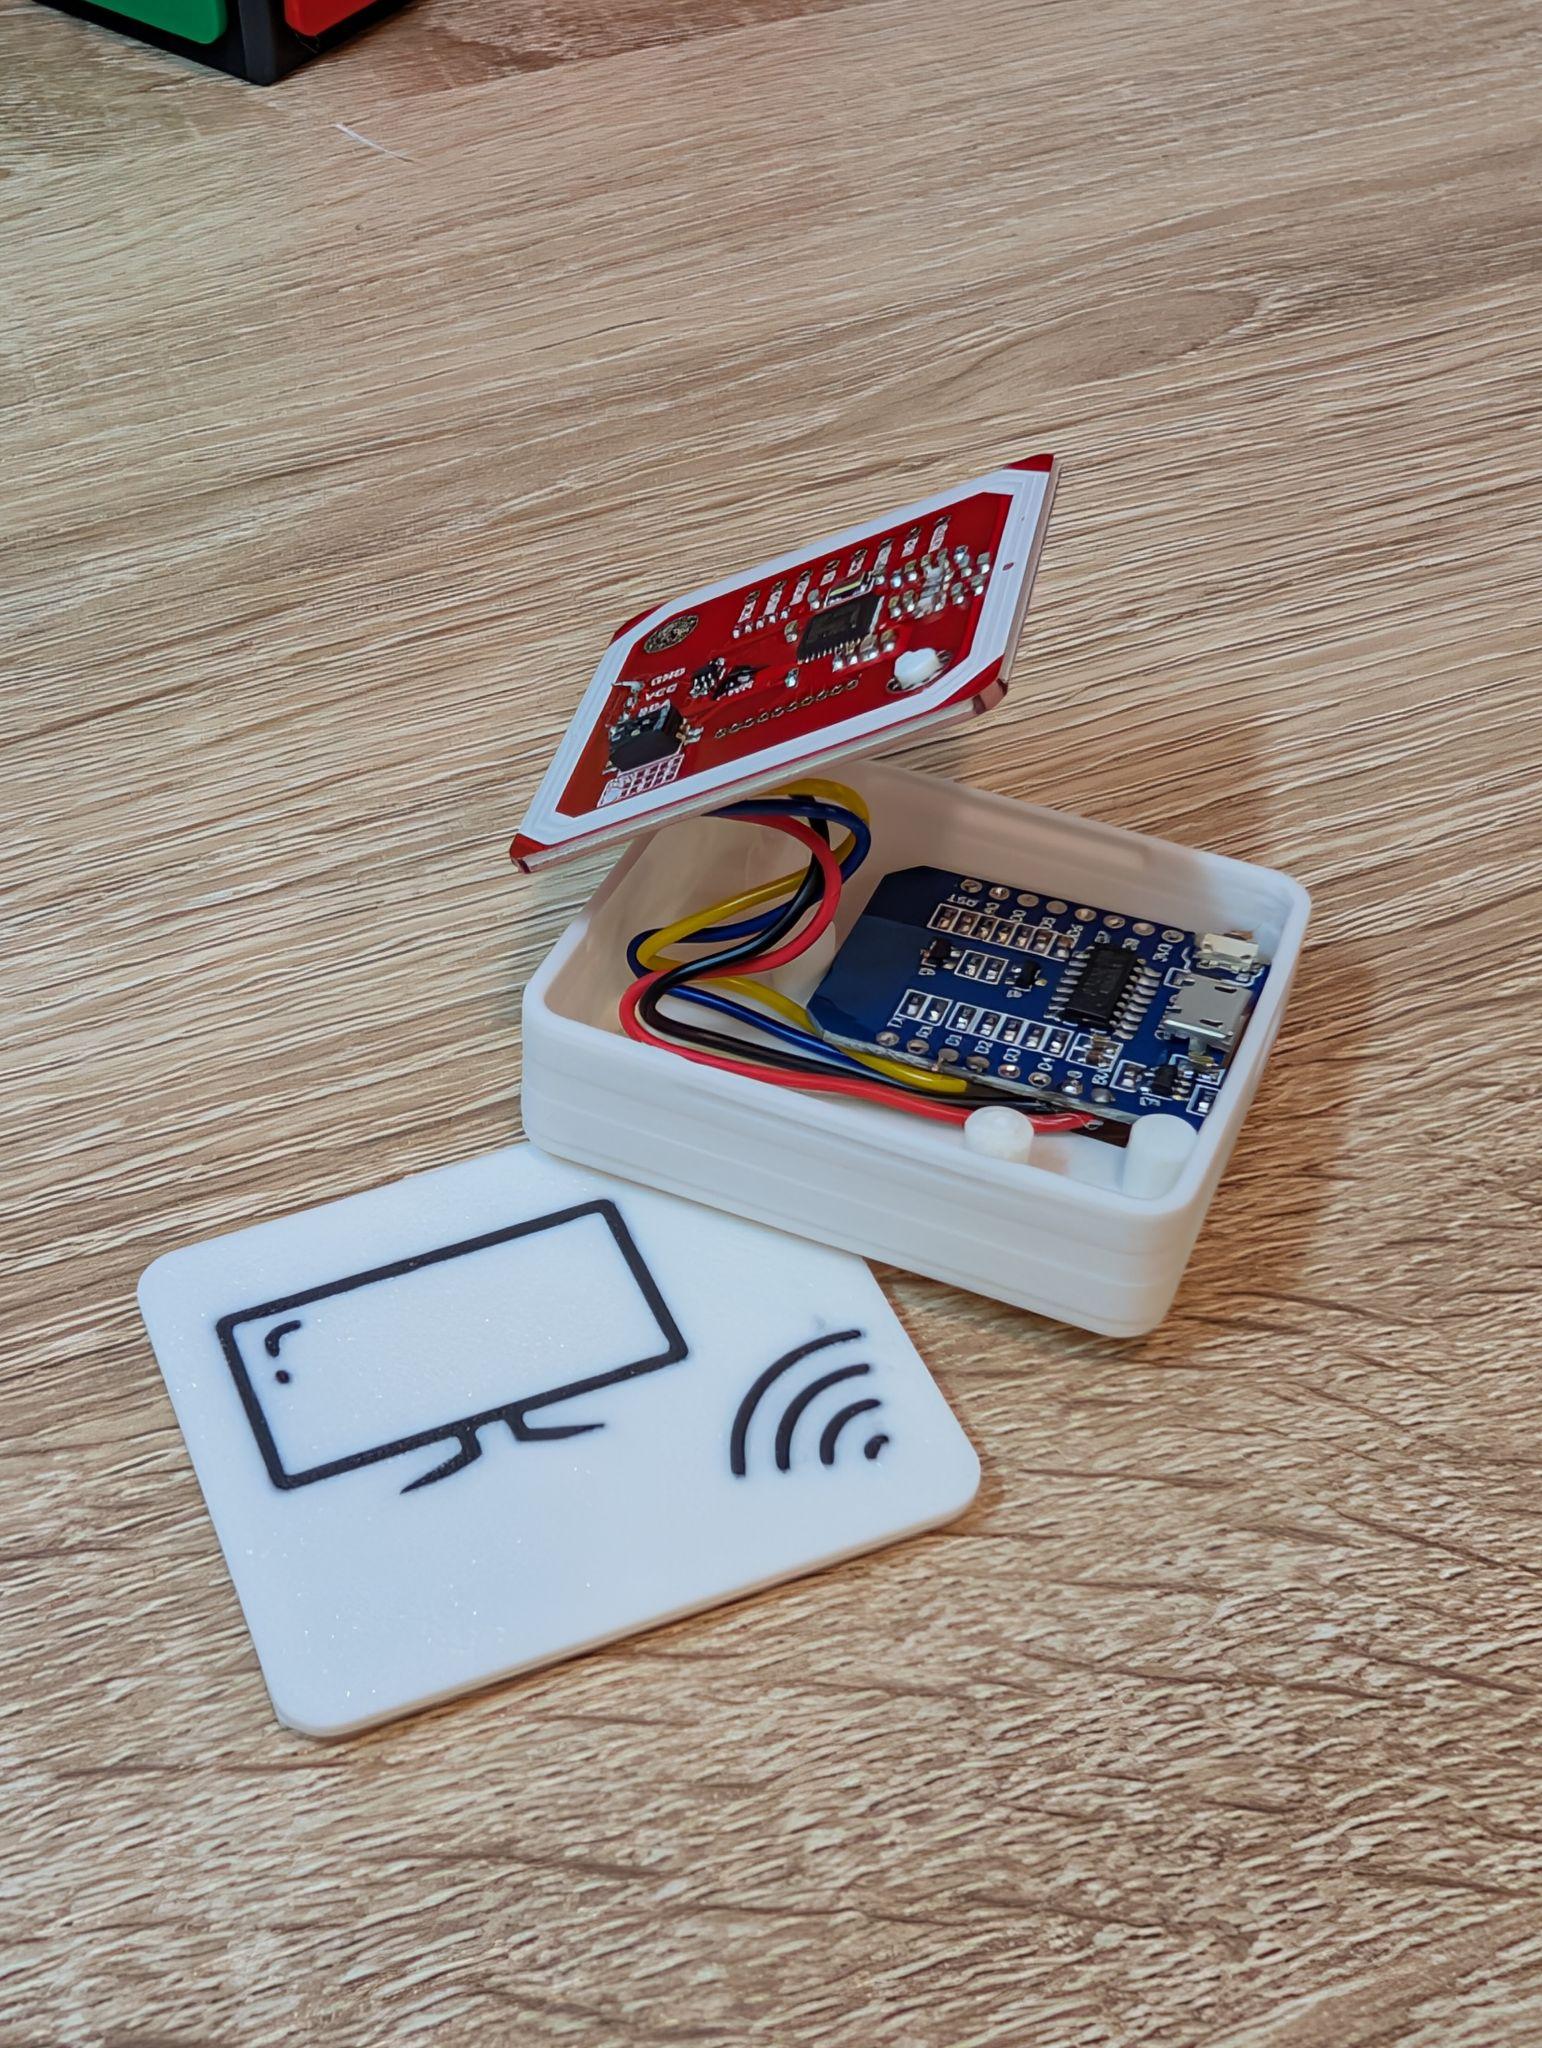
After confirming the wiring, I soldered everything together. A pair of helping hands was invaluable here - keeping the boards aligned so I could stack them neatly and compactly. That’s important, since they need to fit snugly inside the enclosure, as we’ll see later.
BTW, the reason I picked the Wemos D1 mini as the microcontroller for this project is because of its size. I knew I would need to eventually mount the device near the TV, so having a small form-factor is a useful feature. ESPHome, which we’ll talk about next, supports several other microcontroller types in different shapes and with varied capabilities. Even this baby-chip is supported.
Smart Home Integration
With the hardware stacked and soldered, it was ready for the fun part - bringing it to life through ESPHome and tying it into Home Assistant, where we’ll write an automation to make the scanner react to different cards.
If you’re not already using Home Assistant, it’s an open-source smart-home platform that brings all your devices together - TVs, phones, sensors, air conditioners, and much more. You can easily run it on a Raspberry Pi, an old PC, or a virtual machine, so even if this is your first smart-home experiment, you can still install it just for this project
ESPHome Config Basics
The scanner runs on ESPHome, which makes connecting hardware like the PN532 reader almost trivial. Instead of writing firmware, you just declare the pins and components in YAML, and ESPHome takes care of the rest.
esphome:
  name: cardflix_scanner
  platform: ESP8266
  board: d1_mini

i2c:
  sda: D8  # The pins we connected earlier
  scl: D7
  scan: true  # optional, helps confirm wiring

pn532_i2c:
  id: nfc_reader
(Full ESPSHome config yaml code)
“Installing” this config on our microcontroller involves connecting it to the computer and using 2 web tools that do everything. The first tool, ESPHome Builder (a Home Assistant Add-on), parses the yaml config and generates the firmware based on the info on that config. The second tool, ESPHome Web, connects to your device via USB cable and flashes the firmware onto it. There are plenty of good instructions for the process, such as this youtube video or the official ESPHome instructions.
From ESPHome → Home Assistant
Once the firmware is loaded onto the Wemos D1 mini, Home Assistant automatically detects the device and prompts you to add it as an integration.
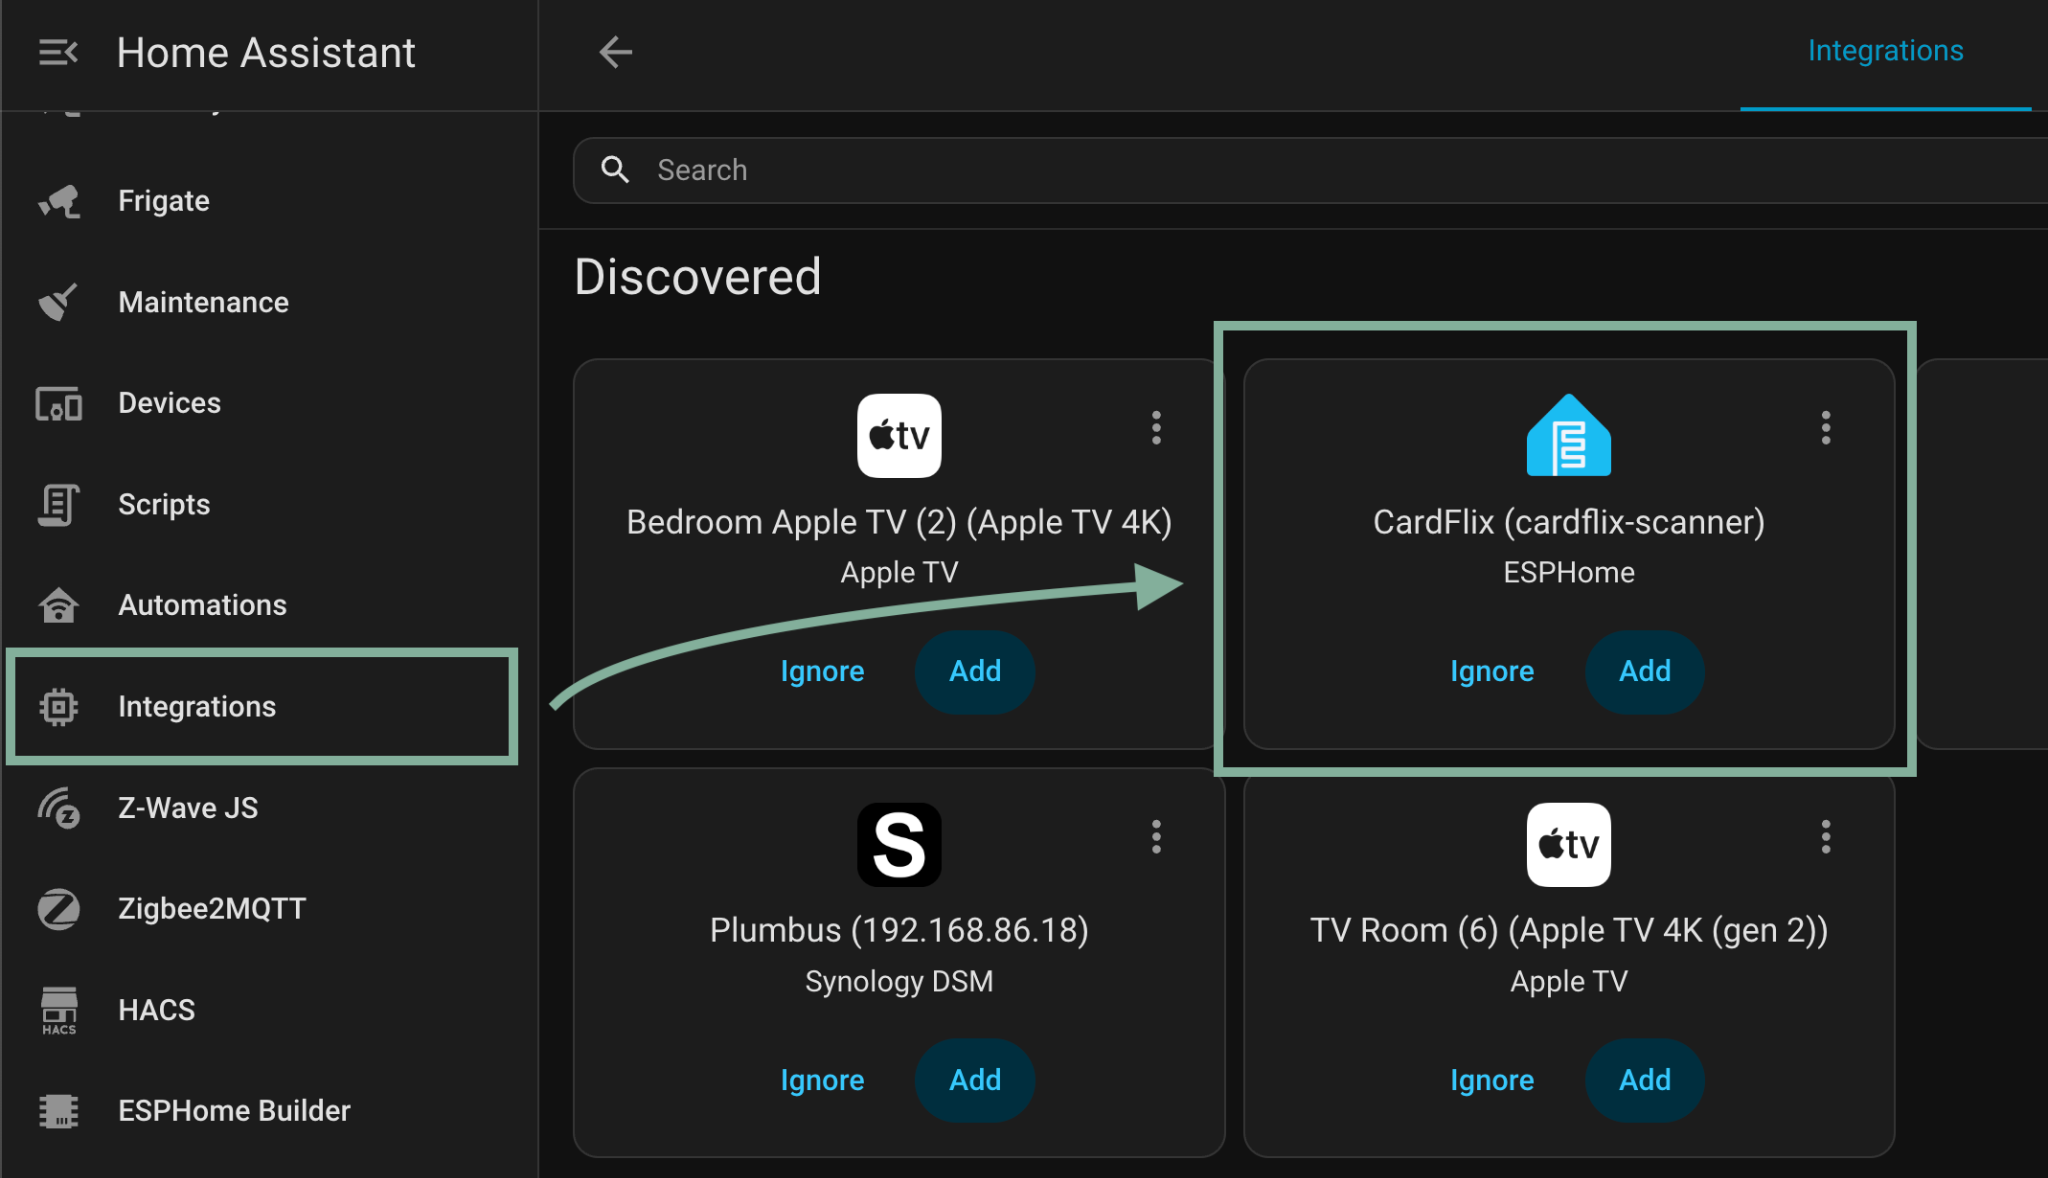
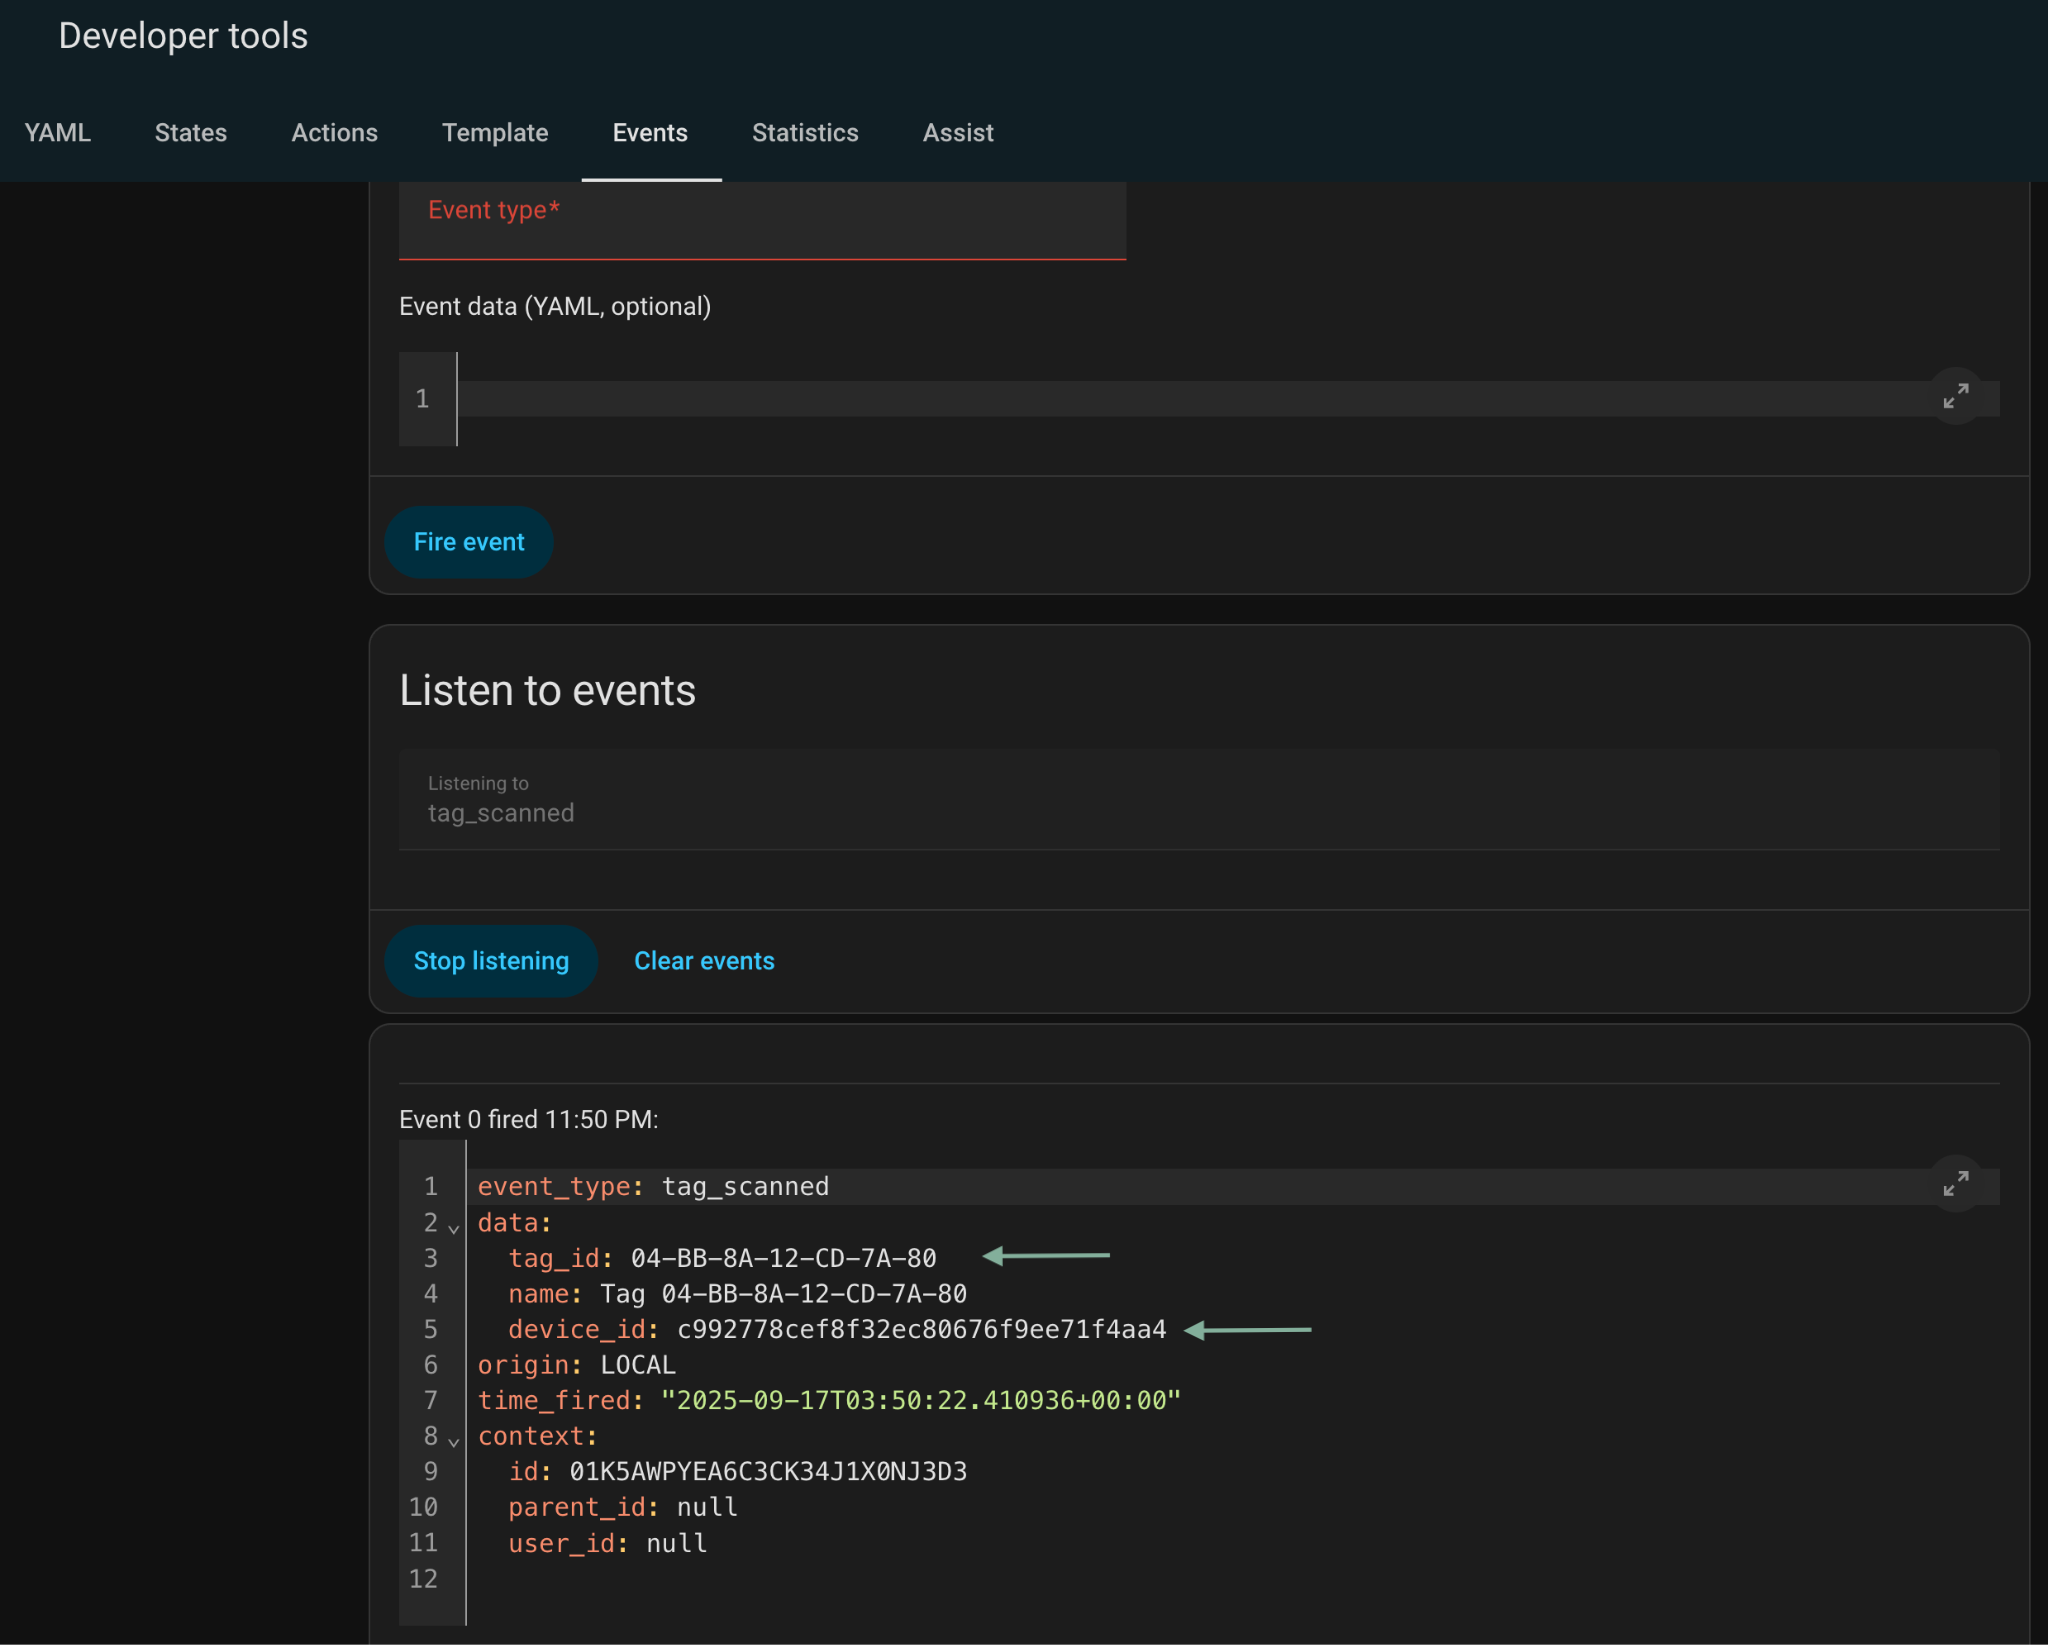
From there, the scanner can report any NFC tags it detects. Home Assistant has an Event Listening feature under Developer Tools, a quick scan of any card, while listening to “tag_scanned” events, will show some useful data for the card and the tag scanner. tag_id is the card’s unique ID and device_id is the tag scanner’s unique ID.
We could also write data onto the cards, but we won’t do that here. There’s no need to complicate the process of onboarding new movie cards, since each card already has a permanent unique identifier (the tag_id we see above). We’ll design an automation that maps each card’s Tag ID to the content we need to play.
Writing the Automation
There are a few ways to set up the automation. I liked the structure Xavier at Simply Explained shared, it keeps the mapping of Tag IDs to content easy to read and update.
I made a few changes of my own:
-
Support for multiple scanners (so different rooms can have their own devices).
-
Some tweaks to handle different types of content (Plex, Netflix, etc.).
Here’s how it works.
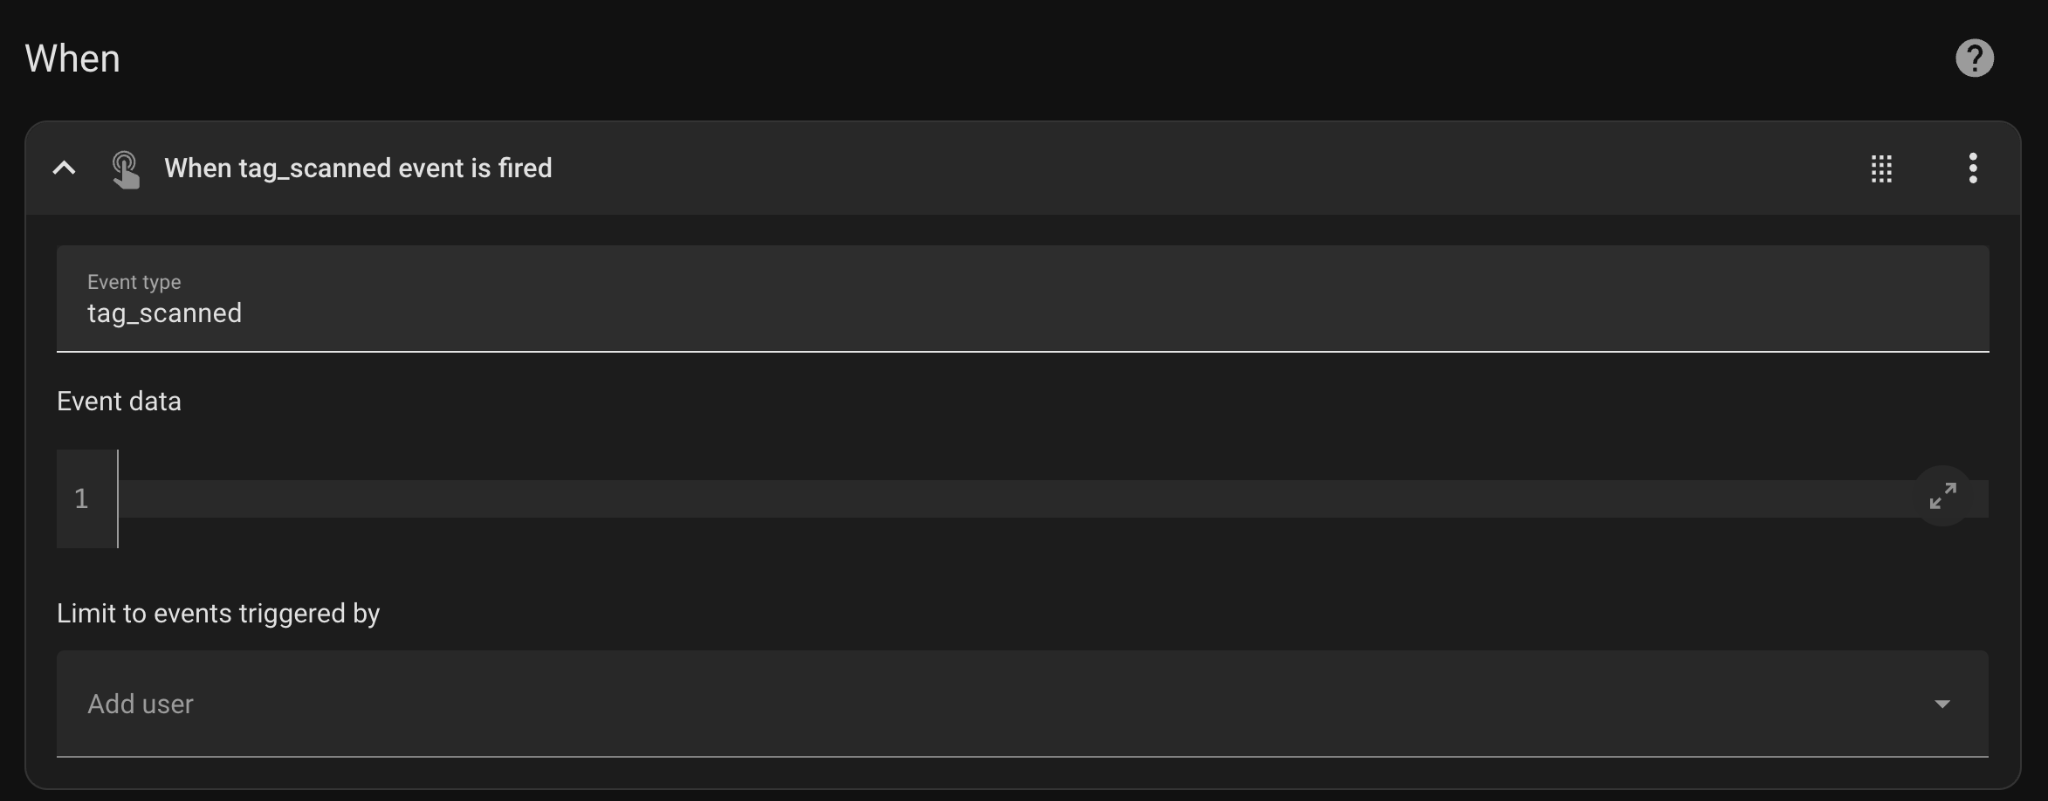
1. The automation’s trigger - scanning a card.
The trigger is a tag_scanned event, the same one we saw earlier when testing the scanner using the Developer Tools. The automation will be triggered when such an event is fired.
2. Defining the variables we need.
These are the variables the automation uses:
- SCANNER_MAPPING - A simple mapping between Scanner IDs to the TV entity they should operate on. This will ensure that the scanner in the bedroom will start any playback on the Bedroom TV and not other TVs. We can get the Scanner ID using the Event Listener tool we saw earlier.
- TARGET_TV - This variable resolves to the TV entity the automation needs to target, based on the Scanner ID that was provided by the tag_scanned event (trigger.event.data.device_id = The Scanner ID). This also defines the default TV in case the scanner is not mapped to any specific TV (In this case, the default is Living Room TV).
- CARD_MAPPING - Maps each card’s Tag ID to the content it should play.
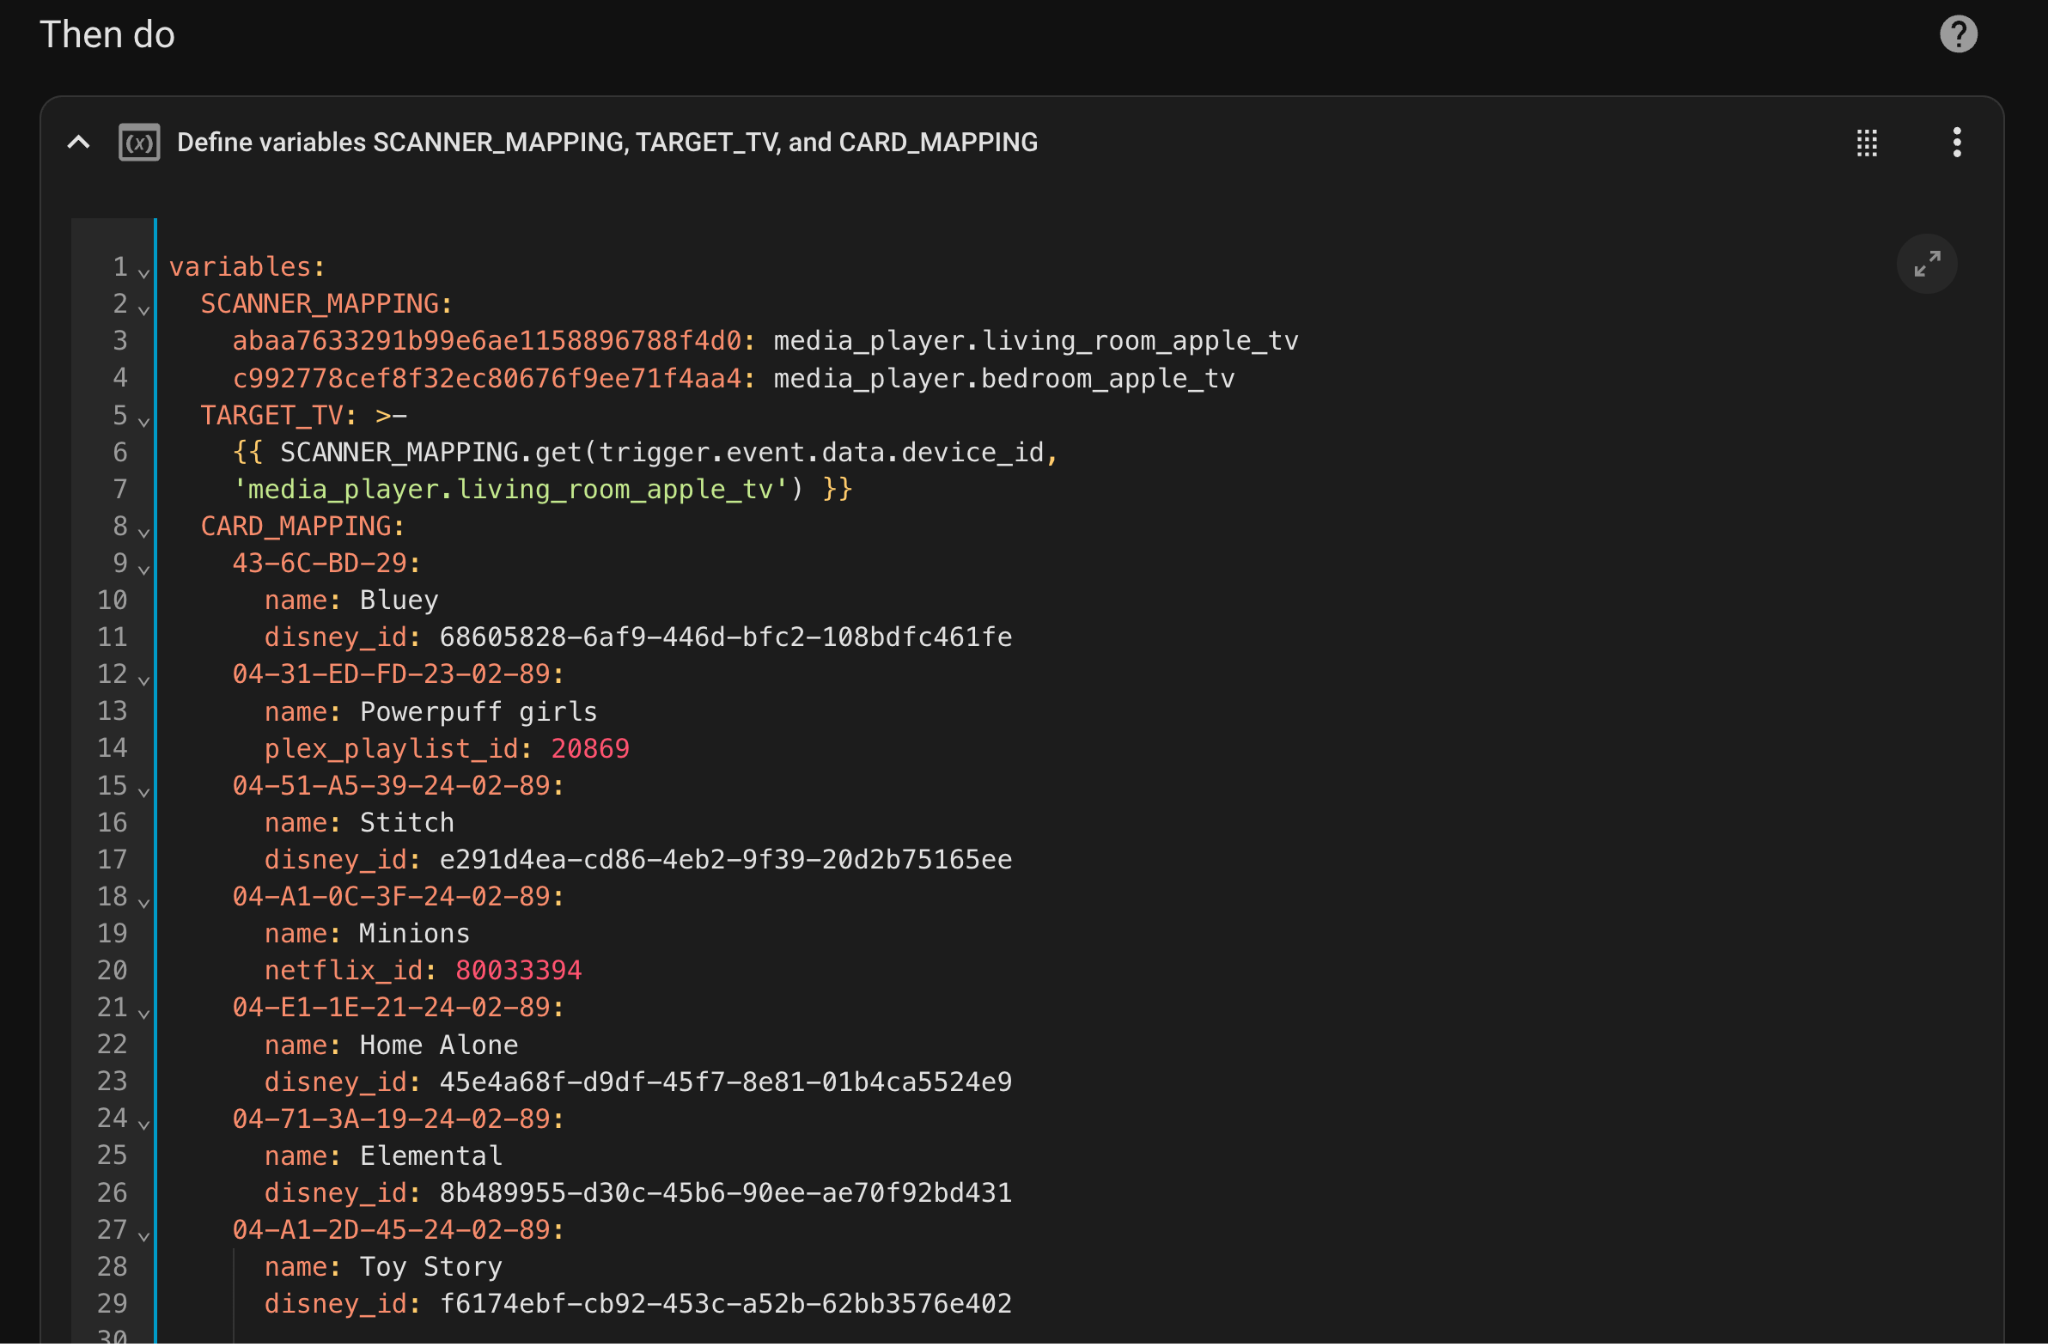
Each card mapping includes the Tag ID, a name (just for readability) and the Content ID. The automation supports a few content types, for several streaming services and Plex. We’ll see below how we deep link to open the content.
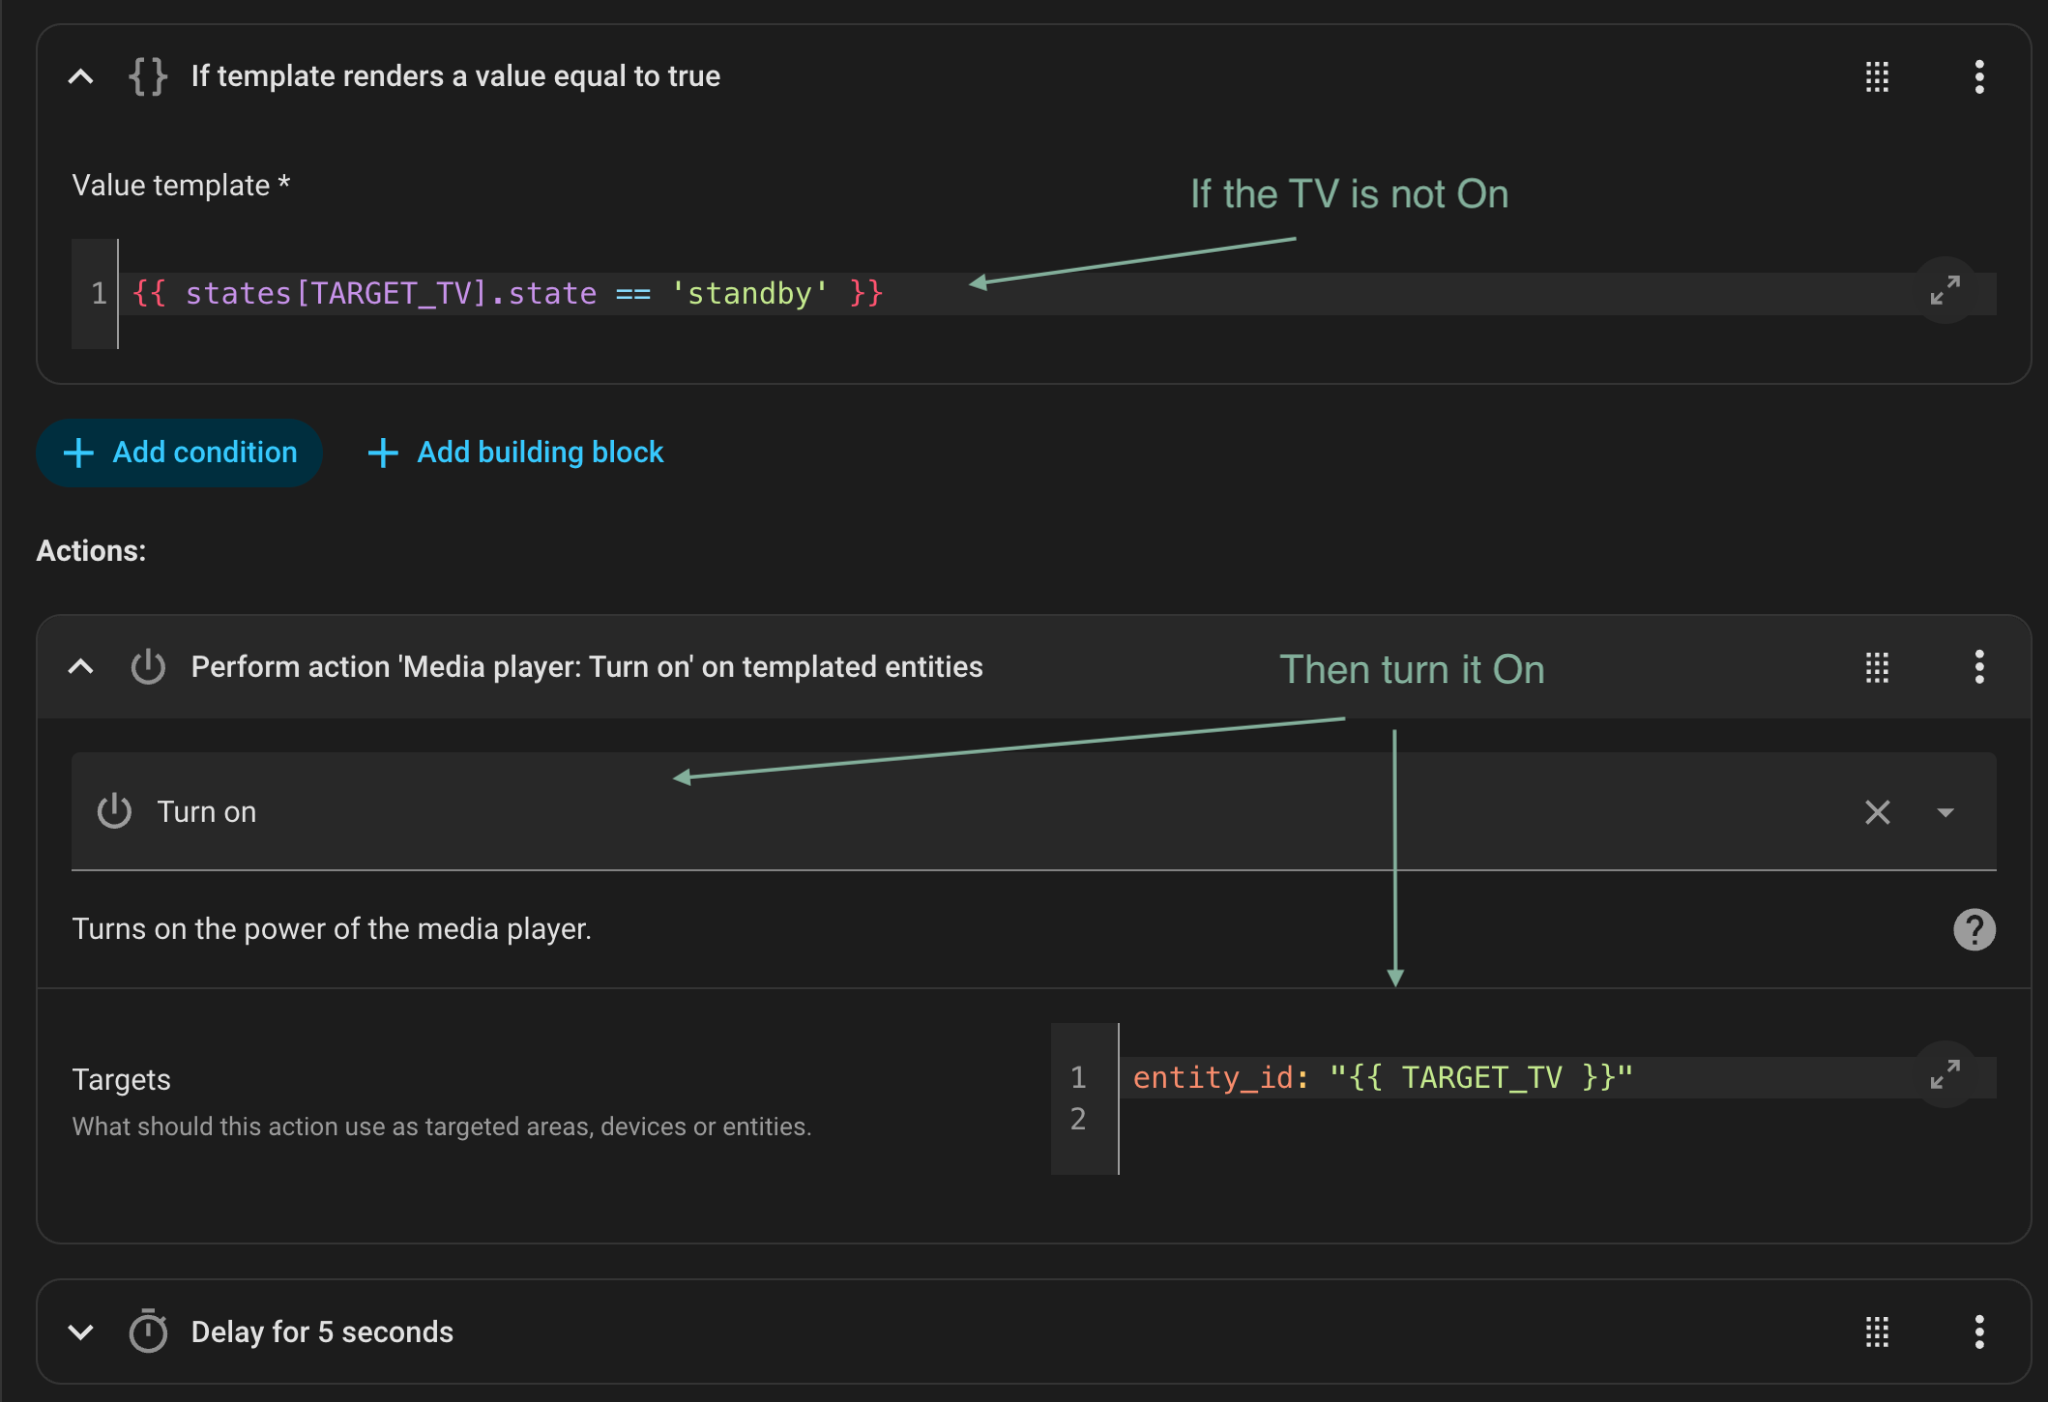
3. Turning on the TV, if needed
The TARGET_TV variable holds the TV we’re targeting, we’ll check its status and turn it on if needed.
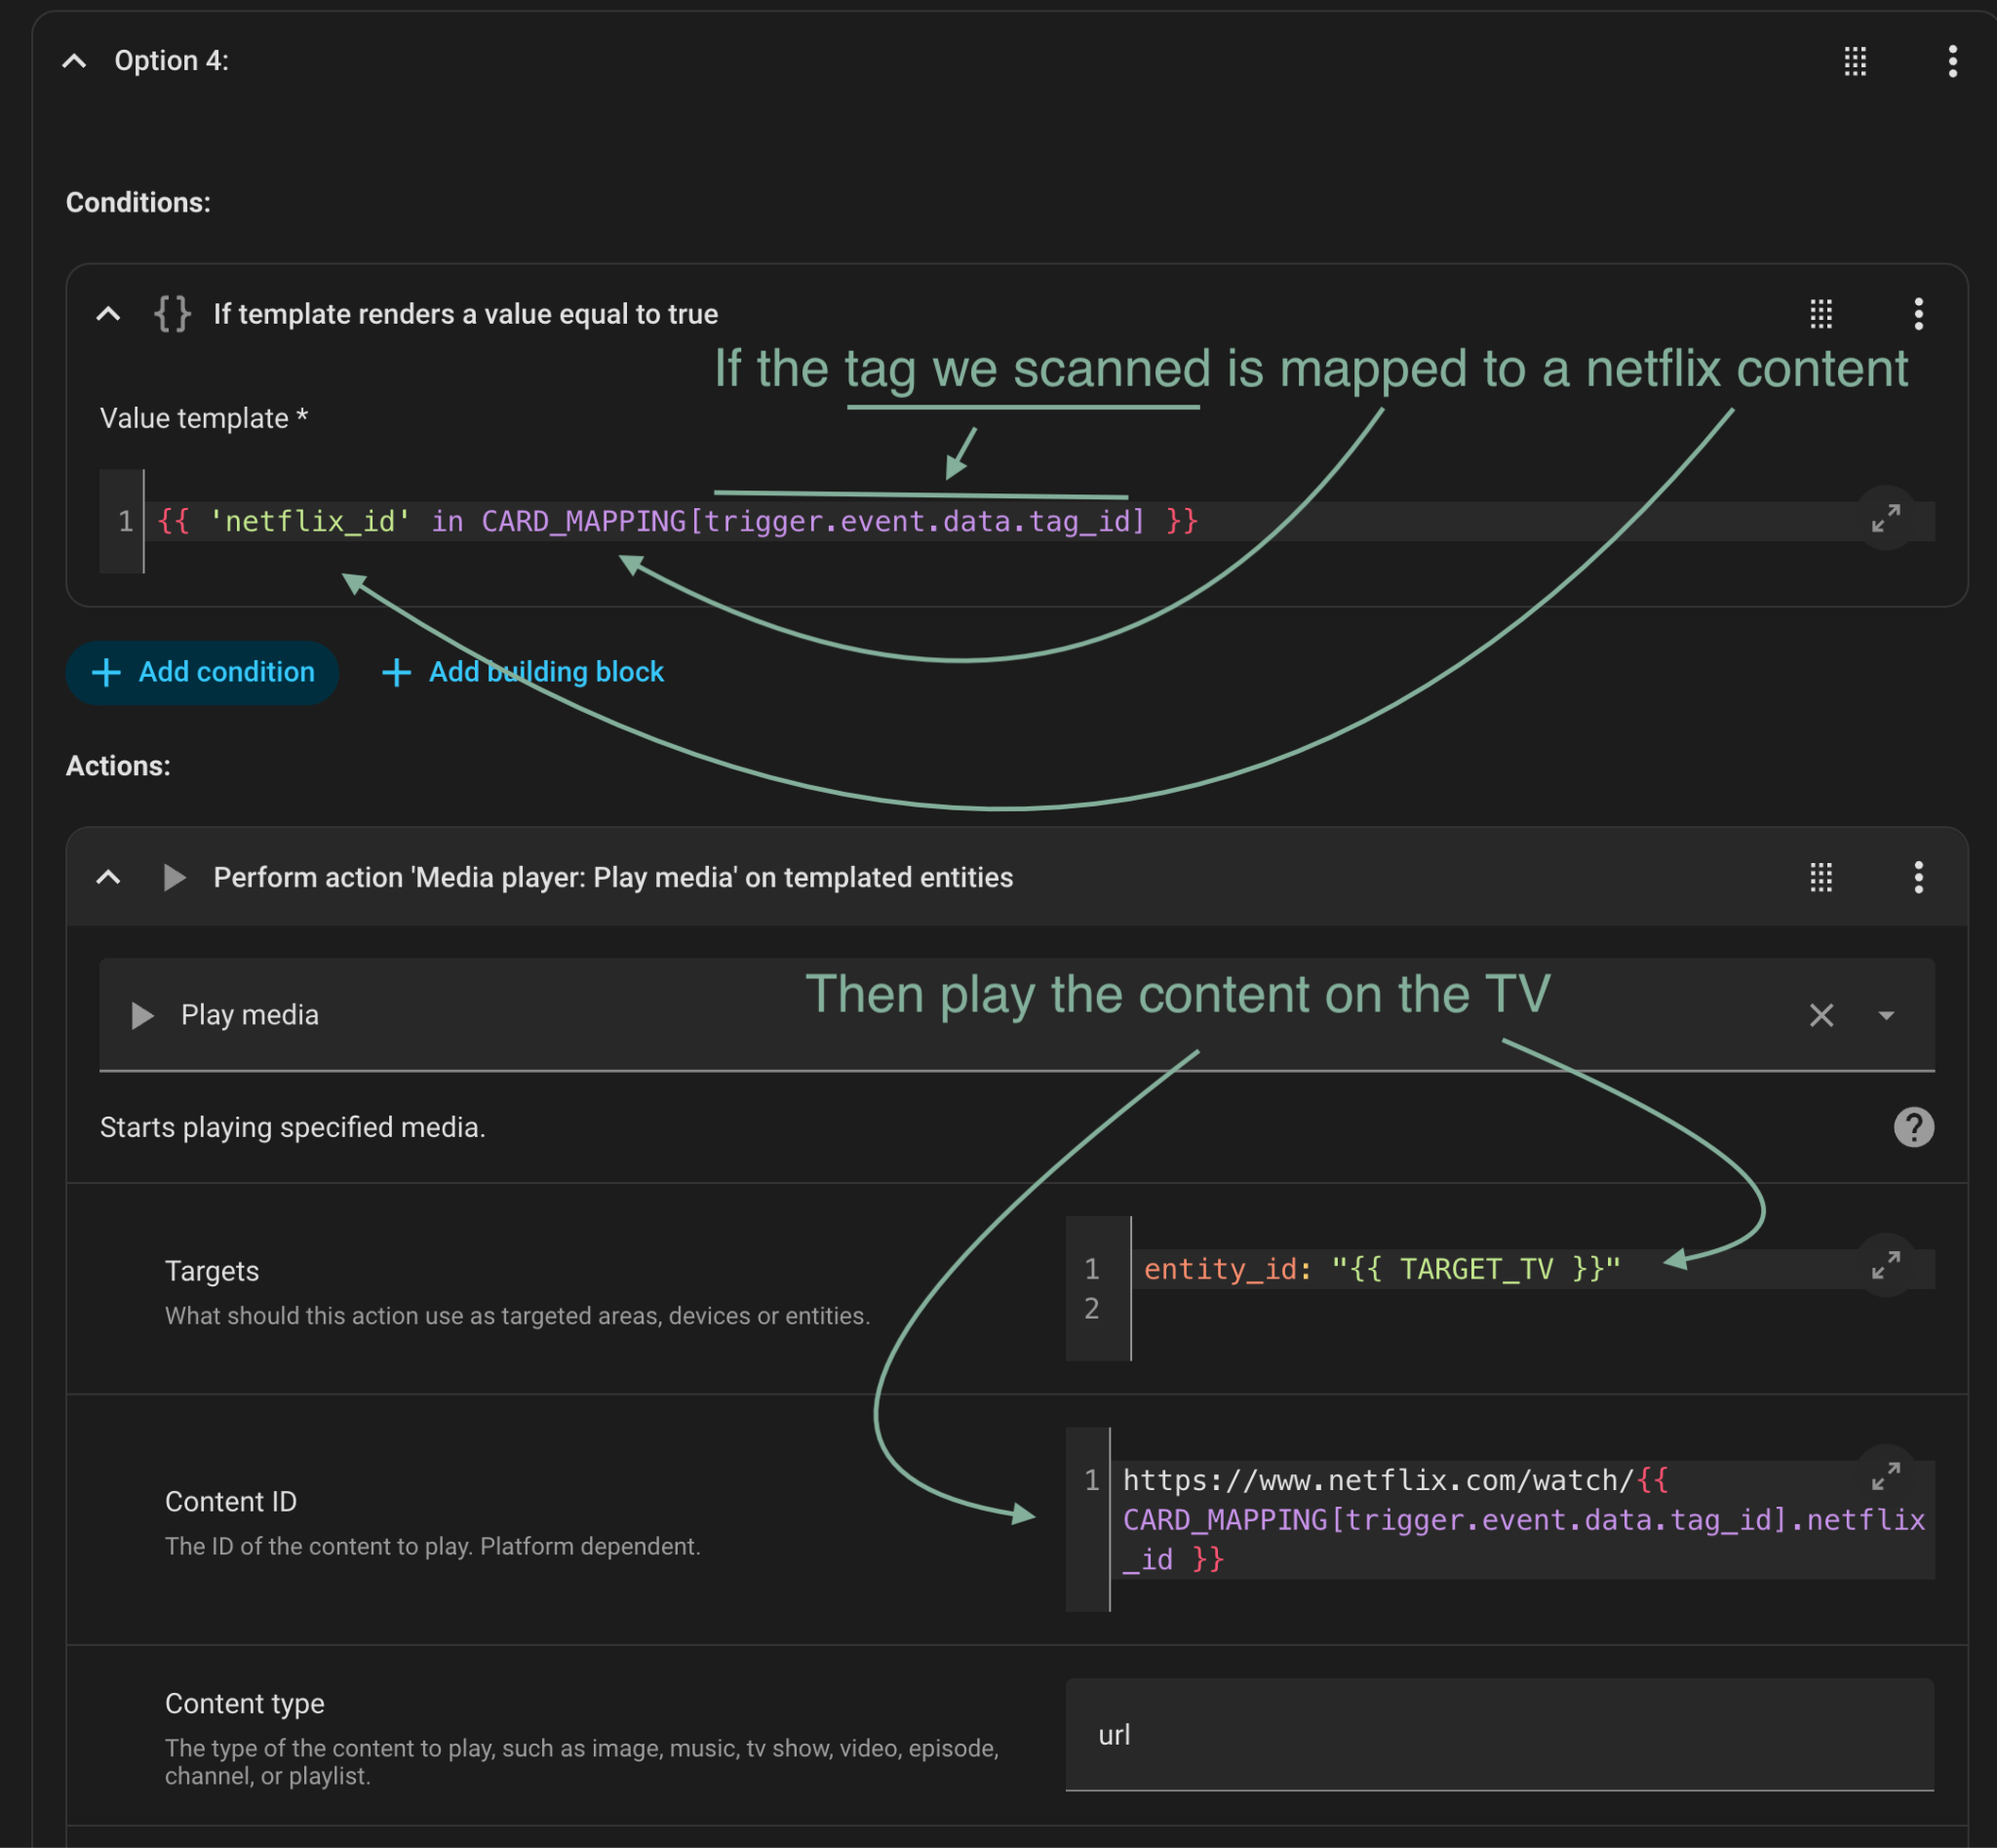
4. Start the requested content using the content mapping defined in CARD_MAPPING
Each streaming service has its own Deep Link format. For each content we’ll check the streaming service it’s using, retrieve the correct deep link format and use it with the content’s ID to start the playback.
In the example below, looking up the Tag ID in CARD_MAPPING provided a “netflix_id”, which we used as part of the Netflix Deep Link URL, like this:
https://www.netflix.com/watch/< CARD_MAPPING[trigger.event.data.tag_id].netflix_id >
The URL is sent to my Apple TV as a “Play Media” request.
This URL works on an Apple TV, which is connected to my TV. It’s possible other media devices, such as Smart TVs, would have different requirements to deep link to a specific content.
These are the main logic of the automation, the full yaml code is available here.
Deep Linking to Content
Deep links are URLs that open a specific content on a specific streaming service. Not all of them are properly documented and some of them might not work on every streaming device (e.g. Apple TV, Smart TVs, Roku device). These are the Deep Link URLs that I found to be working on an Apple TV:
| Service | URL Format |
|---|---|
| Disney+ | https://www.disneyplus.com/en-gb/play/<Content ID> |
| Netflix | https://www.netflix.com/watch/<Content ID> |
| Hulu | hulu://watch/<Content ID> |
| Plex Movie/TV | plex://play/?metadataKey=%2Flibrary%2Fmetadata%2F<Content ID>&server=<Plex server ID> |
| Plex Playlist | plex://play/?metadataKey=%2Fplaylists%2F<Content ID>&server=<Plex server ID> |
The Content ID can be retrieved by opening the content on your browser and checking the URL.
Tip: Using a Plex playlist is a great way to watch random episodes of some TV Show(s), perfect for shows the kids have already watched a hundred times. Instructions on how to do that.
And here’s the automation in action:
Creating the Content Cards
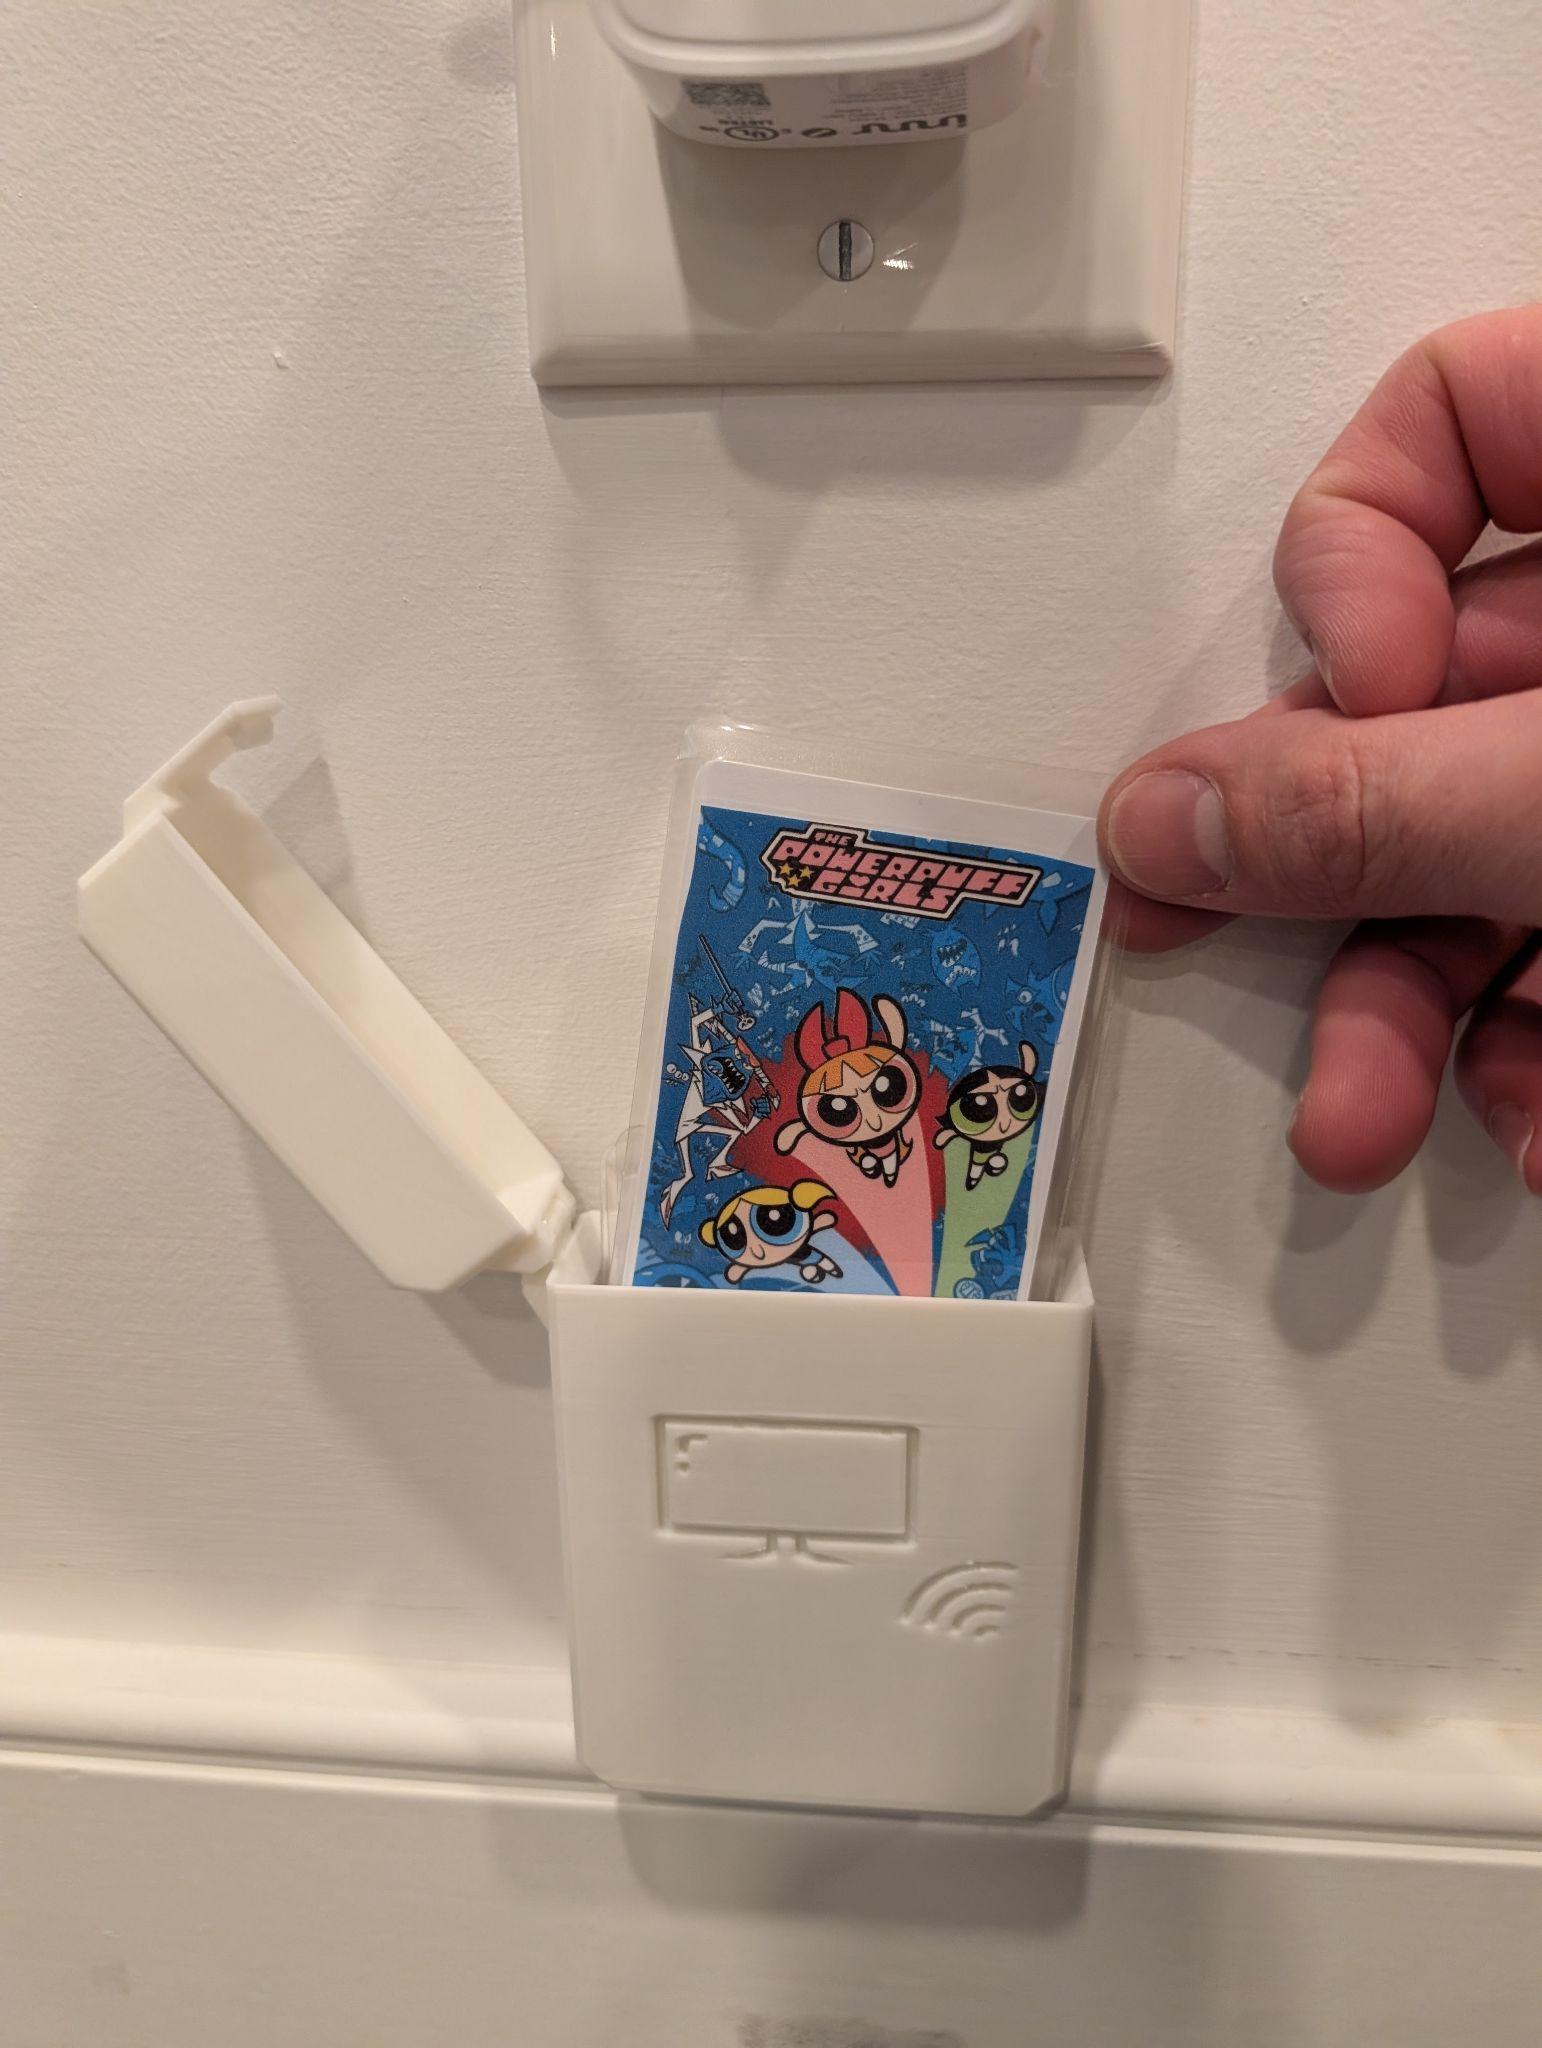
The electronics and automations are only half the story — the real magic (and the part my kids loved most) was creating the movie cards themselves.
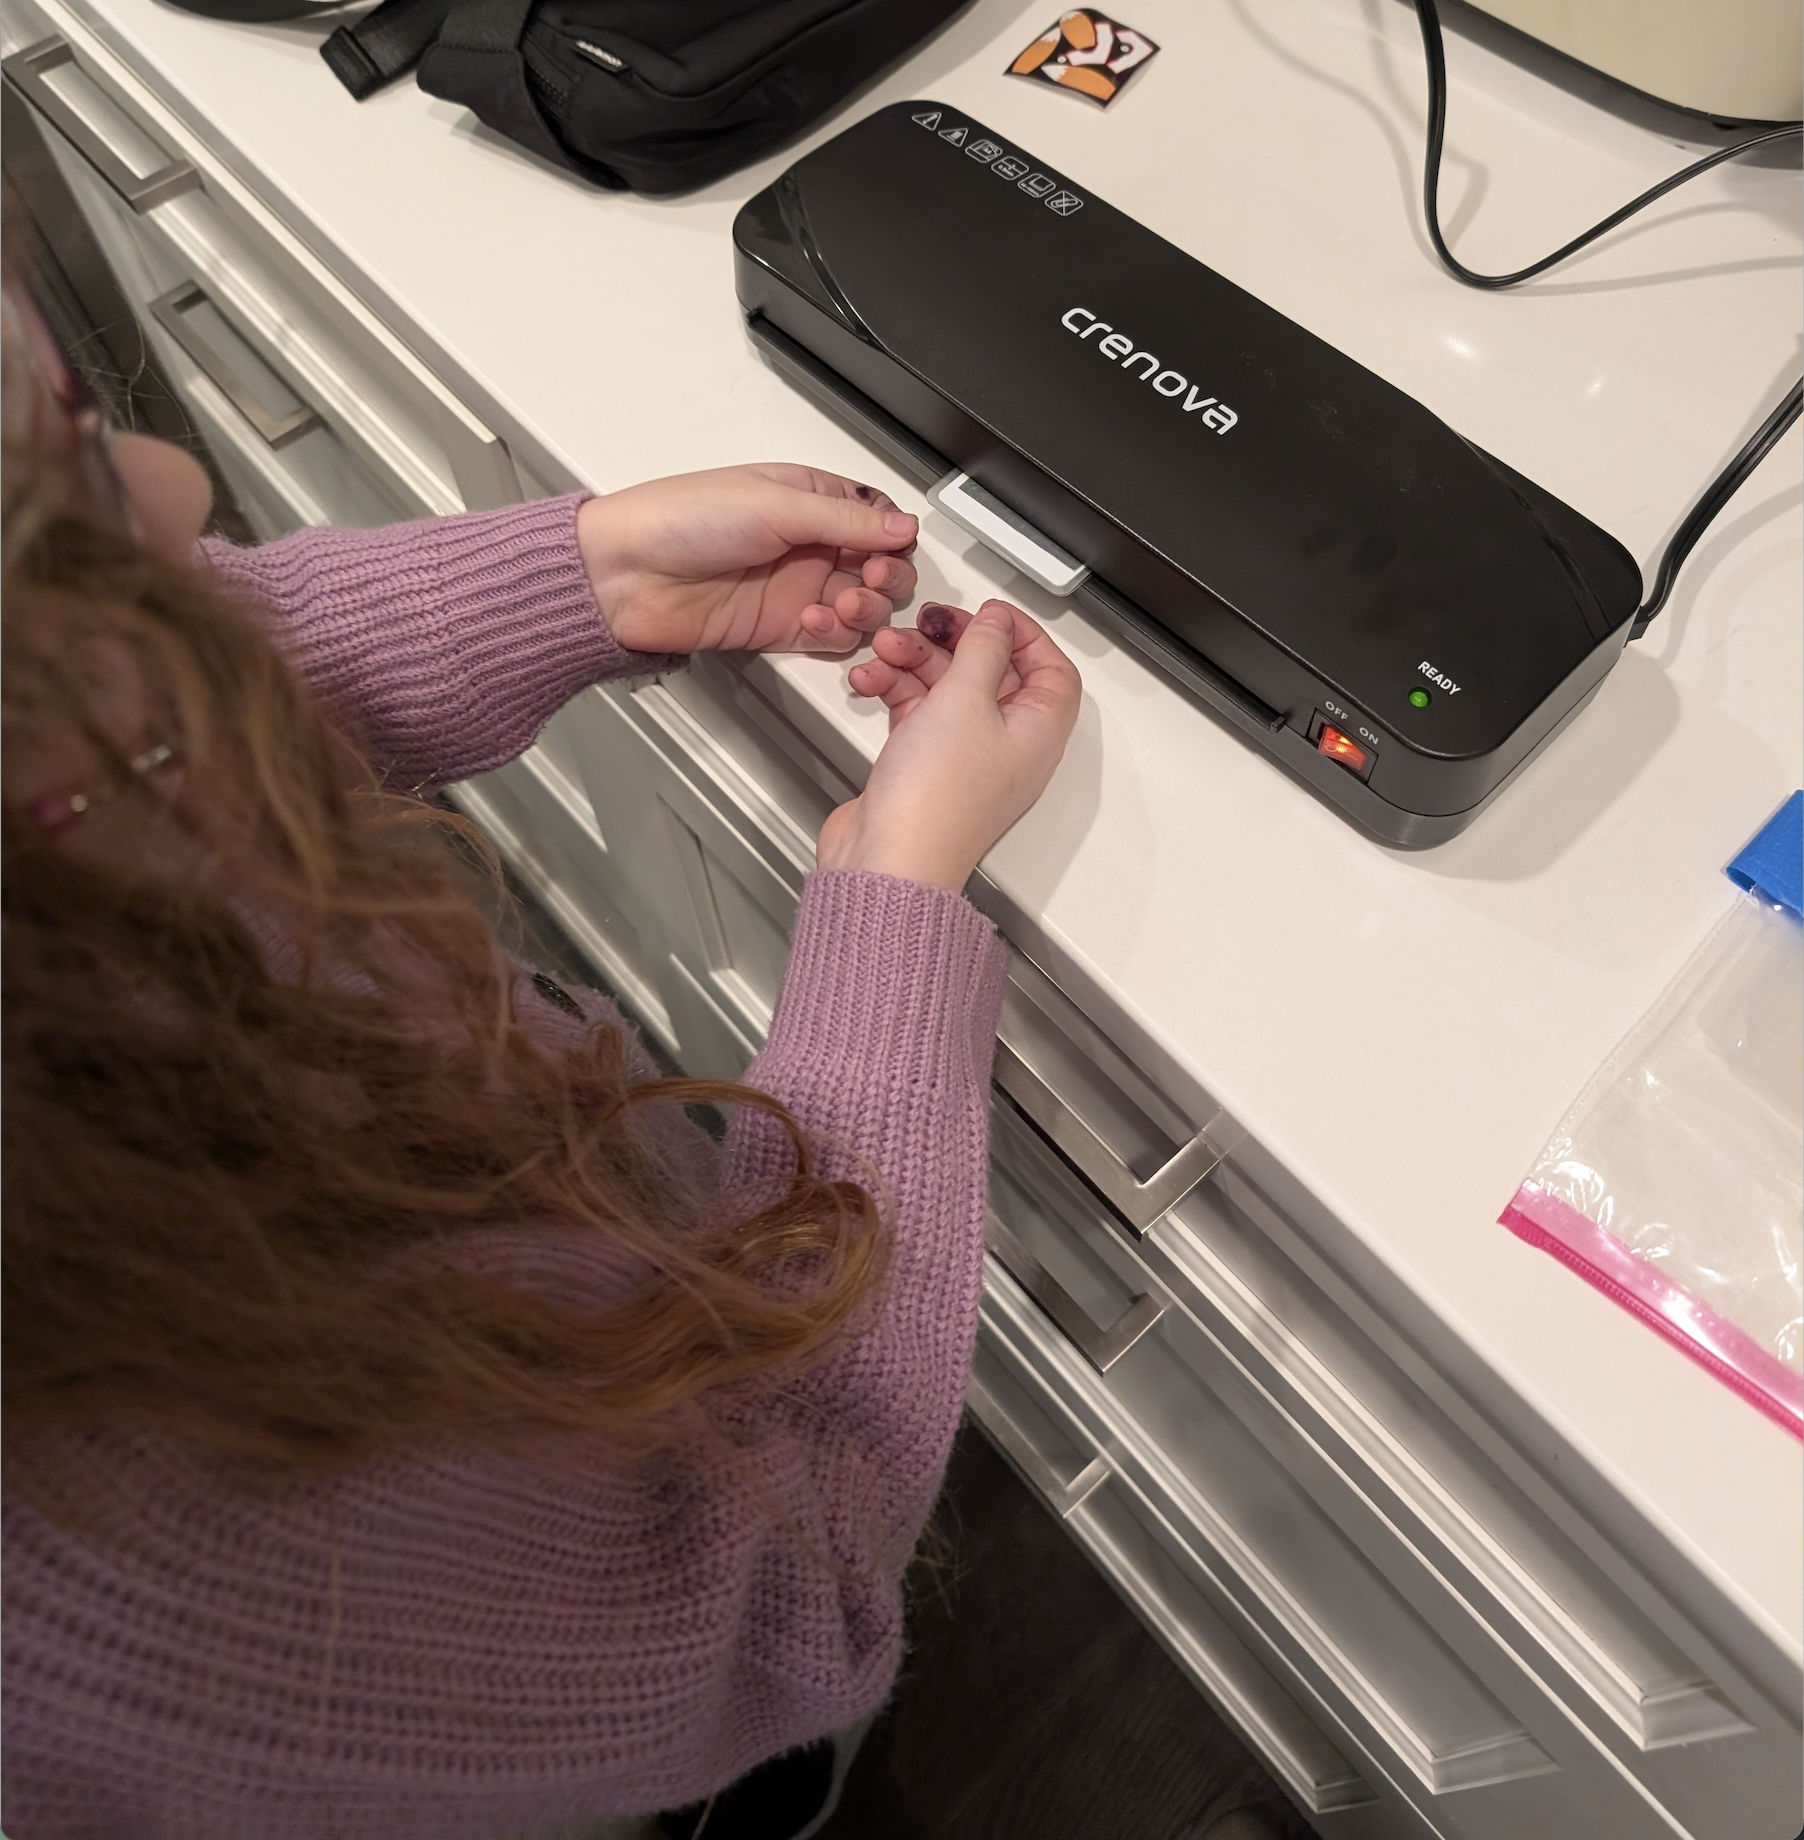
Each card is laminated with the TV/Movie’s artwork. The laminate not only makes the cards sturdy enough for repeated use, but also gives them that satisfying “real card” feel
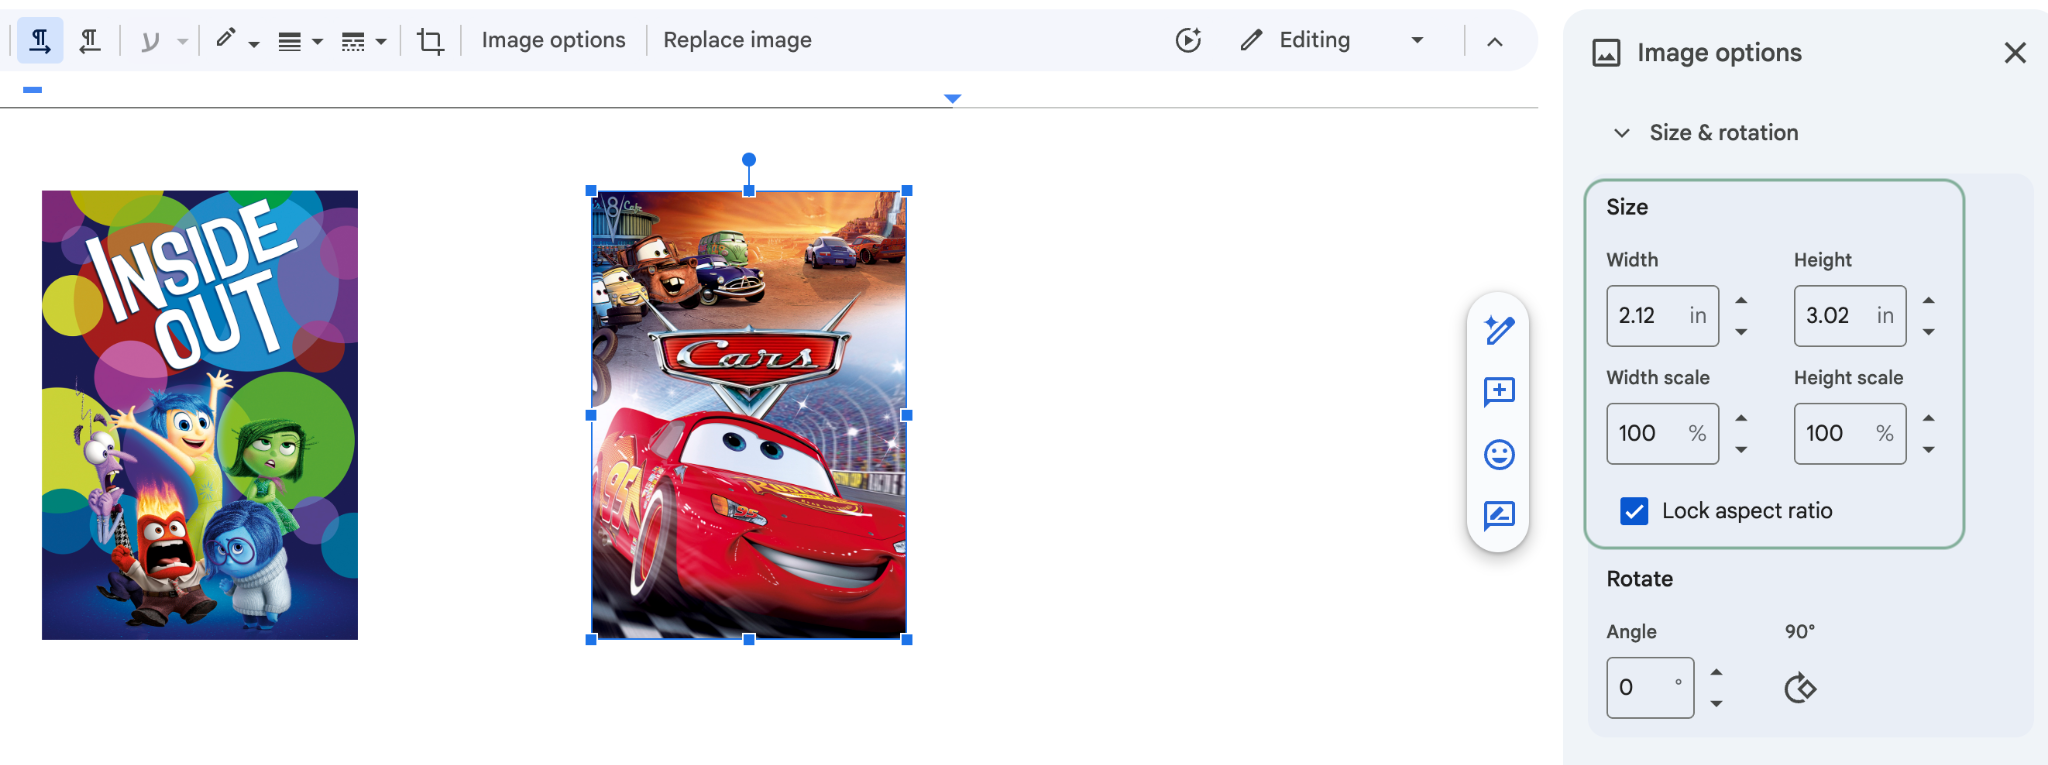
We used fanart.tv as our main source for high-quality TV and movie artwork. It has a huge collection of posters, logos, and backgrounds that work perfectly for this kind of project. Once we picked the right art, we copied it into a Google Doc and resized it to the dimensions of a credit card (Tip: resize to Width 2.12 inch, Height: 3.36 inch, Ratio: 1.583333). We put a few posters on a single page and printed it.
The printed poster we put on top of the card, slipped into a Laminating Pouch and from there straight to the laminating machine. The one I got is cheap (under $20) and it served us well in several projects, definitely nice to have around the house.
Onboarding a New Card
Once the physical card is ready, the final step is onboarding it into Home Assistant. To make things easier, I’ve added to the automation a fallback in case we scan a card that’s not assigned to any content, which prints the card’s Tag ID to Home Assistant’s Logbook.
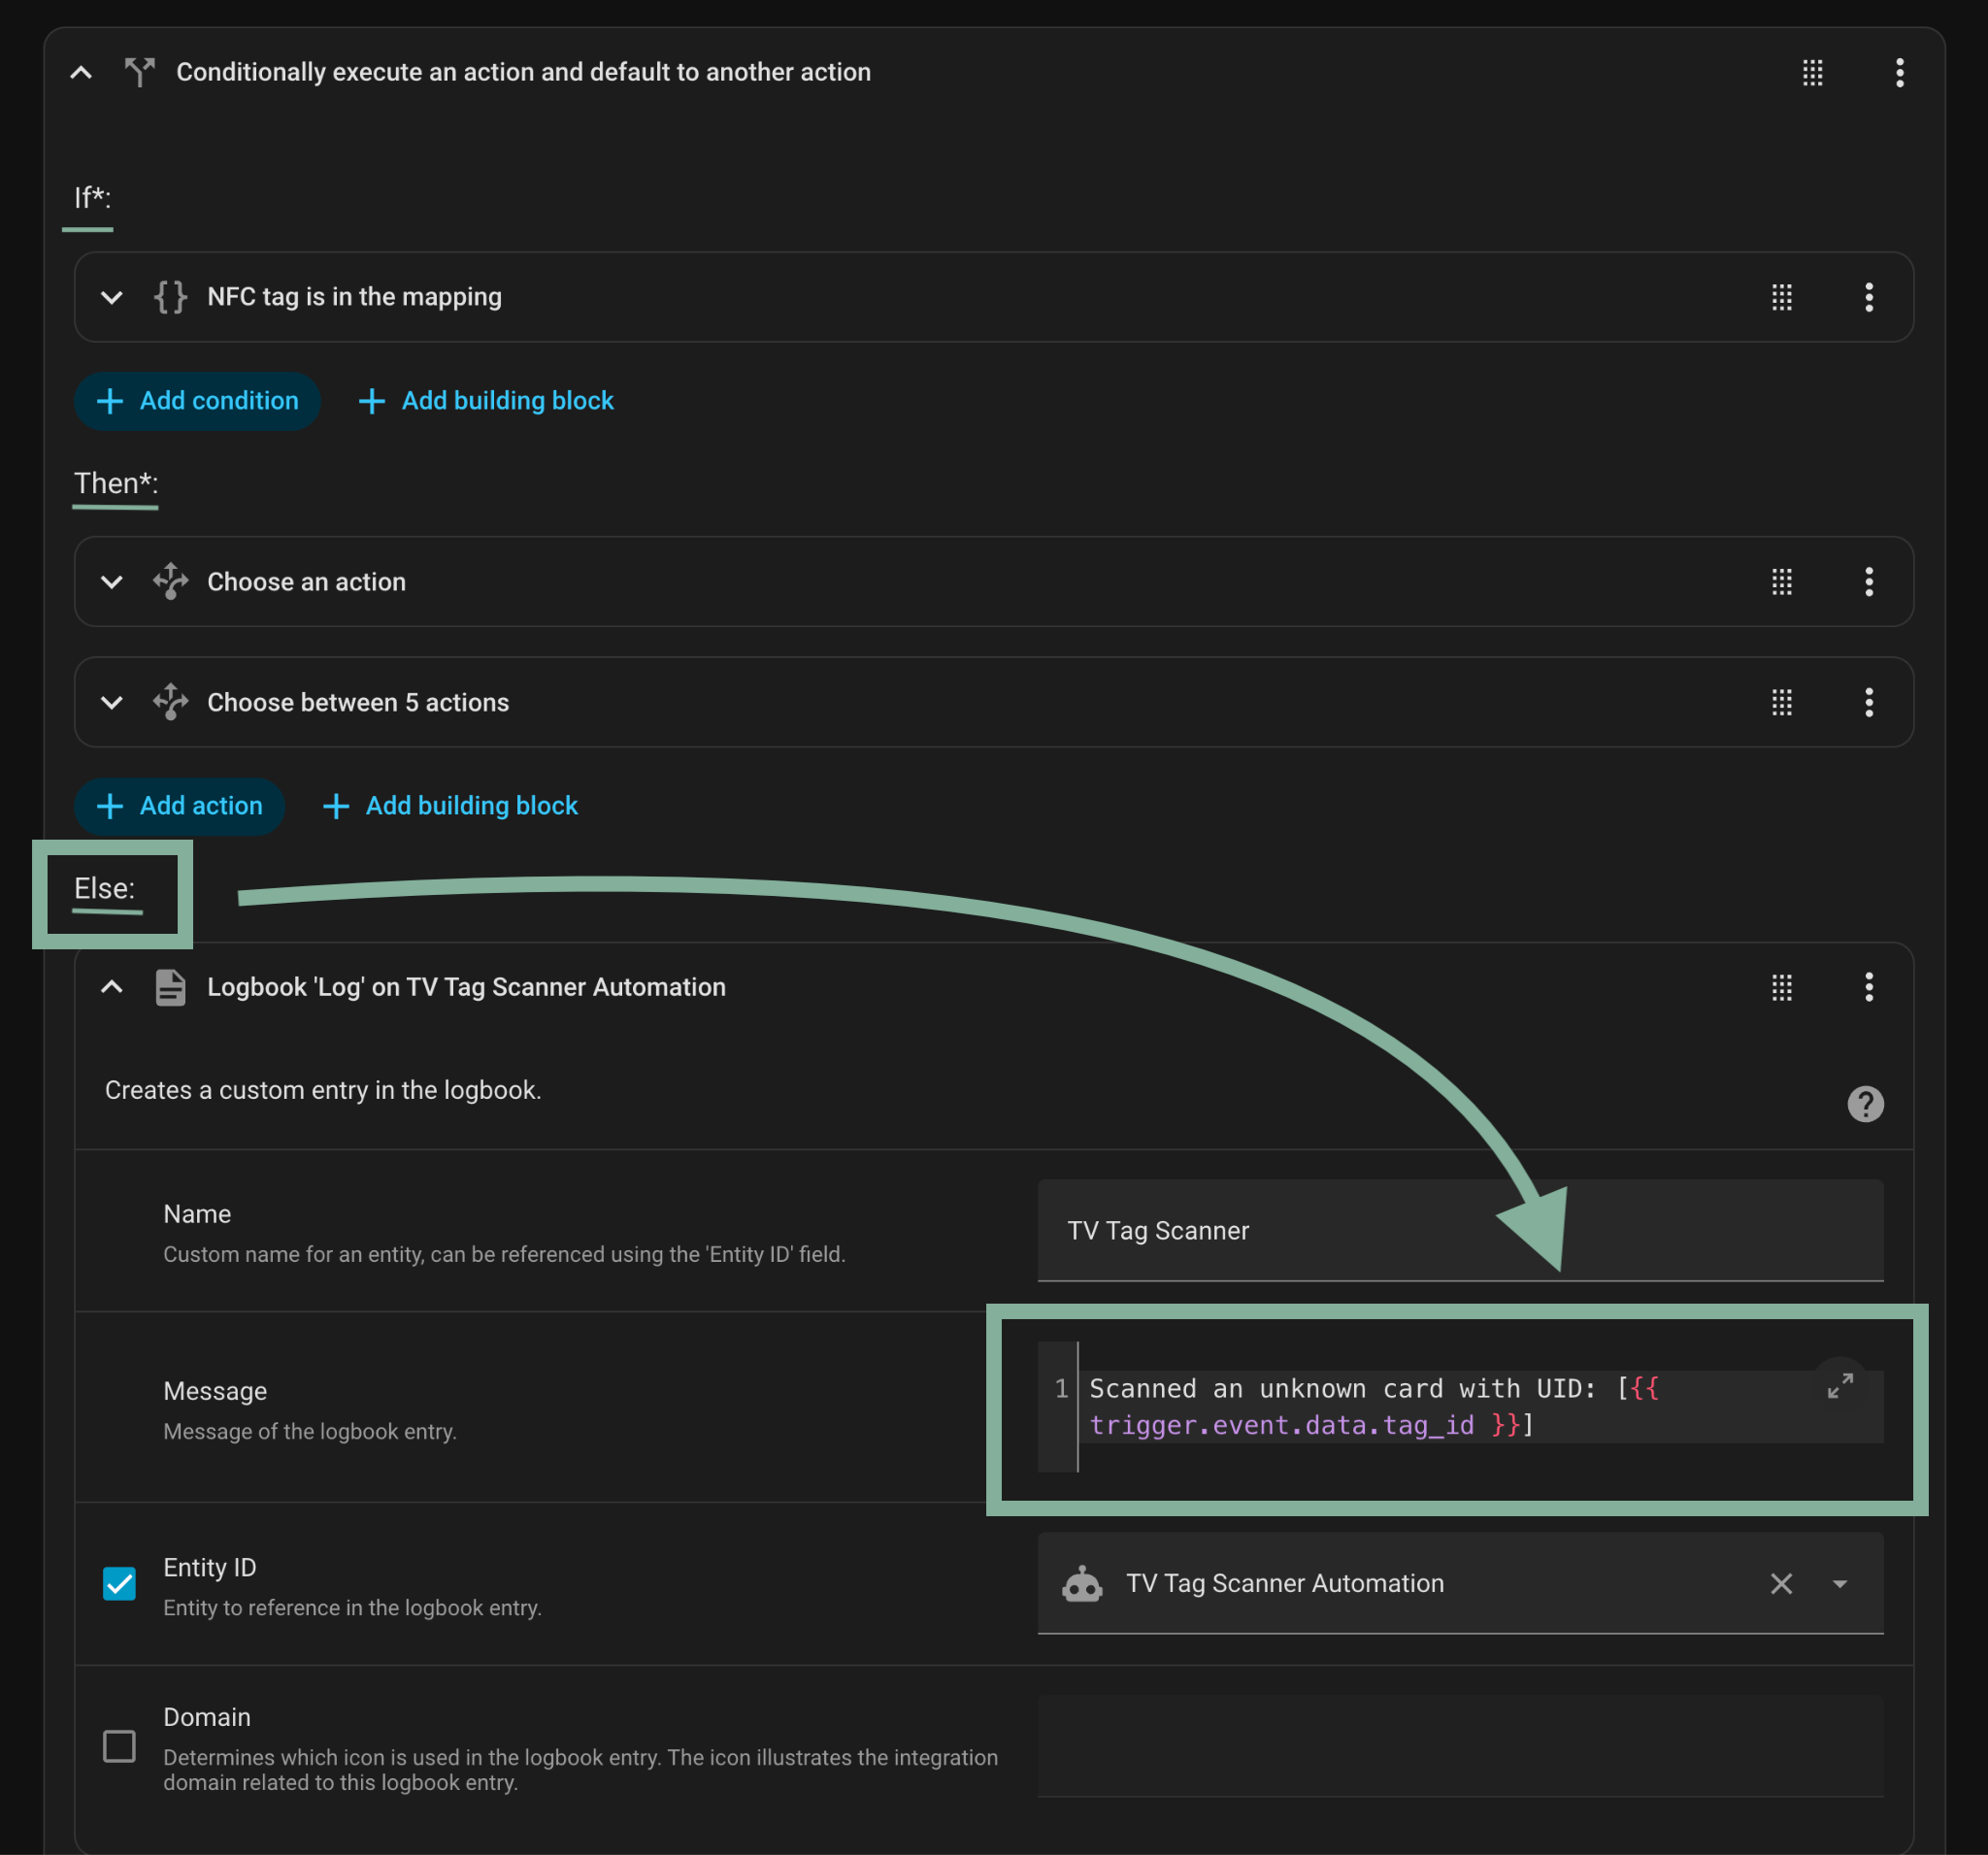
This is how the Logbook entry looks like:

Then all we need is to add a new entry in the CARD_MAPPING variable inside our automation:
CARD_MAPPING:
    ...
    3D-1A-D6-FD:
        name: Octonauts
        netflix_id: 80023363
By streamlining this process we made it very easy to grow the collection. Every time we want to add a few new TV Shows or Movies - I would search the content IDs in the streaming services, while my kids handle the card laminating step and we would meet at the end by scanning the cards and adding the new mapping for each new card. We don’t need to leave the house for a fun family activity.
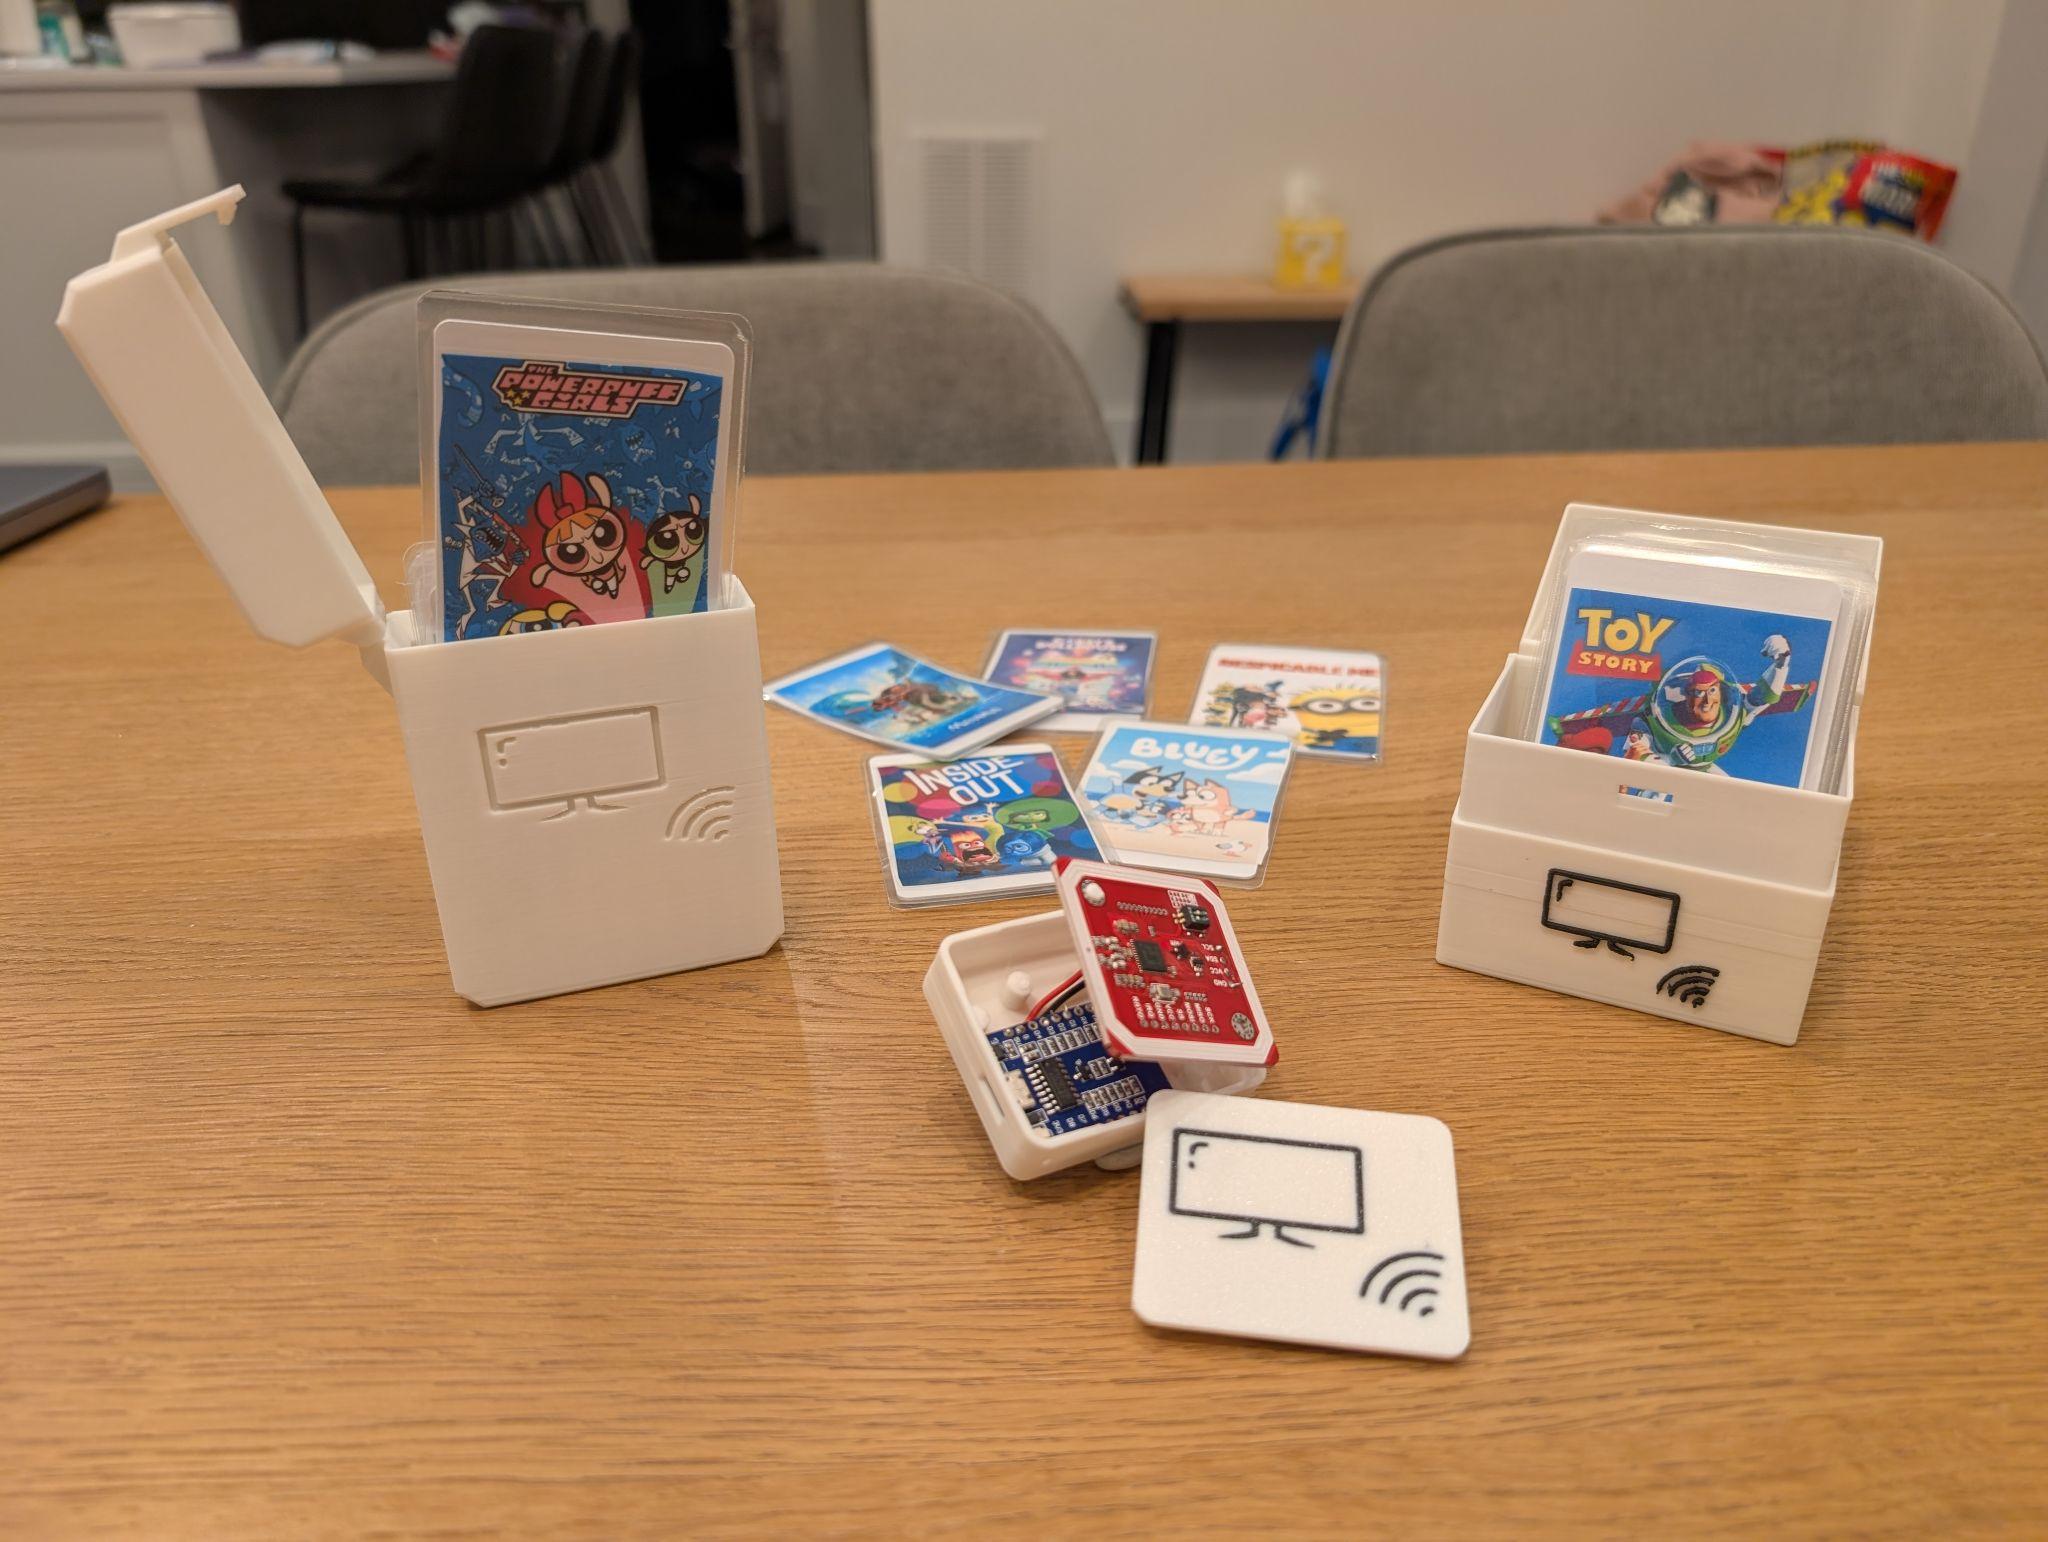
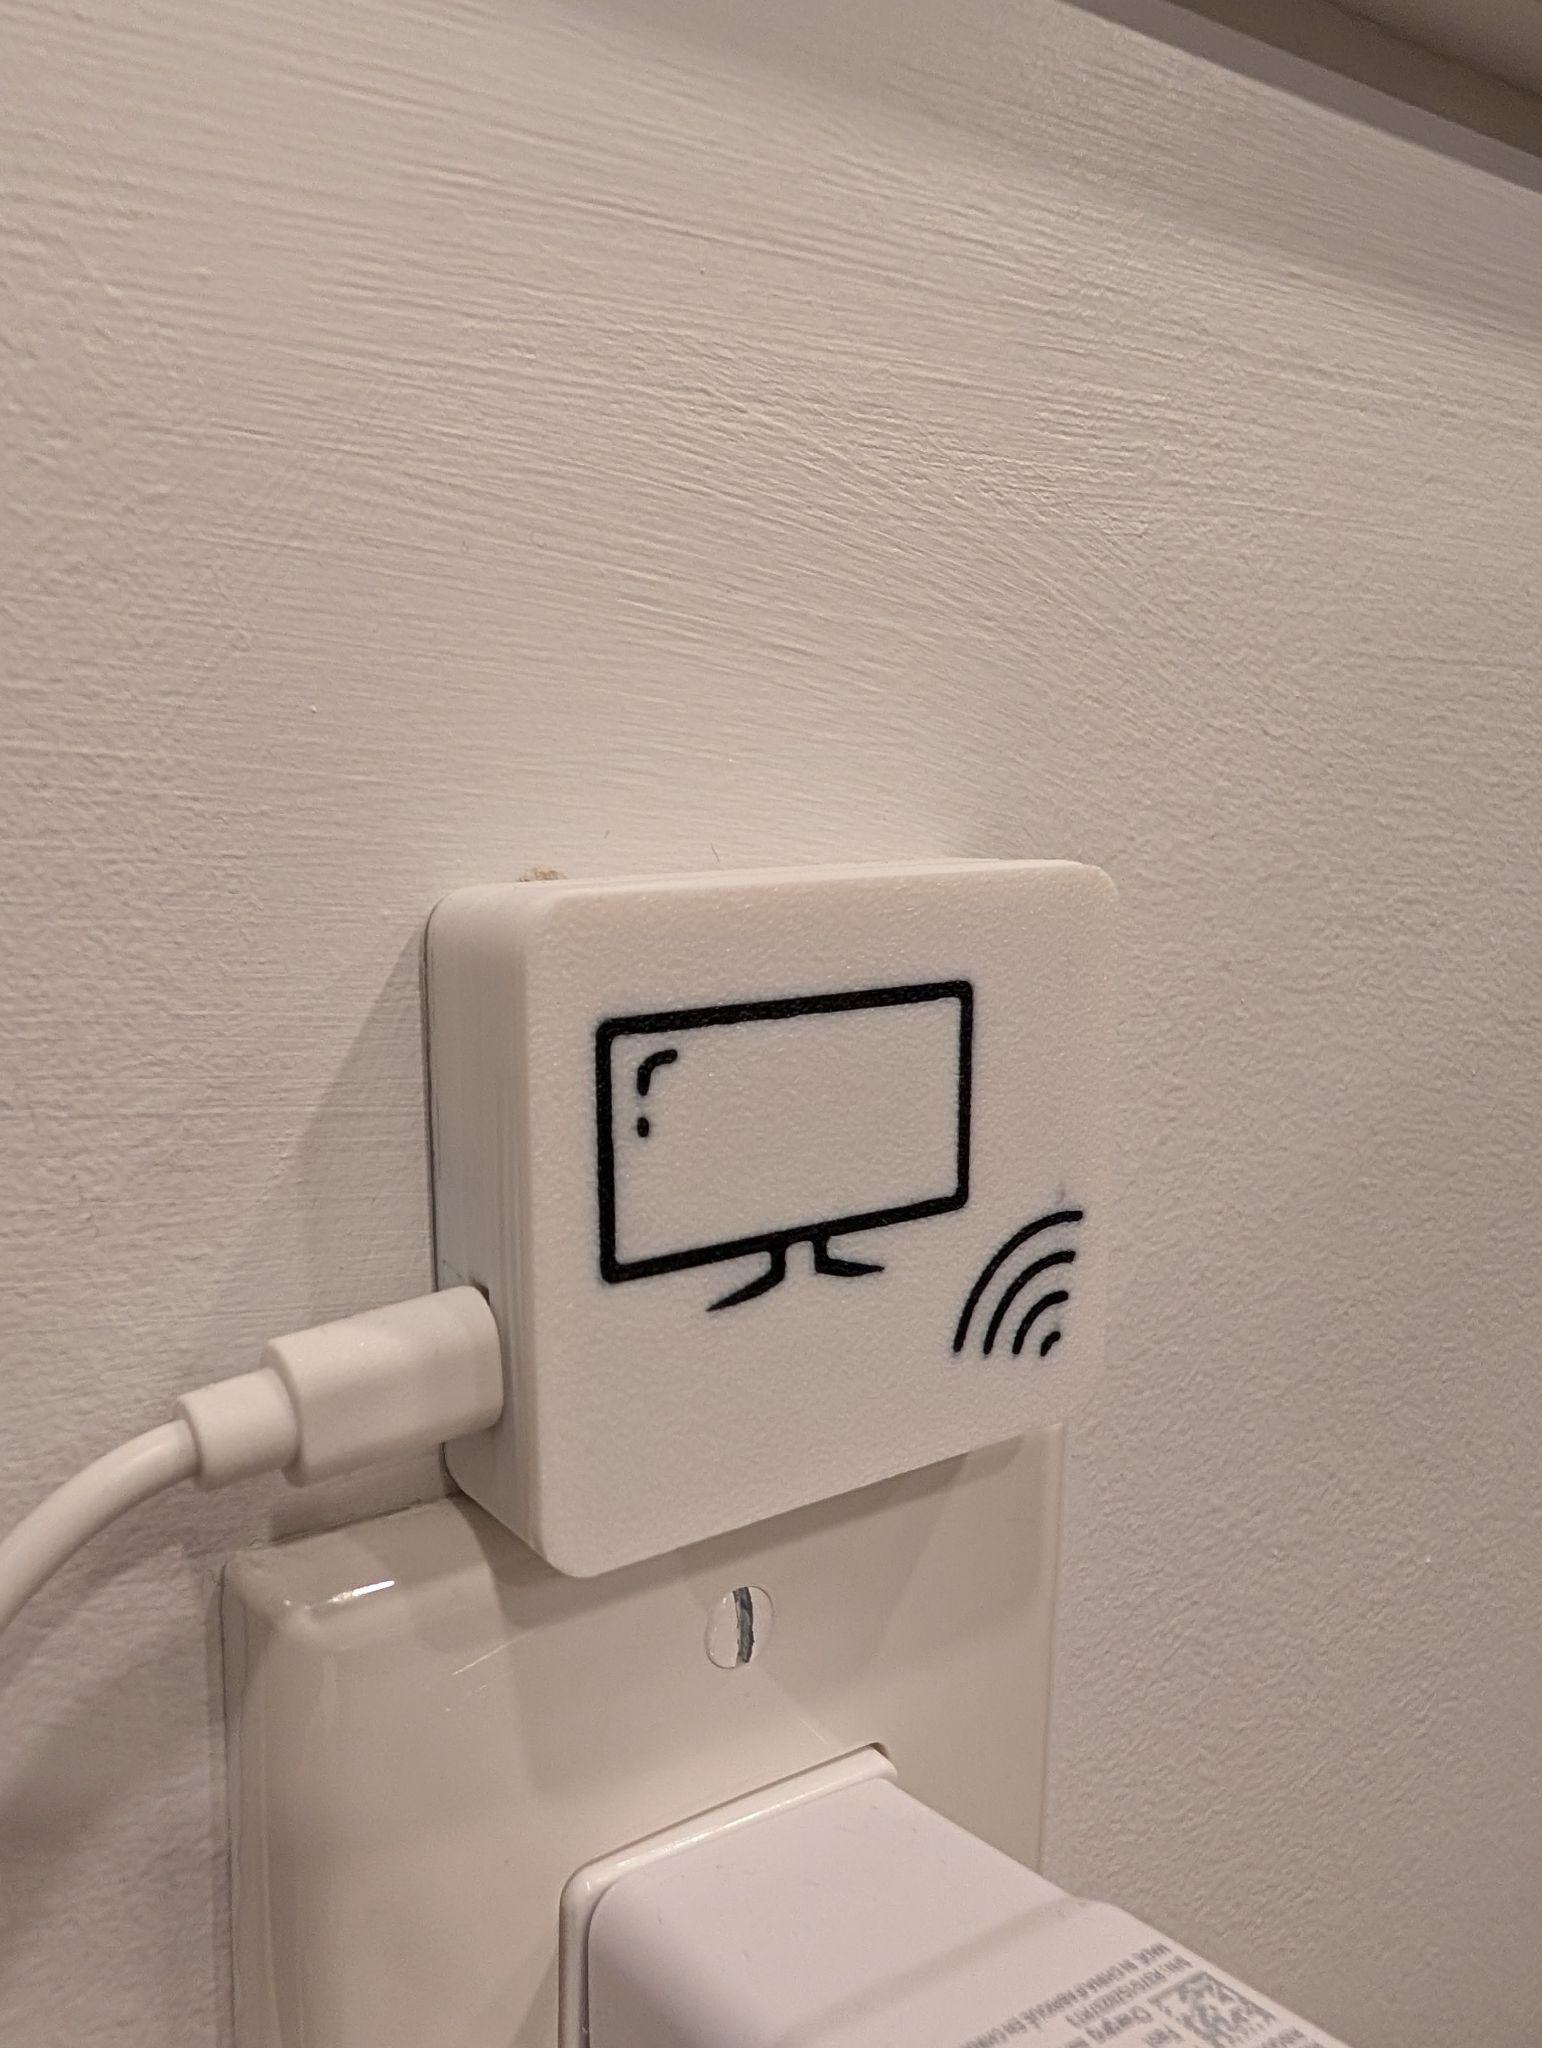
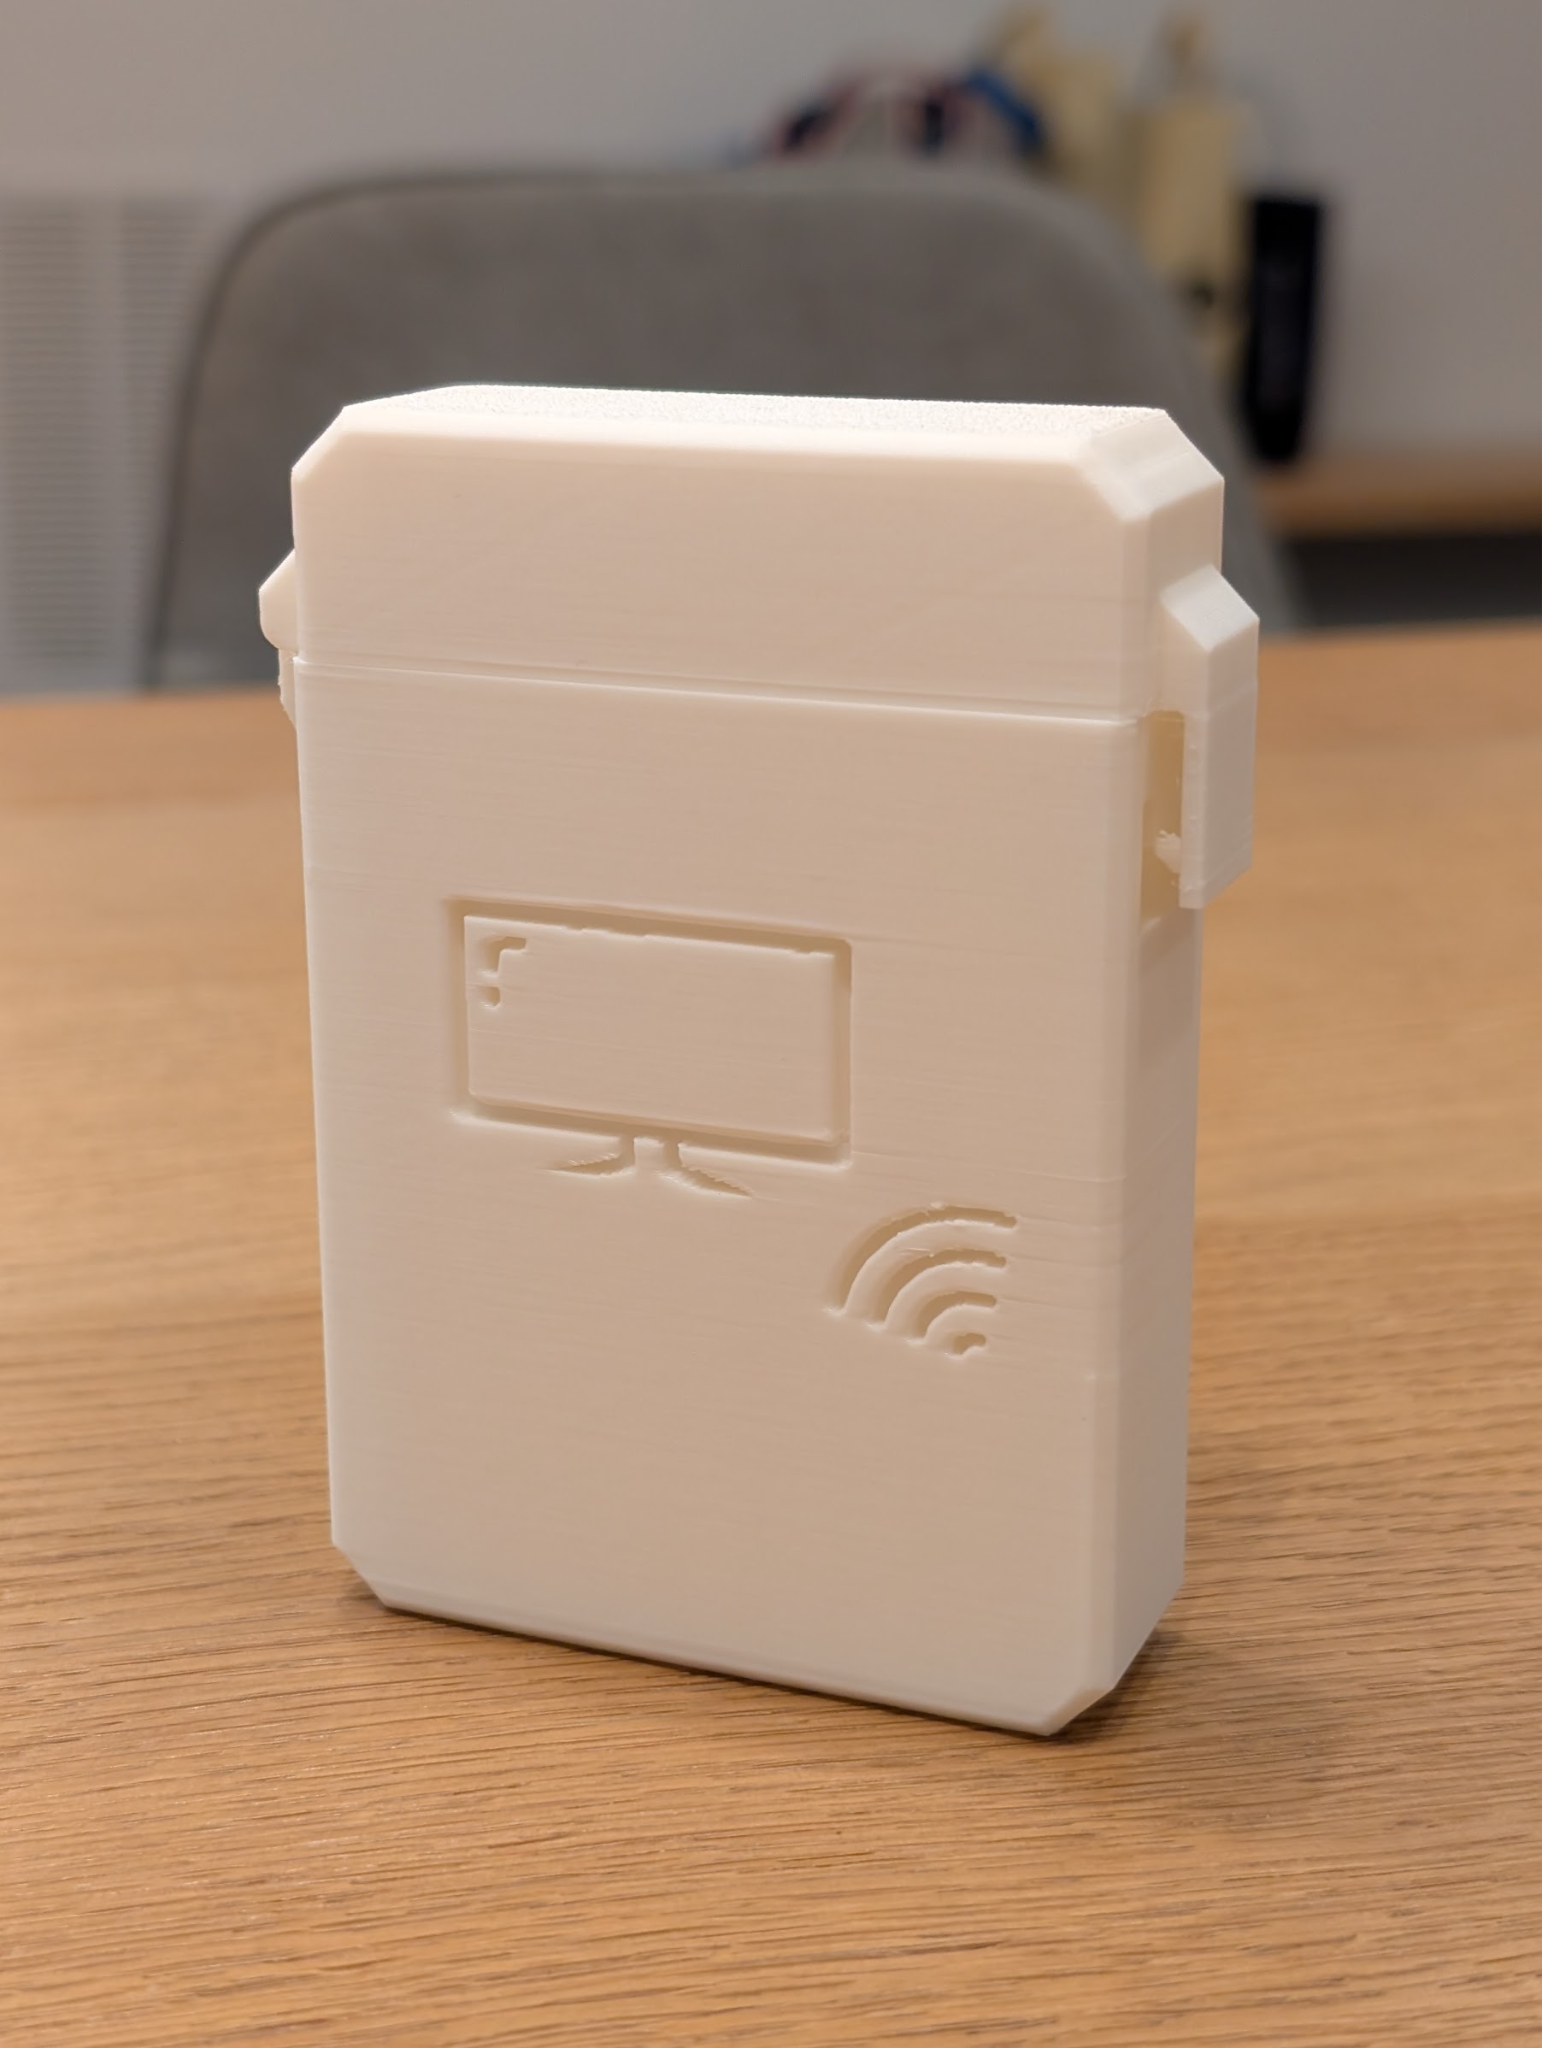
3D Printing the Enclosure..and more
With the electronics and cards ready, the last step was giving the scanner a proper home. I wanted it to be accessible for the kids while being subtle enough to blend into the room’s décor.
Instead of designing something from scratch, I started with an existing enclosure I found online and personalized it with a simple logo that ChatGPT helped create. The result was a clean, kid-friendly enclosure with a custom logo that makes it feel like a finished product.
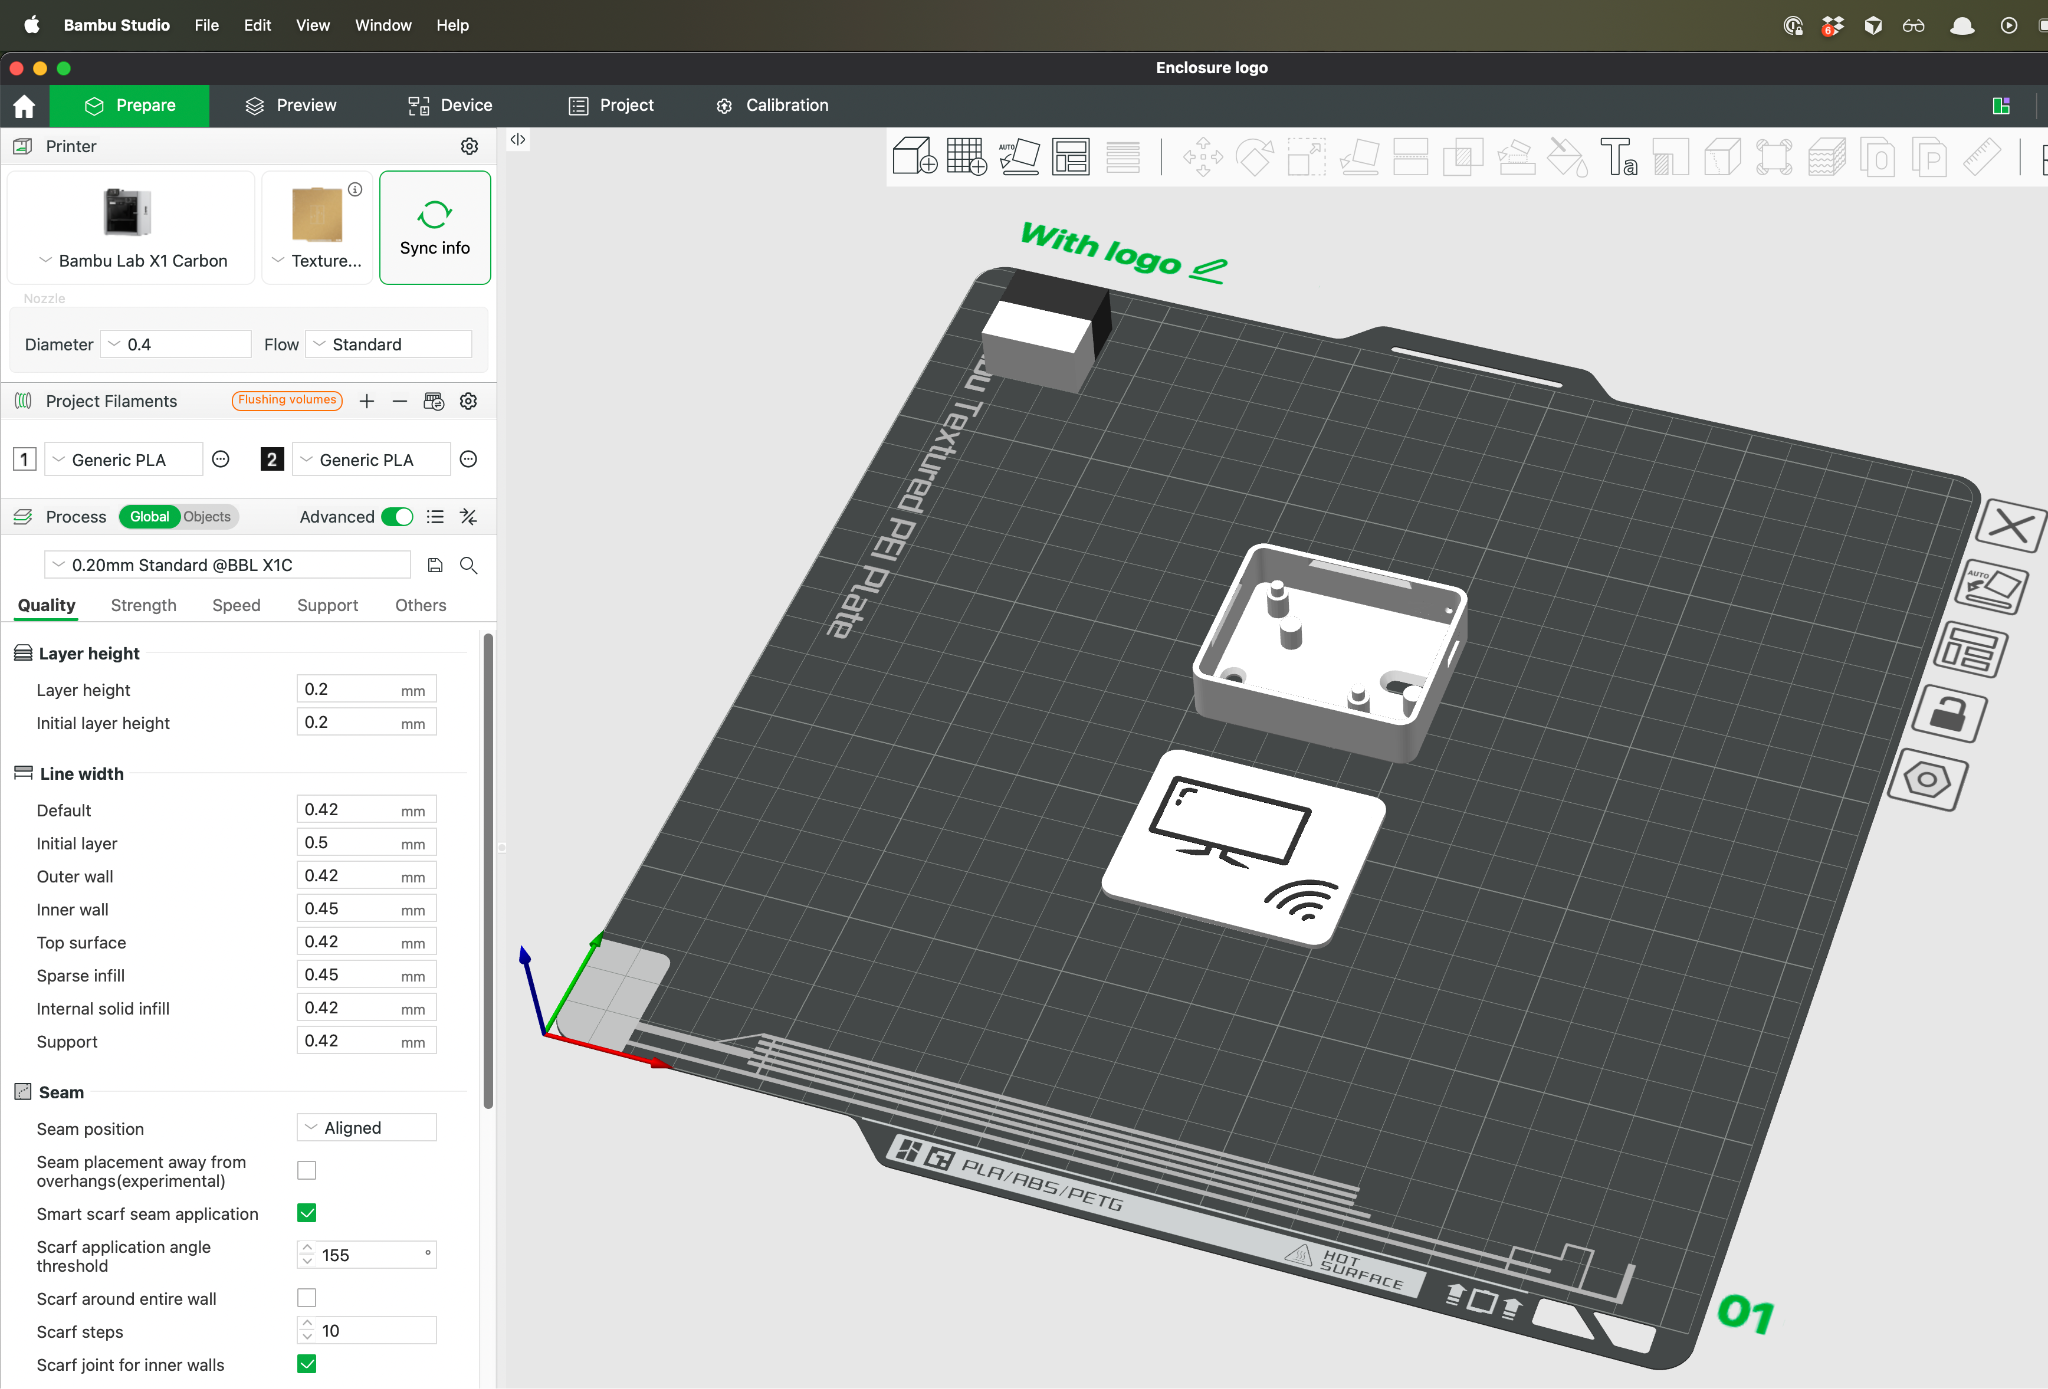
I printed the design on my Bambu Lab printer, using standard PLA. The compact stack of the electronics fit snugly inside, with just enough room for the wires and solder joints.
|
|
You can download the enclosure from here.
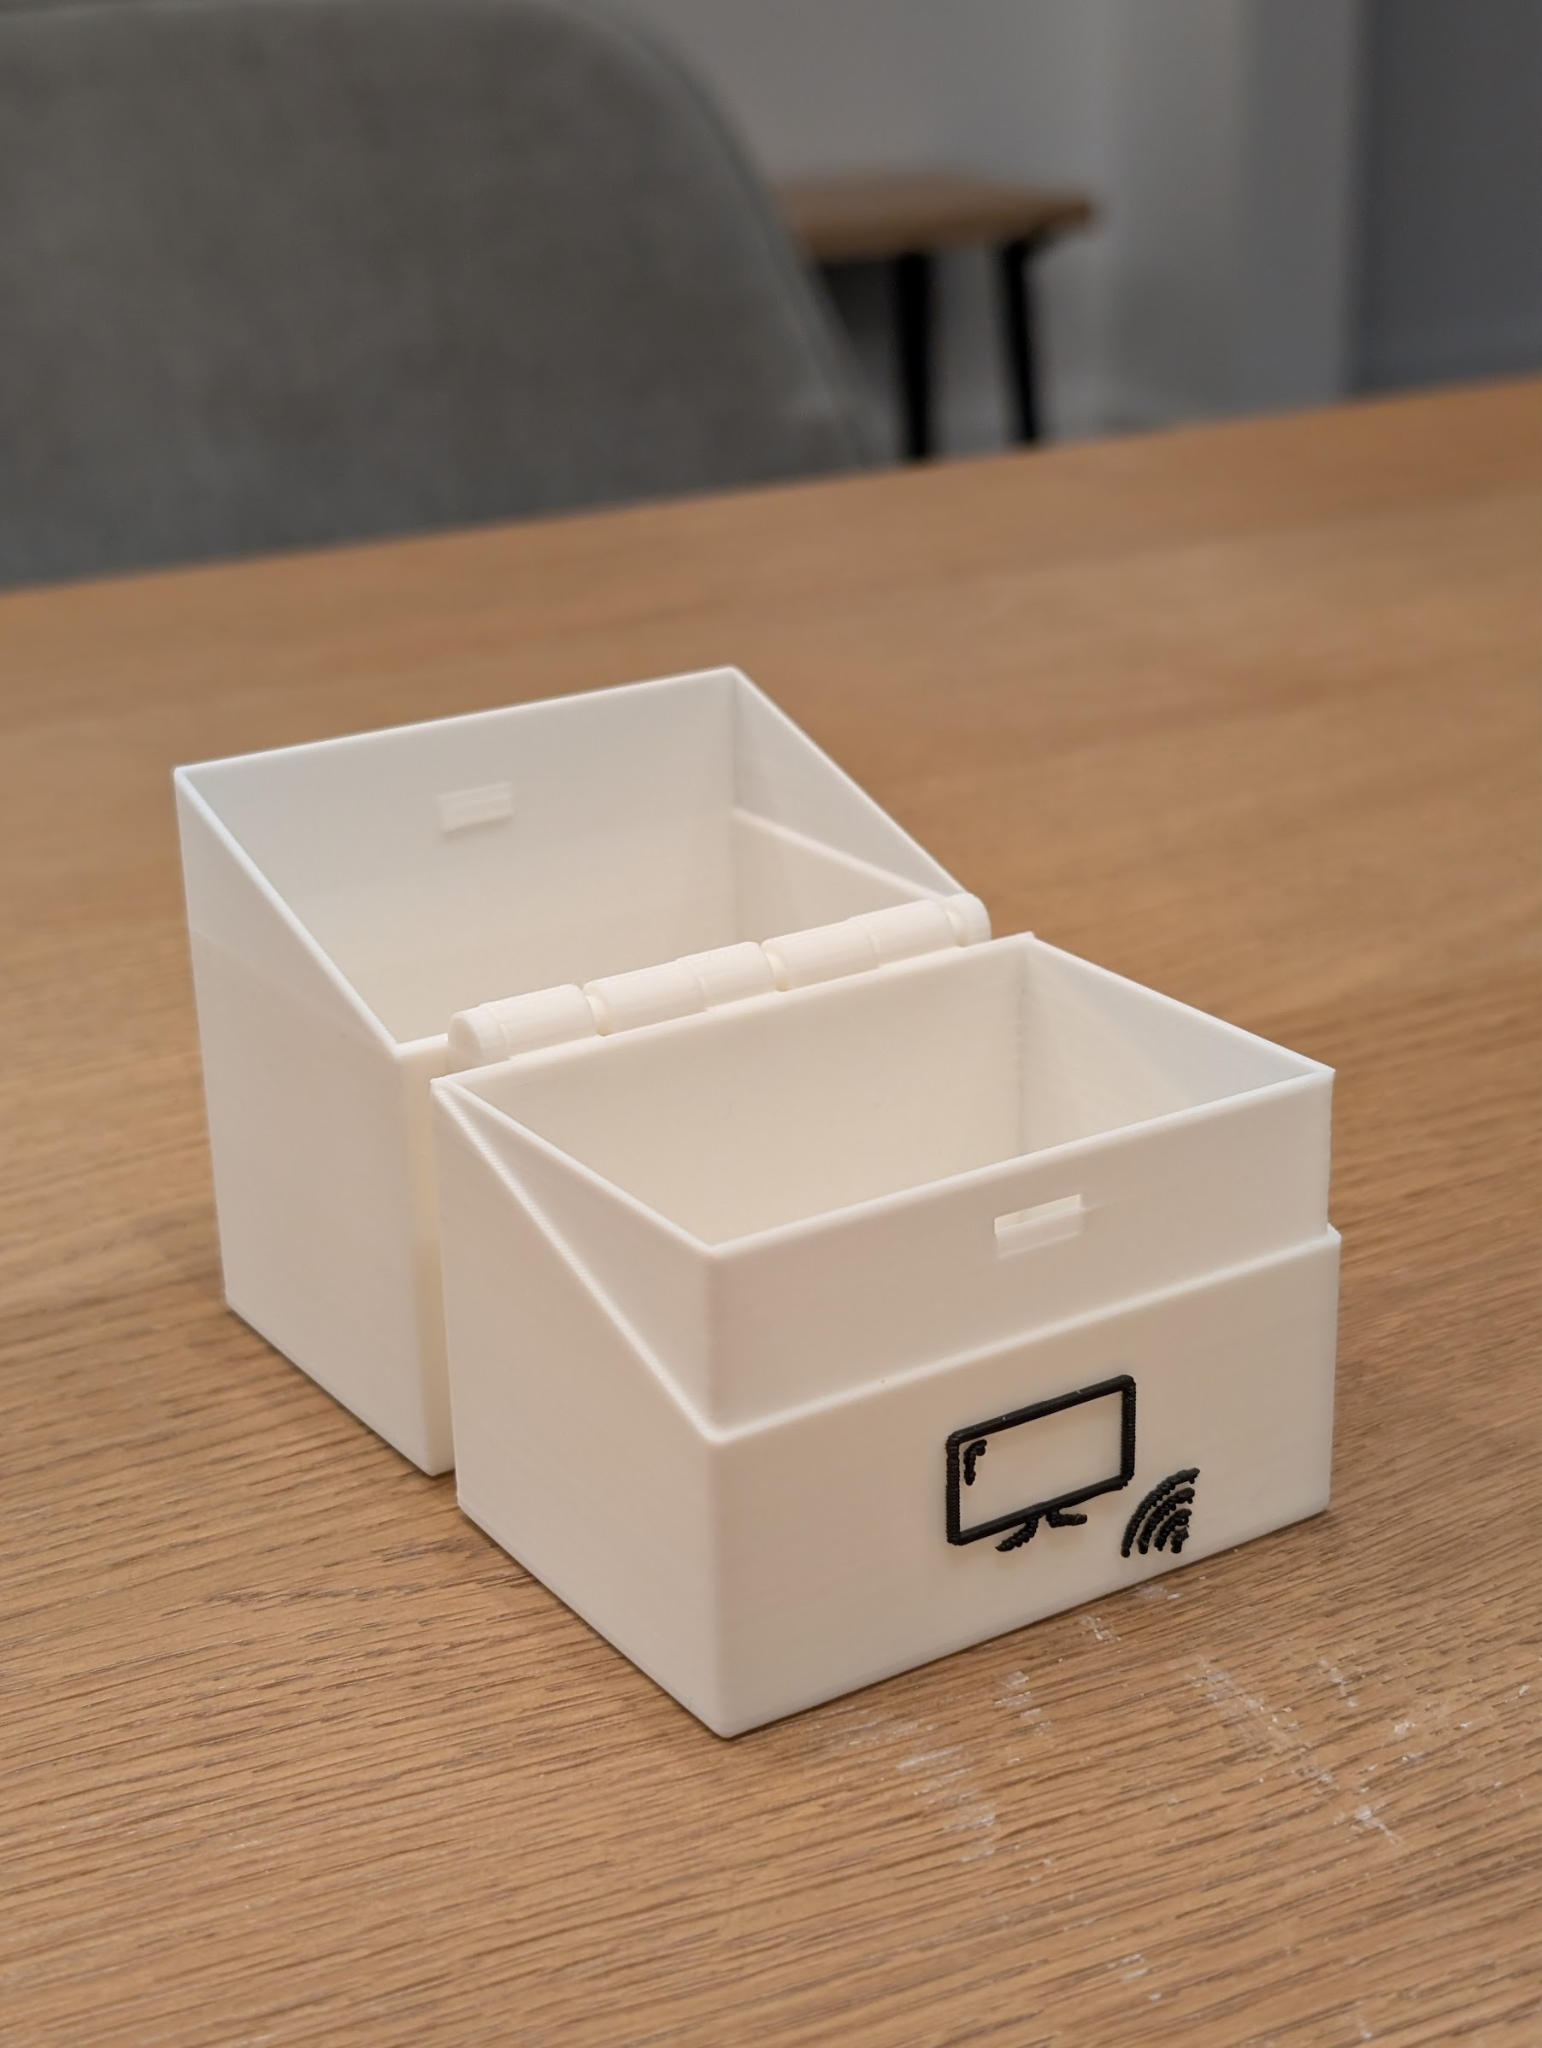
To keep the cards organized and accessible I created 2 boxes - one to hold a large group of cards, another for holding a small group of “most favorite” cards next to the reader.
|
|
And in case you wonder, there are 4 Bluey cards in those boxes…
Links to the 3D models: Cards box / Cards box (slim)
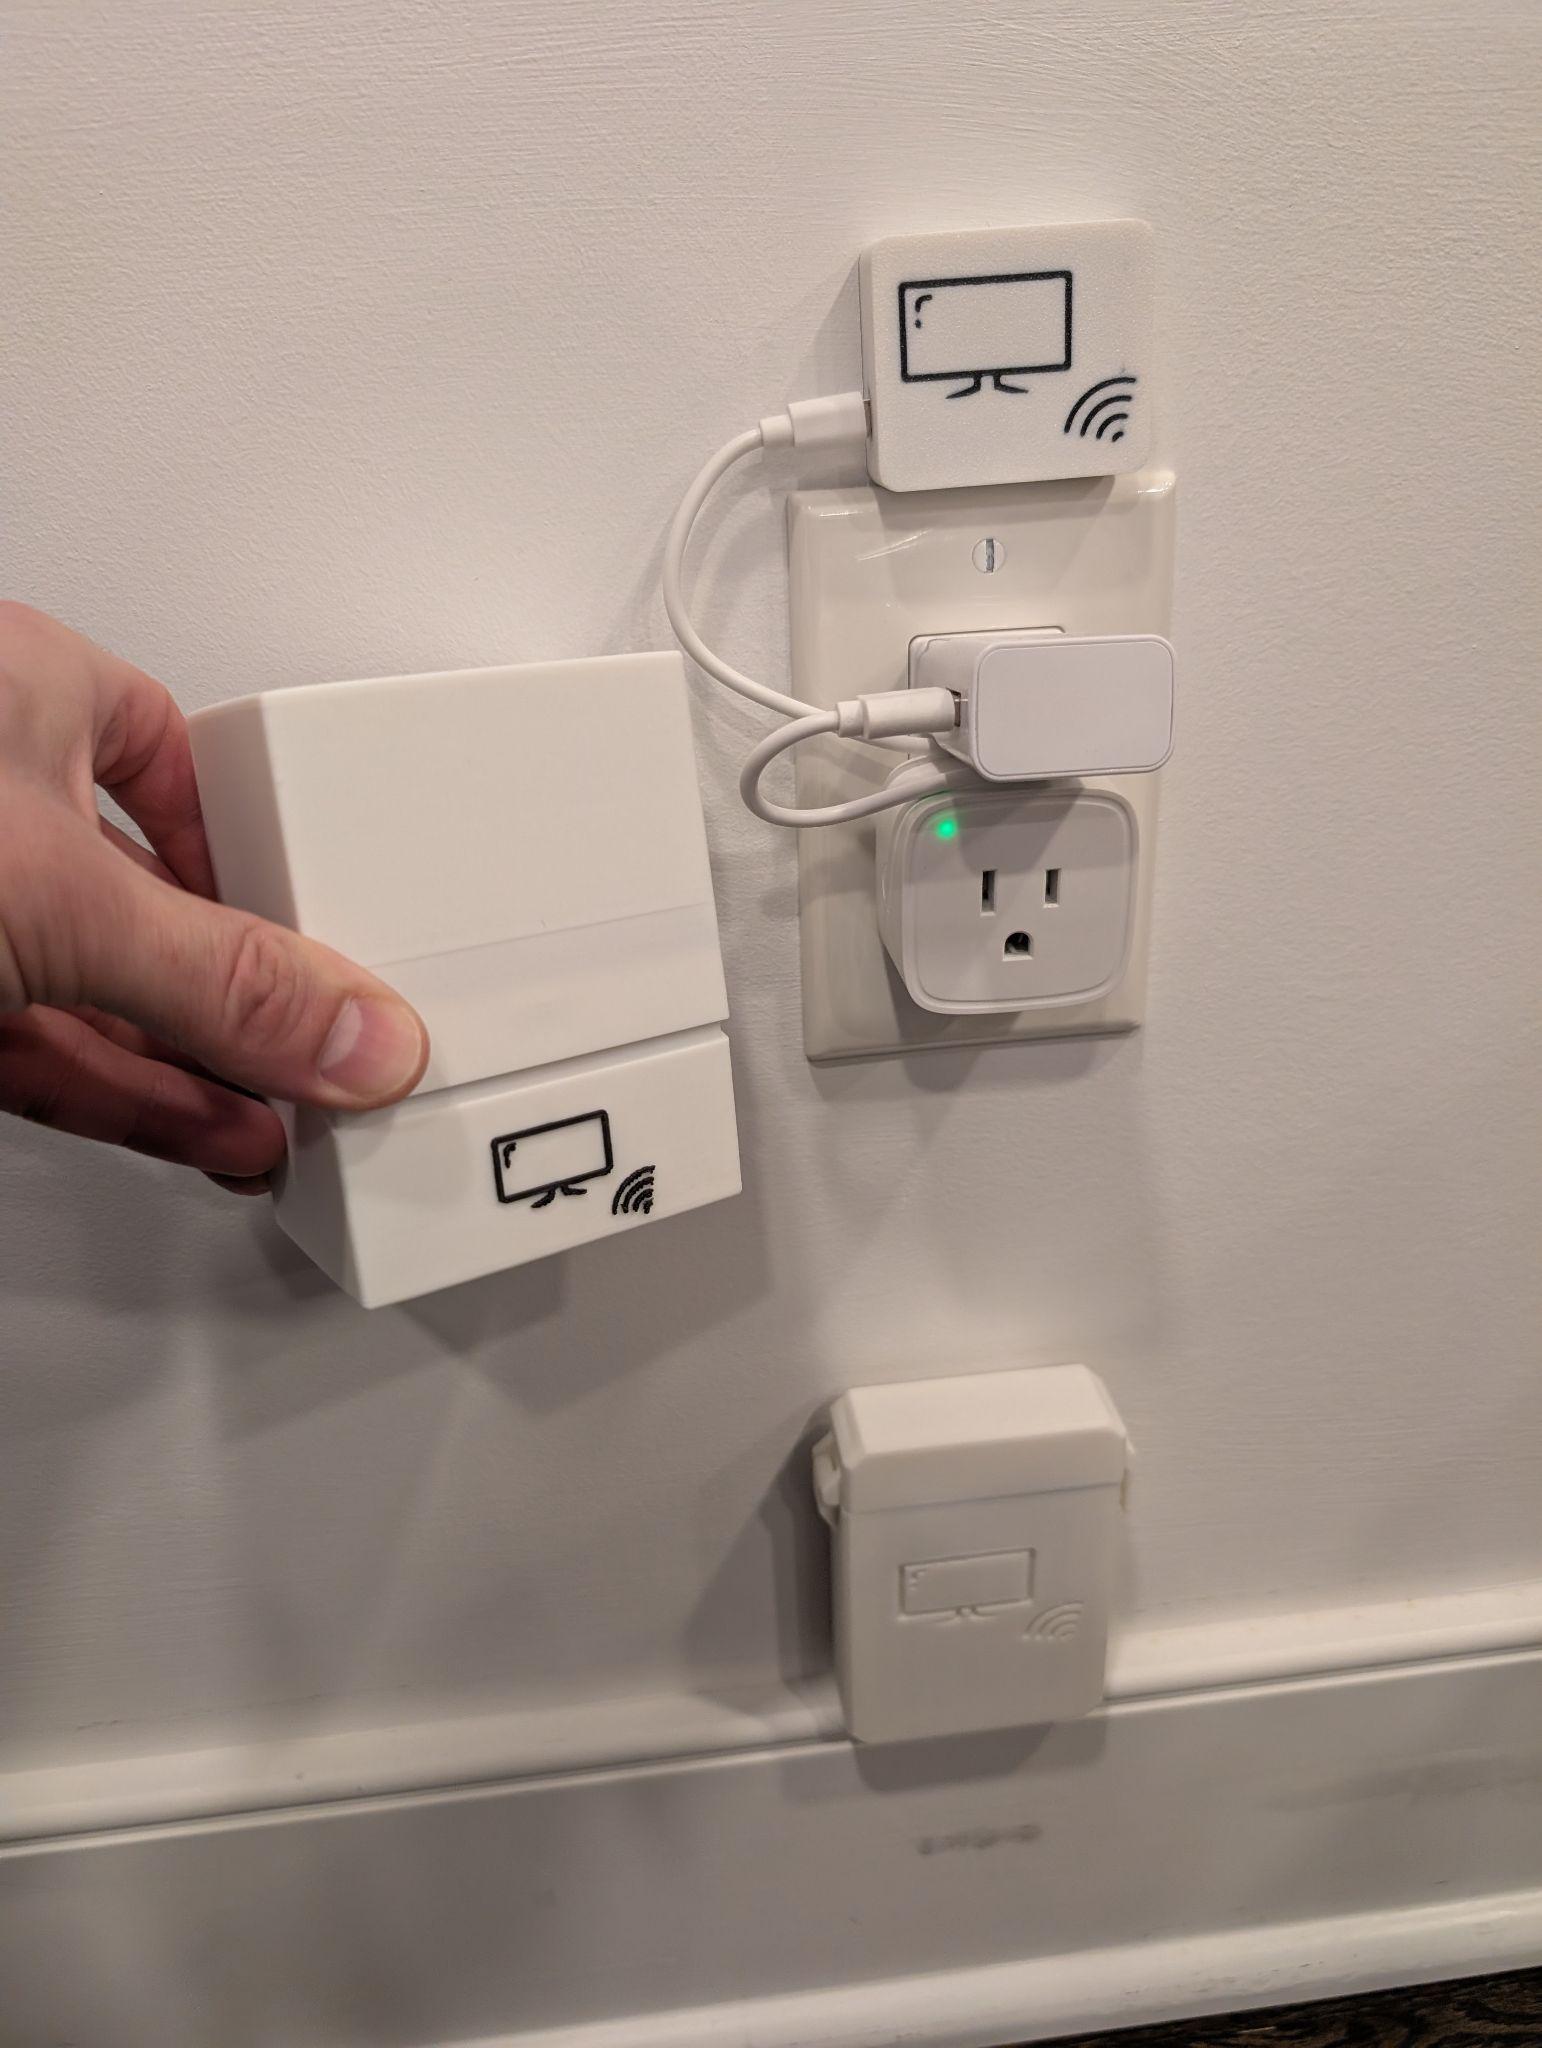
Bringing It All Together
With the hardware soldered, the enclosure printed, the Movie Cards laminated, and the automation wired into Home Assistant - it was time for the payoff.
|
|
Here’s a short demo of the scanner in action:
No menus, no remotes, no digging through apps. Just the card, the scanner, and the content.
It’s been a huge success in our house - my kids love the ritual of picking a card and watching it come to life, and it gives them a healthier, more intentional way to choose what to watch.
Closing Thoughts
This project started as a way to combine electronics tinkering with something useful for the family, and it turned into one of our favorite weekend builds. Between the hands-on soldering, designing the cards, and the 3D-printed enclosure, everyone got a part to play - and the end result is something truly useful.
If you’d like to build your own, all the relevant links to get you through that are below. And if you do make one - I’d love to hear about it!
Links
Electronics:
Code:
Lamination:
3D Print Models:
- electronics ,
- NFC ,
- PN532 ,
- Wemos D1 Mini ,
- ESPHome ,
- Home Assistant ,
- Arduino ,
- ESP32 ,
- ESP8266 ,
- Tag scanner ,
- RFID ,
- Plex ,
- TV Shows ,
- Movies ,
- Kids ,
- Lamination ,
- 3D Printing ,
- i2c ,
- SPI ,
- Deep linking ,
- Hulu ,
- Netflix ,
- Apple TV ,
- BambuLab
